Introduction
When it comes to managing various environments utilising an Infrastructure As Code (or IAC) language such as Terraform, there can be surrounding complexities around interoperability. Let’s take the example of the end users device, which is used to write and deploy the actual IAC.
📘 Whilst all code deployments should eventually aim for a CI/CD approach, in the early stages of development, this is not always practical.
Generally speaking, you’ll usually have two (2) main primary OS types; MacOS and Windows. MacOS natively supports many of the development tools that a DevOps engineer would use today. Windows, on the other hand, is not as friendly as MacOS when it comes to development tools. Having said this, it does include a handy feature referred to as Windows Subsystem for Linux (or WSL).
By using WSL, you are able to interact with development tools similarly to how you would on MacOS. But still, there could issues with consistency of how code is structured, how it is executed, and how it is maintained.
In this article, I will unpack the following:
- What the 3 Musketeers code pattern is
- How it can be applied to virtually any deployment stack
- How it is OS agnostic (as it uses Docker)
- Working examples deploying Terraform code
Prerequisites
In order to get a full breadth of understanding for the concepts and tech stacks discussed in this blog, you should have the following:
- A basic understanding of Docker, and how to use Docker-compose
- A basic conceptual understanding of Terraform and Terraform workspaces
- A preferred code editor such as VS code
3 Musketeers
What is 3 Musketeers?
When you hear the term 3 Musketeers, the first thing that may pop into your mind is this:

A 90s movie where a young man travels to Paris to join the Musketeers, but an evil cardinal has disbanded them!
Jokes aside, this is not what I’m referring to.
3 Musketeers is a code pattern that can be used in a repeatable and consistent manner and consists of three (3) main components:
- Make – Used for orchestration
- Docker – The engine which will execute the code itself inside a container
- Docker Compose – A simplified way of executing Docker commands in a yaml file
📘 To read more about 3M, refer to this official website.
Whilst each of these products has many distinct components, we only need a basic level of understanding to leverage them in our 3 Musketeers pattern to deploy our code.
How the 3 Musketeers pattern can be applied to virtually any deployment stack
One of the key features of the 3 Musketeers pattern is its level of consistency across different OS types and languages. Essentially, if you can execute code inside of a container, you can use the 3 Musketeers pattern. And because of the beauty of Docker, this will be consistent on any OS that you choose. Let’s take an example of a super simple execution that is everyone’s favourite; Hello, World!
Firstly, we will start with our docker-compose file. This is written in yaml, and should be contained within your directory, along with your other files (which we will cover later in this blog)
# file name: docker-compose.yml
version: "3.7"
services:
  alpine:
    image: alpine:latest
This is a super simple docker-compose file that is doing the following:
- Using version 3.7 of Docker
- Creating an image called “alpine”
- Souring the latest Alpine image from the Docker registry
Next, let’s move onto Make. This has no particular language, but is similar to declarative programming.
# file name: Makefile

hello:

docker-compose run --rm alpine echo 'Hello, World!'

.PHONY: hello
In this Makefile, we have done the following:
- Declared a goal called ‘hello’
- Declared what this goal will perform when it is called
- Added a .PHONY statement (for the context of this blog, phony targets prevent conflicts with the same name and improve performance)
Now, let’s put pen to paper, and run our Make goal ‘hello’
➜ make hello

docker-compose run --rm alpine echo 'Hello, World!'

[+] Running 1/1

⠿ Network 3m-blog_default  Created                                                                                                                                                                                    0.1s

[+] Running 2/2

⠿ alpine Pulled                                                                                                                                                                                                       6.1s

⠿ 59bf1c3509f3 Already exists                                                                                                                                                                                       0.0s

Hello, World!
To dissect what the above is showing:
- We called our Make goal ‘hello’
- This in turn executed the goal which we had outlined within the Make goal; run docker-compose and echo ‘Hello, World!’
- We received a console output of what we echoed
This simple demonstration shows just how easy and powerful 3 Musketeers is. The exact same stack could have been run on Windows, or on Linux, and achieved the same outcome.
Using the 3 Musketeers pattern with Terraform
Now comes for the interesting part; how can we use the knowledge we have obtained on 3 Musketeers and apply it to our Terraform code?
It honestly isn’t much different to what we have already seen, but this time we will inject a few environment variables. Mainly this is due to flexibility of leveraging Terraform workspaces, which allows for the same code to be deployed to different environments. In our example below, we will deploy a test VPC into an AWS environment. To complete this we will need our two (2) existing files in Make and Docker-compose, in addition to our Terraform implementation.
It is also good practice to include a readme, giving instructions about how a product works.
📘 Before proceeding, please note that this is a bare minimum deployment of Terraform using the 3 Musketeers pattern.
You can add several enhancements, including a VCS, a cloud-based Terraform backend, and an ignore file for your VCS.
These, however, are out of scope of this blog.
Makefile
Lets first focus on our Makefile, and include steps that Terraform requires for initialisation, workspace, plan, apply and destroy. If you are following along, feel free to remove the hello Make goal that we used before:
This new Makefile introduces a new concept for Make that you may or may not be aware of. You will note in lines 13 and 18 that we see a Make goal, in addition to other Make goals. What we are essentially doing here is specifying a prerequisite Make goal to be run before we execute the specific goal. For example, when we run the plan goal, we will run the init, and workspace goal first before running the plan goal. This is another handy feature of Make, where in you don’t need to repeat the same steps over and over and can instead nest goals as needed.
Docker-compose
Next we will reconfigure our docker-compose file, to pull down the official Hashicorp Terraform image from the Docker public registry:
# file name: docker-compose.yml

version: "3.7"

services:

terraform-utils:

image: hashicorp/terraform:latest

environment:

- AWS_SDK_LOAD_CONFIG=1

entrypoint: ""

volumes:

- .:/work

- ~/.aws:/root/.aws

working_dir: /work
There are several additions from our previous docker-compose file, including environment variables, entry point, volumes to mount to the container and also the working directory.
The volumes we mount into the container are for accessing the Terraform implementation, and also accessing our AWS environment respectively.
Terraform files
Now that we have the hands and feet of our 3 Musketeers pattern implemented, lets go ahead and add our Terraform implementation. In order to use the structure that we have configured with 3 Musketeers, we will need to create a sub-directory within our main implementation that contains the Terraform code. This could be the technology you are using, or a particular application stack you are targeting.
In our example, we will name this directory vpc. As our implementation is a simple one, we will use a single main.tf file for our entire codebase. For anyone fluent in Terraform, most will understand this is not proper practice and instead it should be broken down to capture individual parts such as backend, locals and providers. But for illustrative purposes, this is fine for our example:
This is a very simple deployment that consists of two (2) workspaces, each with different configuration, that will deploy a VPC to the ap-southeast-2 region. We have also nominated unique workspaces with a naming structure that easily identifies what the workspace is for.
Readme
Lets be honest; if we were to remember every single thing we did in our entire working lives, we probably wouldn’t be human. Or at the very least, we would be super human with an IQ of over 160. But, I digress. Readme’s are a good habit to get into updating, simply because it will make your life or someone else’s life easier. As such, here is a simple readme that I have created for our implementation:
It shows how to perform the deployment via the CLI using our 3 Musketeers pattern. Note that we do need to specify environment variables into our CLI call using Make, so that the container has the information it needs to be able to create our VPCs.
Deployment
And now for our epic final step; deployment! Lets go ahead and run the following line of code to see what happens:
TERRAFORM_ROOT_MODULE=vpc TERRAFORM_WORKSPACE=vpc-apse2-main-dev make plan
This will run all of our Make steps in the plan goal. You should get output similar to the following:
➜ TERRAFORM_ROOT_MODULE=vpc TERRAFORM_WORKSPACE=vpc-apse2-main-dev make plan
docker-compose run --rm terraform-utils sh -c 'cd vpc; terraform init'

Initializing the backend...

Initializing provider plugins...
- Finding latest version of hashicorp/aws...
- Installing hashicorp/aws v3.74.1...
- Installed hashicorp/aws v3.74.1 (signed by HashiCorp)

Terraform has created a lock file .terraform.lock.hcl to record the provider
selections it made above. Include this file in your version control repository
so that Terraform can guarantee to make the same selections by default when
you run "terraform init" in the future.

Terraform has been successfully initialized!

You may now begin working with Terraform. Try running "terraform plan" to see
any changes that are required for your infrastructure. All Terraform commands
should now work.

If you ever set or change modules or backend configuration for Terraform,
rerun this command to reinitialize your working directory. If you forget, other
commands will detect it and remind you to do so if necessary.
docker-compose run --rm terraform-utils sh -c 'cd vpc; terraform workspace select vpc-apse2-main-dev || terraform workspace new vpc-apse2-main-dev'

Workspace "vpc-apse2-main-dev" doesn't exist.

You can create this workspace with the "new" subcommand.
Created and switched to workspace "vpc-apse2-main-dev"!

You're now on a new, empty workspace. Workspaces isolate their state,
so if you run "terraform plan" Terraform will not see any existing state
for this configuration.
docker-compose run --rm terraform-utils sh -c 'cd vpc; terraform plan'

Terraform used the selected providers to generate the following execution plan. Resource actions are indicated with the following symbols:
  + create

Terraform will perform the following actions:

  # aws_vpc.main will be created
  + resource "aws_vpc" "main" {
      + arn                                  = (known after apply)
      + cidr_block                           = "10.0.0.0/20"
      + default_network_acl_id               = (known after apply)
      + default_route_table_id               = (known after apply)
      + default_security_group_id            = (known after apply)
      + dhcp_options_id                      = (known after apply)
      + enable_classiclink                   = (known after apply)
      + enable_classiclink_dns_support       = (known after apply)
      + enable_dns_hostnames                 = (known after apply)
      + enable_dns_support                   = true
      + id                                   = (known after apply)
      + instance_tenancy                     = "default"
      + ipv6_association_id                  = (known after apply)
      + ipv6_cidr_block                      = (known after apply)
      + ipv6_cidr_block_network_border_group = (known after apply)
      + main_route_table_id                  = (known after apply)
      + owner_id                             = (known after apply)
      + tags                                 = {
          + "Name" = "vpc-apse2-main-dev"
        }
      + tags_all                             = {
          + "Name" = "vpc-apse2-main-dev"
        }
    }

Plan: 1 to add, 0 to change, 0 to destroy.

─────────────────────────────────────────────────────────────────────────────────────────────────────────────────────────────────────────────────────────────────────────────────────────────────────────────────────────

Note: You didn't use the -out option to save this plan, so Terraform can't guarantee to take exactly these actions if you run "terraform apply" now.
If you did get output similar to the above, then your configuration is looking good! Lets now go ahead and run the apply Make goal:
TERRAFORM_ROOT_MODULE=vpc TERRAFORM_WORKSPACE=vpc-apse2-main-dev make apply
Accept the prompt:
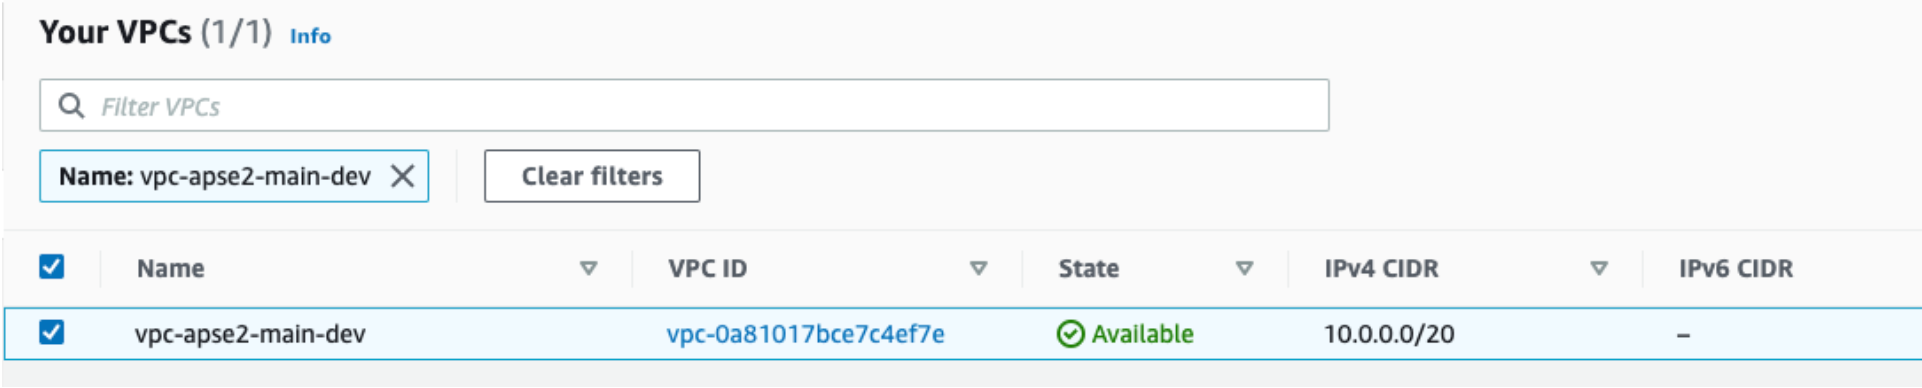
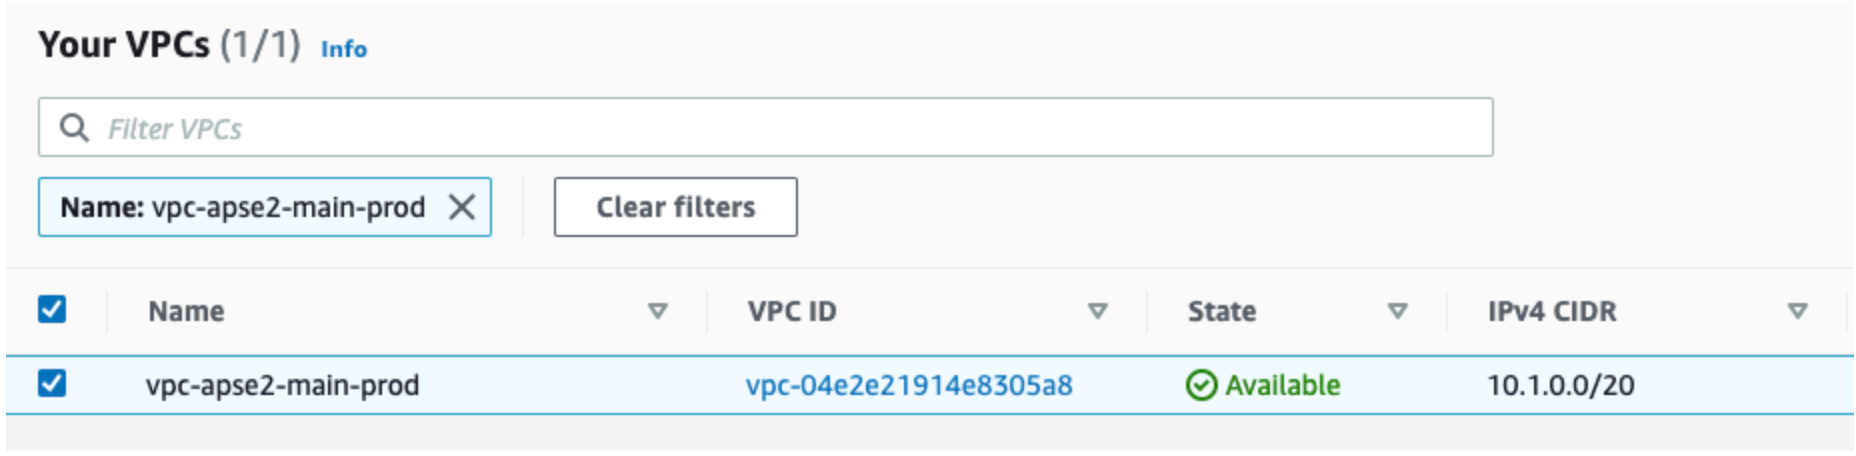
Incredible stuff! We can see that we have actual infrastructure deployed! To prove out the specifics of Terraform workspaces, lets also deploy the production implementation:
TERRAFORM_ROOT_MODULE=vpc TERRAFORM_WORKSPACE=vpc-apse2-main-prod make apply
Accept the prompt:
Do you want to perform these actions in workspace "vpc-apse2-main-prod"?

Terraform will perform the actions described above.

Only 'yes' will be accepted to approve.
And check your AWS account for the deployed infrastructure:
Cleanup
After you have performed your deployments, verified that they are working, and are finished with the examples, ensure that you tear down the infrastructure using the destroy Make goal:
TERRAFORM_ROOT_MODULE=vpc TERRAFORM_WORKSPACE=vpc-apse2-main-dev make destroy

TERRAFORM_ROOT_MODULE=vpc TERRAFORM_WORKSPACE=vpc-apse2-main-prod make destroy
Accept the prompts as necessary.
Conclusion
In this blog, we covered many concepts relating to the 3 Musketeers pattern and how they can be applied to Terraform. We saw the ease of writing a few Make goals, editing the docker-compose file to pass the container the correct configuration, implemented a simple Terraform deployment and wrote a simple readme to capture what we had done. Although simple, this can be greatly enhanced with more complex Terraform deployments, leverage a VCS and implemented using automation in a CI/CD pipeline.
FAQ’s
Q. What is 3 Musketeers?
3 Musketeers refers to a code pattern that can be used in a repeatable and consistent manner across multiple different operating system types. The components include Make, Docker and Docker Compose.
Q. What is Make?
In software development, Make is a build automation tool that is used to orchestrate the construction of solutions from either executable programs and libraries from source code. It does this by reading Makefiles that outline how the orchestration should take place, along with a flow and separate command per step in the orchestration process.
Q. What is Docker?
Docker is a platform which allows you to manage operating system-level virtualisation to deliver software in packages referred to as containers. Containers can consist of simple applications which execute a command once, or may consist of a long-running application such as web server that will service requests for users.
Q. What is Terraform?
Terraform is an infrastructure as code tool that allows you to construct on-prem and cloud resources using human-readable configuration files. It works by abstracting the API layer of various cloud and on-prem providers, allowing you to only need to interact with Terraform. Terraform, on your behalf, will interact with the API layer of any supported platform to build out resources.
Q. How can I use 3 Musketeers with Terraform?
By writing several goals in your Makefile, you are able to interact with Terraform code, and build infrastructure using your Terraform configuration file.
Q. What are the benefits of using the 3 Musketeers code pattern?
- Consistency – Run the same code on any operating system or CI/CD tool kit to achieve the same builds
- Control – Maintain end-to-end control of what you are building by leveraging services like Github for versioning
- Confidence – Be assured that if you build the same thing that works on one platform, it should also work on another. This also includes CI/CD tool kits
