Redis is an open-source, in-memory data structure store or a key-value store used as a database, cache, and message broker. It offers a rich set of features that make it effective for a wide range of use cases and is getting more and more popular in the Kubernetes ecosystem. However, it is designed to be accessed by trusted clients inside trusted environments. That means the vanilla installation of the Redis server can be directly accessed by untrusted clients via TCP port or UNIX socket. This blog is to share some ideas on how to secure the Redis server running in Kubernetes.
Restrict access from network layer
The Redis general security model suggests the restriction from the network layer should be your №1 consideration. We can use a firewall to restrict access but let’s look at an alternative approach by utilising the power of Istio service mesh.
This diagram illustrates an example solution implemented on a Google Kubernetes Engine (GKE) cluster with Istio enabled and enforce STRICT mode in Istio peer authentication, which means workloads only accept mutual TLS (mTLS) traffic.
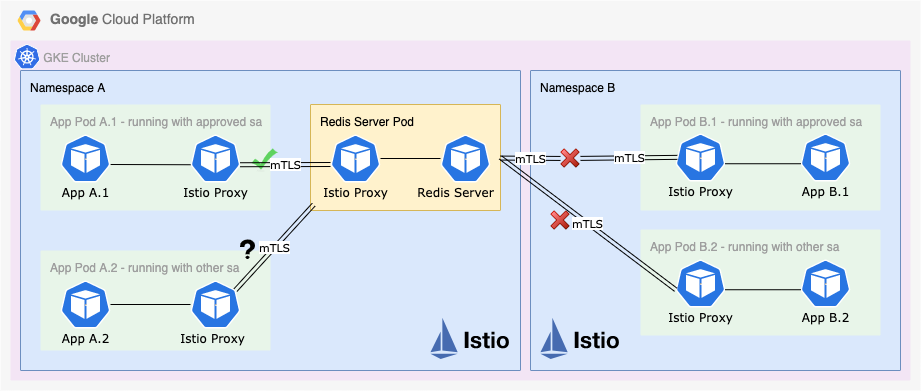
How can we restrict the apps access to the Redis server? The easiest solution is to bind the Redis server to a single interface by adding bind 127.0.0.1 in redis.conf file. However, it blocks all the external traffic. All apps are not able to connect to the Redis server unless they are deployed to the same pod. Thanks to Istio, we don’t have to stick to this limited solution. The magic is to use Istio Authorization Policy.
There are 2 ways to apply the restriction
- Apply at the namespace level. That means any pods can access the Redis server as long as they are running in the same namespace.
- Apply on the container level with a custom service account. In this case, we need to run the container on a custom service account (not the default one), and then define this service account as source in the Istio authorization policy. That means only the containers running with an approved service account and in the same namespace can access the Redis server.
Ok. Let’s look at how we implement these 2 restrictions now
In the first scenario, we can apply the following Istio policy to allow only pods running in “Namespace A” to have access to “port 6379” which is the default Redis server listening port. Please note that both App A.1 and App A.2 are running on the defaults service account. As shown in the below policy, we define namespace-a as the source and port 6379 as the destination.
---

apiVersion: security.istio.io/v1beta1

kind: AuthorizationPolicy

metadata:

name: redis-policy

namespace: namespace-a

labels:

target: app-a-1

spec:

selector:

matchLabels:

app: redis

rules:

- from:

- source:

namespaces: ["namespace-a"]

- to:

operation:

ports: ["6379"]
Once deployed, both App A.1 and App A.2 are allowed to access the Redis server because they are running in the same namespace namespace-a App B.1 or App B.2 are not allowed to access because they are not running in the namespace namespace-a
In the second scenario, we first need to create a custom service account and then use this service account to run the containers.
Unfortunately, we have to add serviceAccountName the deployment manifest file, as shown below. We can’t simply deploy a container with a custom service account using kubectl.
---

apiVersion: v1

kind: ServiceAccount

metadata:

name: redis-auth-sa

apiVersion: extensions/v1beta1

kind: Deployment

metadata:

name: app-a-1

spec:

template:

# Below is the podSpec.

metadata:

name: app-a-1

spec:

serviceAccountName: redis-auth-sa

automountServiceAccountToken: false

...
Now we have the app pod running with a custom service account. The next step is to define this service account redis-auth-sa as principal in the Istio authorisation policy. Please note that the namespace is also considered as a factor of the authorisation process. The principal syntax is:
cluster.local/ns/<YOUR_NAMESPACE_NAME>/sa/<YOUR_SERVICEACCOUNT_NAME>
The following policy allows access only if the app containers meet
- Running in namespace-a. same namespace as the Redis server pod)
- Running with a custom service account namespace-a redis-auth-sa
Once deployed, only App A.1 is allowed to access the Redis server because it meets both conditions. App A.2 is not allowed because it is not running with an approved service account, although it’s running in namespace-a. App B.1 and App B.2 are not allowed because they are not running in the same namespace namespace-a
Once deployed, only App A.1 is allowed to access the Redis server because it meets both conditions. App A.2 is not allowed because it is not running with an approved service account, although it’s running in namespace-a. App B.1 and App B.2 are not allowed because they are not running in the same namespace namespace-a
Enable password authentication
By default, Redis doesn’t enforce any password authentication. Prior to Redis 6, it provides a tiny layer of authentication that is optionally turned on by either editing redis.conf or passing — requirepass when starting the server. When the authorization layer is enabled, Redis will refuse any query by unauthenticated clients. A client can authenticate itself by sending the AUTH command followed by the password. Since Redis 6+, a new ACL system is introduced which allows username + password authentication.
As recommended by the Redis security model, the password should be long enough to prevent brute force attacks for two reasons:
- Redis is very fast at serving queries. Many passwords per second can be tested by an external client.
- The Redis password is stored inside redis.conf file and inside the client configuration, so it does not need to be remembered by the system administrator, and thus it can be very long.
Now, let’s look at how we extend the existing solution to enable password authentication. Please note that the implementation discussed here is based on “redis:5.0.7-alpine3.11”. One of the options is to integrate with HashiCorp Vault because it is one of the most secure ways for managing and retrieving secrets. However, a custom wrapper script is required to serve as a bridge between Vault and Kubernetes.
Here is an example solution. We have this wrapper script deployed as a Kubernetes job to:
- Login to Vault with the service account token
- Get the secret(s) from Vault. It is the Redis server password in our case.
- Create or update the password in a Kubernetes Secret object
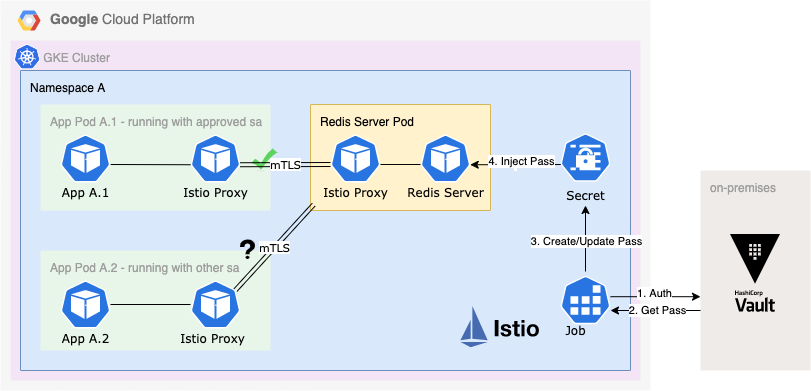
Once we get the password stored in the Secret object, we can inject the password secret as an environment variable from the object when deploying the Redis server pod. Then, we can start the Redis server with the password. The command to use is:
redis-server –requirepass $(REDIS_PASSWORD)
Tips: Please keep the parentheses around the environment variable name, otherwise the substitution doesn’t work. The Redis server will consider the password literally as “$REDIS_PASSWORD”.
Here is an example deployment manifest showing how to change the container startup behaviour by providing custom command and args.
---

apiVersion: extensions/v1beta1

kind: Deployment

metadata:

name: redis-server

spec:

template:

metadata:

name: redis-server

... ...

spec:

containers:

- name: redis-server

image: redis:5.0.7-alpine3.11

imagePullPolicy: Always

command:

- redis-server

args:

- --requirepass

- $(REDIS_PASSWORD)

... ...
Congratulations! We now have a Redis server with password authentication enabled. To verify whether it’s actually working, we can use redis-cli connect to the server and try to create a new key-value pair, and we expect to see NOAUTH error.
$ redis-cli

127.0.0.1:6379> set key 1

(error) NOAUTH Authentication required.
Secure container workload
Another common vulnerability issue is that containers are running with root user by default. There are a couple of ways to remediate this issue. My teammate Jake Nelson is an expert on this so I highly recommend his most recent article: Securing Your Container Workloads in Kubernetes. He will show you how to use the power of Kubernetes securityContext to secure your container workload.
Furthermore – why not Memorystore
Memorystore is a fully managed Redis service for Google Cloud Platform. Redis instances are protected from the internet using private IPs, and access to instances is controlled and limited to applications running on the same Virtual Private Network. Instances are further secured using Cloud IAM roles, which enables granular control over who can manage and access the Redis instance. Also, Memorystore for Redis is integrated with Cloud Audit Logging, enabling you to answer “who did what and when”.
Memorystore might sound like a one-stop solution for Redis. However, it doesn’t have all required security features in a financial technology environment with tight regulatory requirements, such as authentication and mTLS. That’s the main reason why I want to write this blog to address those security gaps.
THE END! Thank you for reading this blog. I hope it brings you some ideas for securing Redis in Kubernetes. Please let me know if you have a better approach or want to discuss more in the comment. I look forward to hearing from you.
