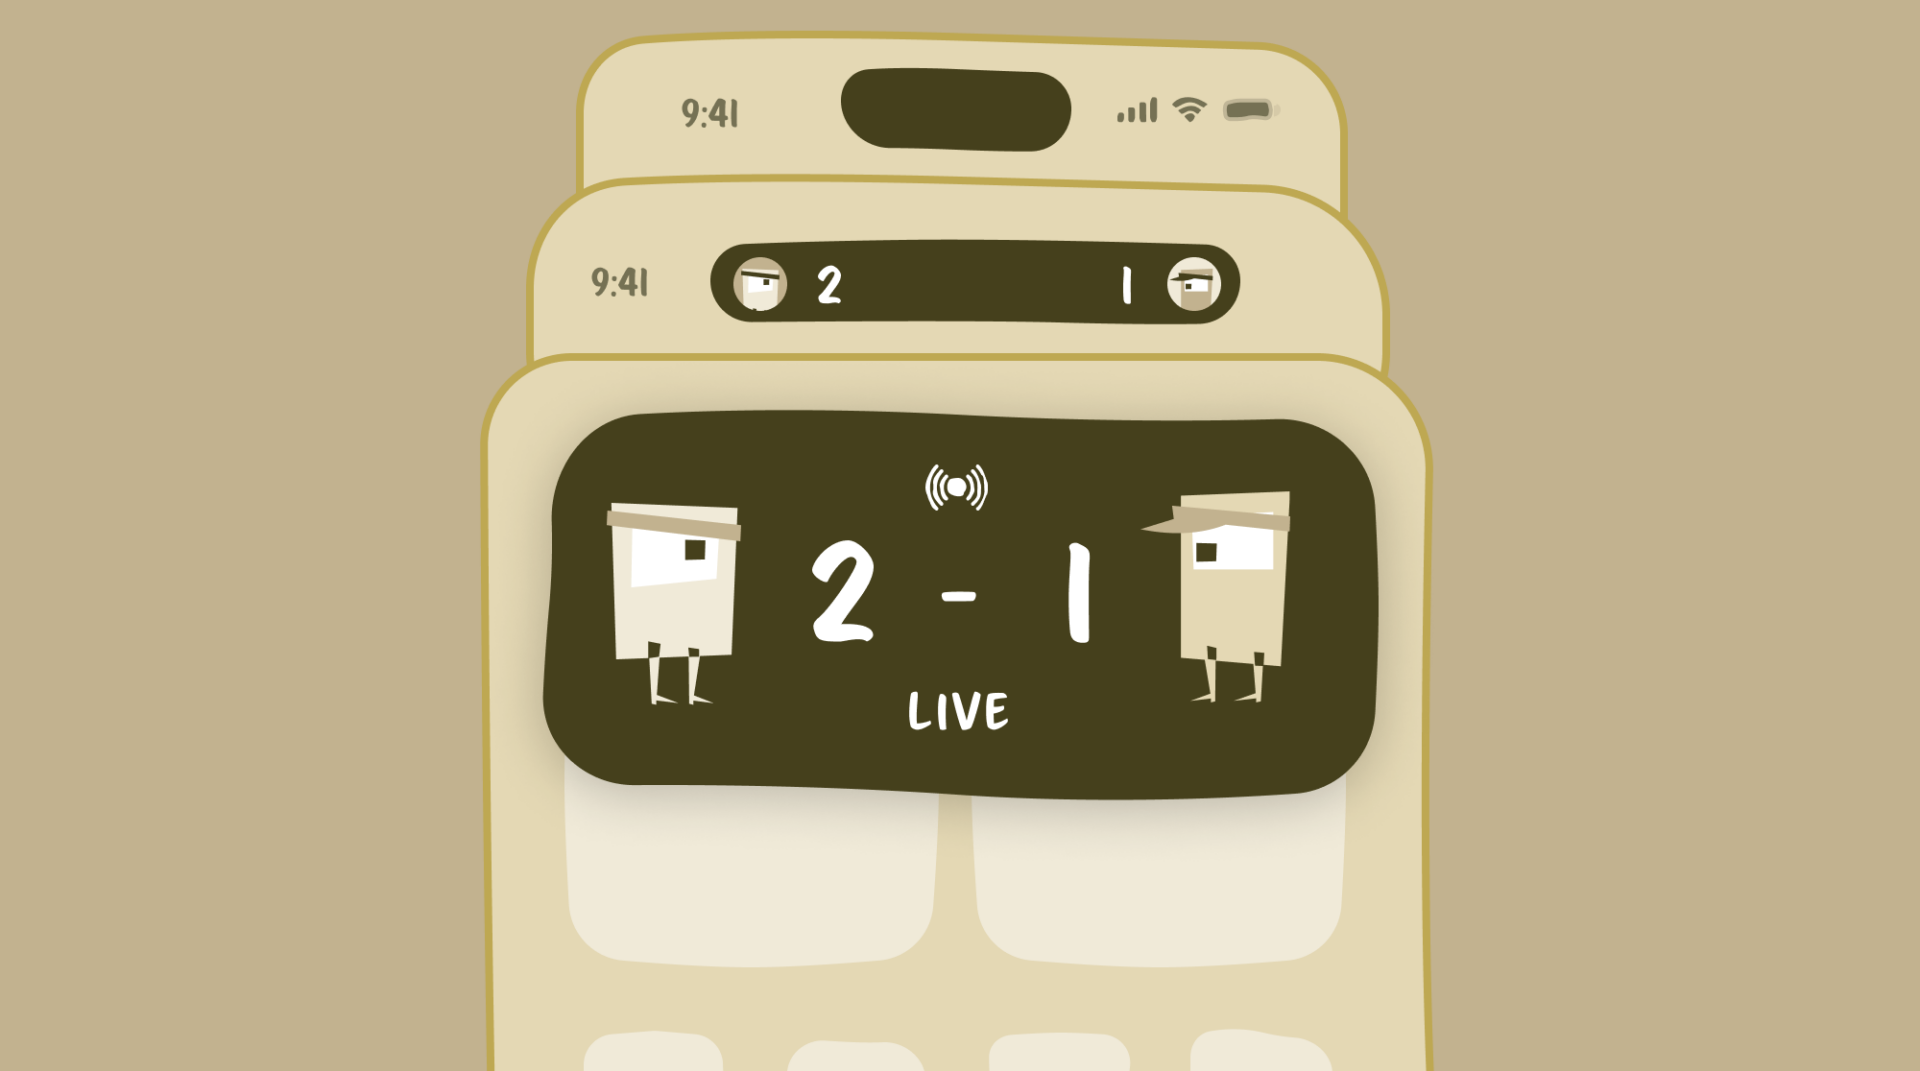
Today, James Warren presents a tutorial on building Live Activities for iOS 16. Live Activities are a way to display rich and persistent information outside of an app, on the lock screen on iOS 16 and in the “dynamic island” of the iPhone 14 Pro.
The source code used in this tutorial is available on GitHub.
Transcript of Presentation
James Warren
So today, I’m gonna be giving a presentation on the new live activities API that got introduced last year. Like what it’s good for, and then kind of a brief rundown of how to, use the basics of it.
So first up, what actually are live activities? They’re a way to show rich, persistent information outside of your app, about a particular activity that’s happening within your app. They appear on the lock screen and in the dynamic island for the new iPhone fourteens. And an important thing is these are not separate experiences.
In the view definition, you have to define both a lock screen and dynamic island view, and you can’t schedule one or the other. You have to start both of them at the same time. And these are largely based on the Widget framework. In fact, they’re actually defined as part of a widget extension to your app.
So a couple of limitations, like widgets, they’re SwiftUI only. They must be started from the foreground of your app. You can’t start them from the background or in response to a push notification from a server. Although you can update them from both of those.
A single live activity can only be active for a maximum of eight hours, after which the system will end them. But then after they’ve been ended, either by you or the system, they can remain on the lock screen for up to four more hours, depending on how you end them and if there’s any other activities the system wants to show.
You don’t get to do any networking or location updates from the activity itself. You don’t really get to do any processing itself.
This is how the views are set up. On the right you ’ve got the dynamic island, all the different parts of that. When you define it, you don’t just define a single view, you define it in several little parts.
The first one, is the lock screen, and this is just a regular view. You get to pretty much put whatever you want there. Although there is a height limit of around 160 points. The system will let you have a little bit more than that, sometimes they don’t really tell you when they will or they won’t. You should stick to around 160 points.
Then you define the main expanded dynamic island, which is split up into several different little parts, some of which are optional. So you’ve got like leading trailing center and bottom. But center and bottom are optional, but leading and trailing, you do have to define yourself.
Then there’s the little parts for when it just pops into the dynamic island but isn’t expanded. So you’ve got compact leading, which can be shown on its own. Compact trailing, which has to be shown with compact leading. So it’s kind of like a supplemental view. Then there’s also the minimal definition, which is just that tiny little bubble.
One challenging part of this is that you have to define all of these. Even if for your particular activity, there’s no real meaningful information you can give in that one little 30 by 30 circle. You still have to define it and come up with something. So that is one challenge with this.
A couple of caveats around being SwiftUI. So it’s kind of like a limited subset of SwiftUI. So big one is no modifying animations at all. You don’t get to do anything custom. You don’t get to decide when the animations happen. For all text it’s always just gonna use a fade in and out, unless it’s a number only text label that you’ve got. Then you can add to this numeric text view modifier, and then that’ll get the numbers to slide up or down, depending on whether it’s the counts down flag. And this is really meant for timers.
So if you’ve got some timer that’s counting up or down, you can have the numbers slide in and out rather than the text label blurring every second. And you can also define the transitions that are used when your views are added or removed. So you don’t get to control the animation, but you could say, when this particular view gets added, slide in from the left and then slide out from the right.
You don’t get to have any internal state in your views. It is really just that body property. And no buttons or actions within the view so you don’t get to do any real processing. This is a kind of artificial limitation that’s placed just on our views. In iOS 16, the new now playing, little thing on the lock screen is actually built using the live activity framework and they do have buttons in there, like the pause, play forward back. They’re private APIs that we don’t get access to. The only kind of workaround for this is that you can set specific deep link URLs from different parts of the live activity. So you can create kind of like pseudo buttons, but then they have to launch your app.
This is how the models are defined. Each live activity view definition is tied to a particular type. And that’s how they get tied together in the system. And then the type has to conform to this activity attributes, protocol, which says that you have to have this content state struct inside it, and it must also conform to Codeable and Hashable.
The reason for this is that it needs to be at a serialize them from JSON, which is how it does push notification updates. But I’ll talk a little bit about that later. There’s the two main parts of the model definition. You have some variables that are for the whole activity and these are variables straight on activity attributes.
These you get to set once when you start the activity, and then don’t get to update them again. So if we’re saying, doing a food ordering, app. This might be the restaurant you’ve ordered from and the total for your order, they’re not going to change. Then you have this content state struct that you get to provide a new, updated version of with every update to your live activity as it runs.
For that food delivery that might be the status of your order, if it’s out for delivery, the estimated time of delivery, and you can update that as often as you want. Up to about once a second, before the system starts throttling you.
I’ve got a little sample project. I got set up with a live activity to show you how they work in practice.
One thing is that since this is a separate target, for your app, any models you want to share between your app and the live activity, it’s easiest if you have them in some sort of a separate package. It could be a framework or I’ve got here a Swift package, or it could literally just be in the inspector manually adding them to both targets. But they do need to be available in both.
So this is where you define your widget bundle. Since it’s part of the widget extension, you could also have any widgets here for your app to find here. But in this case we’ve just got the single, live activity and you can have multiple live activities defined for the same target as well.
The app is showing the results of a F1 race. So I’ve just got, driver, fastest lap, track, constructor, name, number, and race order for first, second, third.
The live activity itself. It’s defined as something that conforms to the widget protocol, which means you have to give it a widget configuration, in which you define the activity attribute.
This is, uh, like I was showing off before where here is the lock screen definition, then the dynamic island definition. In this case, I’m just providing the leading trailing and bottom and ignoring the center. And then, for each of the little parts, you’ve just got, compact leading, compact trailing and minimal.
This is all just fairly stock standard SwiftUI code. You can provide all the standard, accessibility modifiers just like in normal SwiftUI and they get read out by voiceover when you’re on the lock screen. Yeah, all the standard APIs work.
So here I’ve just got some views, nothing particularly interesting, except for this text. This is using a new initializer that was introduced as part of iOS 16, where you can now give a text label just a date range, and it will handle, formatting the countdown or count up through that date range. You don’t have to provide constant updates for this. The system will update it once a second every second.
And so this means that it doesn’t count towards the budget of updates the system will allow you and you can still have a constantly counting up or down timer. And then there is this new environment variable for isLuminanceReduced.
This is for the new iPhone 14 Pros. How they have the always on screen where it’s the active lock screen and then it’s got the faded out version. When it’s faded out, it’s classed as luminance reduced. In this case, the system will disable all animations. Even the system generated ones like that text countdown.
So in this case you might wanna do something where if I say luminance is reduced, just ignore the text, because it’s gonna look weird to have a timer just stopped working. So just fade it out. Everything else is pretty stock standard.
One little tip that I only found while I was building this is that it is actually possible to preview live activities.
It’s not included in any of the Apple documentation and it’s not included when you generate a template. So when you just, add new widget bundle with a live activity, it doesn’t include a preview for you. I only found this in an Apple Dev developer forum thread.
Unfortunately while live activities were added in iOS 16.1, the ability to preview them was only added in 16.2, which is odd. But it’s cool cause it does the new Xcode 14 thing where you can show off all variants. And it’ll show you all the different variations of your widgets.
So you’ve got the compact, leading and trailing, minimal, your expanded, dynamic island, and then what it looks like on the lock screen. And you can see here in the, low luminance mode, I’m just getting rid of the race countdown timer.
Everything else is just standard SwiftUI.
So I can start a live activity and when I start it, this is just going to tell me the ID for the live activity. And you need to keep track of this cuz this is how you tell the system to update a particular one. And then if I hit the home button, we can see, we’ve got the dynamic island version here.
We can see car number 23’s in first place and we’re on lap 0 of 58. If I tap and hold, you get the expanded view. And lock it and it’s on the lock screen. And then if I do the equivalent of like tapping a screen, we can see we’ve got this, constantly counting up timer.
So the question was, how does the system decide precedence? It uses the latest update to decide between, third party live activities. So whoever’s updated most recently will be shown in the most prominent position.
For music playing, that’s a special case where Apple’s, again, using their own access to make sure that now playing is always there. Same as timers. And then if you have multiple live activities running from a single app, when you provide updates, you give it a relevance score and then it’ll use that relevance score to break ties. If you have two activities from the same app trying to display at the same.
If there’s enough room, it will let you have multiple, at the same time as well.
So the ContentView, I’ve just got this activity helper with some helper methods for starting and updating the activities. Then three buttons and we’re getting the activity ID.
Starting an activity isn’t actually asynchronous. I’ve just got the task here so I can do the MainActor.run. Since this activity, ID is a main actor published property. But this is a synchronous task. It can fail because on a app by app basis, the user can disable live activities for your app. But it defaults too allowed so you don’t have to pop up a permission dialogue for example. And then on the lock screen it’ll have a little thing where it’s like, “Hey, XYZ app has run a live activity. Do you want to continue to allow it to run live activities?”, and the user can’t allow or deny at that point.
So I’m getting my content. I’ve gotta helper function, which generates a random race order. This would ordinarily come either from your backend or location data or from some setup from the user. It’s just random here. You have to provide a stale date. So this is, at what point do we consider this update to no longer be valid?
The reason this is here is you can just set it to like distant future if the updates are evergreen or if, let’s say, in this case, because it’s based on the current state of the race. After two minutes, we don’t consider this update valid anymore, so we might want to display some information like, no network connection or unable to get race updates.
The reason for this is that the user might get an update, and then lose network connectivity, and then if we don’t have this, we would continue showing that update, which may no longer be valid. For like a sports thing, not a big deal, but if it was some more timely information, we don’t want the user to be relying on it if it’s not valid.
So we can provide the stale date here. We call into the system provided Singleton to request the ID. So this is where we provide attributes. These are the variables that are across the entire length of the live activity. And then we provide an activity, content where we provide the current state of the activity. The stale date, for that update, and then the relevance score, which is again, used to break ties between your own live activities and is also used when you’re sending updates via push notifications, you also provided this relevance score, and you can use this to have an update, not count against your app’s budget.
They won’t give you an exact number of how many per minute you’re allowed to send. But a lot of the documentation talks about, a sports score which is updating every couple of seconds. You are allowed to do that, but you do have to provide an extra entitlement in your info.plist.
That seems to be about the limit, but you’re only budgeted a certain number of those. So you can provide a low relevance score, which is telling the system, “Hey, if you can use this update, go for it.” Which case it won’t count against your budget. So you can kind of save your budget for if I’ve got 10 low priority updates, give them a low relevance score, system might display them and then, no this update actually has to go through, I’m happy to spend some of my budget on this update.
So if it succeeds, you get back your activity. Then you would store this activity ID. You do need to store this because this is how you would update the running activity.
In this case, I’m just storing it in memory. But you would probably want to persist this to UserDefaults. If you then want to update a running activity you don’t provide an update to a particular ID. You instead ask that activity singleton for every activity that matches a particular type. And then in this case, I’m just doing get the first one where the IDs match. So it’s not the best since it means you’re gonna be potentially looping over a bunch of them, but you’re usually only gonna have one or two running at a time anyway, so it’s not a terribly bad thing.
In this case, I’m getting my updated content by generating another random content update and increment the lap count. Again, setting that two minute stale date. Then once you’ve got that running activity, you call .update on it and provide it with the updated content and the stale date for that update.
So if I go here. So this is sending a random update. And now we’ve got car number four on the podium, and then apparently Daniel Ricardo is on the podium. So this is definitely a fantasy.
Then if you wanna go about ending them, it’s almost the exact same process to sending an update. You loop over the array of activities you get, find the one where it matches your ID. When you end a live activity, you have to provide a final, content update, which is gonna be displayed on the activity while it’s in the inactive state. And then you also have to provide this dismissal policy.
So what this is, is it’s deciding how long your activity should remain on the lock screen after it’s ended. So this is what I was talking about before where you can have your activity displayed on the lock screen for up to an additional four hours after it’s ended. And this is how you determine how long.
So In this case, I’m just saying, end this immediately and this will make the live activity disappear as soon as you hit end. But you can also say default, which is just allow it to stay on for up to four hours. But the system may decide, if it wants to use that spot for a different live activity, it could kick you off early.
You can also give it a specific time so you could say, I only want this to remain, in the ended state for up to an additional 30 minutes, and after which time it’ll be removed.
And that’s how you go about updating them. In this case, I’m doing all of this from the foreground, which is totally valid. But you are also allowed to do this, in a background processing task, it doesn’t have to be done from the main actor.
But if you wanna do it for a push notification, there are a couple of little things. So to register for push notifications, you just, set ‘em up as normal where you would register with the APNS service and you go to add all the entitlements to your app and all the provisioning profiles and all that good stuff.
When you start your activity, you do have to pass it a token pushType. And then, once you’ve started it, you then, can get back a push token, and you would send this token off to your server. And then on your server, instead of sending a push notification to a particular device, you send it to that push token.
Then in your, payload that you send to the push notification servers, you would add, an additional JSON payload. Which is that ContentState struct. And that’s why all of this has to conform to Codeable because the system needs to be able to take in that JSON that comes from a push notification and then serialize it to that ContentState type.
One weird thing is that this push token can change over time so you can observe an AsyncSequence of this token and then every time it updates, you do have to update your server that this user’s device has now updated its push token for this running activity. But then it’s otherwise the same where you’re just sending that content state as JSON and giving it a relavance score and a stale date.
And that’s pretty much it for the, basis of how to do live activities. Are there any questions?
Questions & Answers
Hey James. Yeah. Awesome, awesome presentation. I just wondering if I have a UIKit app, like purely UIKit. Is it possible to also introduce live activities?
James Warren
Yeah, definitely. So because it’s all defined in a separate extension, you would just have to use SwiftUI when you’re defining the view in that separate extension.
So that does mean that you’re going to have to recreate any views you want to use for that live activity. You couldn’t use any preexisting components, but you wouldn’t have to then import SwiftUI into your main app target.
Decheng Ma
Okay. Need some like kind of bridging classes to import SwiftUI into the UIKit?
James Warren
No, no, no, unfortunately not. Yeah, it’s cuz it’s, it’s all based on that WidgetKit framework, which has to be able to serialize the views to disk and then reconstitute them later.
Decheng Ma
Gotcha. Gotcha.
Alex Zahan
How would this look on a notch device where there’s no dynamic island?
James Warren
Oh, so the lock screen one would look exactly the same. And then you just don’t get the dynamic island ones.
Sean Woodhouse
Alex, in, in your designs for various client work, have you ever, had them ask about lock screen widgets or dynamic island, anything like that?
Alex Zahan
Definitely not dynamic island. We did at one point discuss widgets. But there’s never enough budget or time or you know, need to do anything.
Sean Woodbouse
Yeah, it certainly seems to be an area where clients don’t really take advantage of the full capabilities of the OS. So again, I kind of see clients kind of imagining an, an app is that squircle you tap on and goes full screen. But those other integration points with iOS that they’ve been building out over the last, you know, five, six years are very rarely leveraged.
