In a world where everyone talks about serverless and containers, it’s easy to lose sight of improvements to the ‘old’ ways. EC2 instances are still an essential part of many environments, and it is useful to look at some improvements there as well.
We’ll start with the new service EC2 Instance Connect.
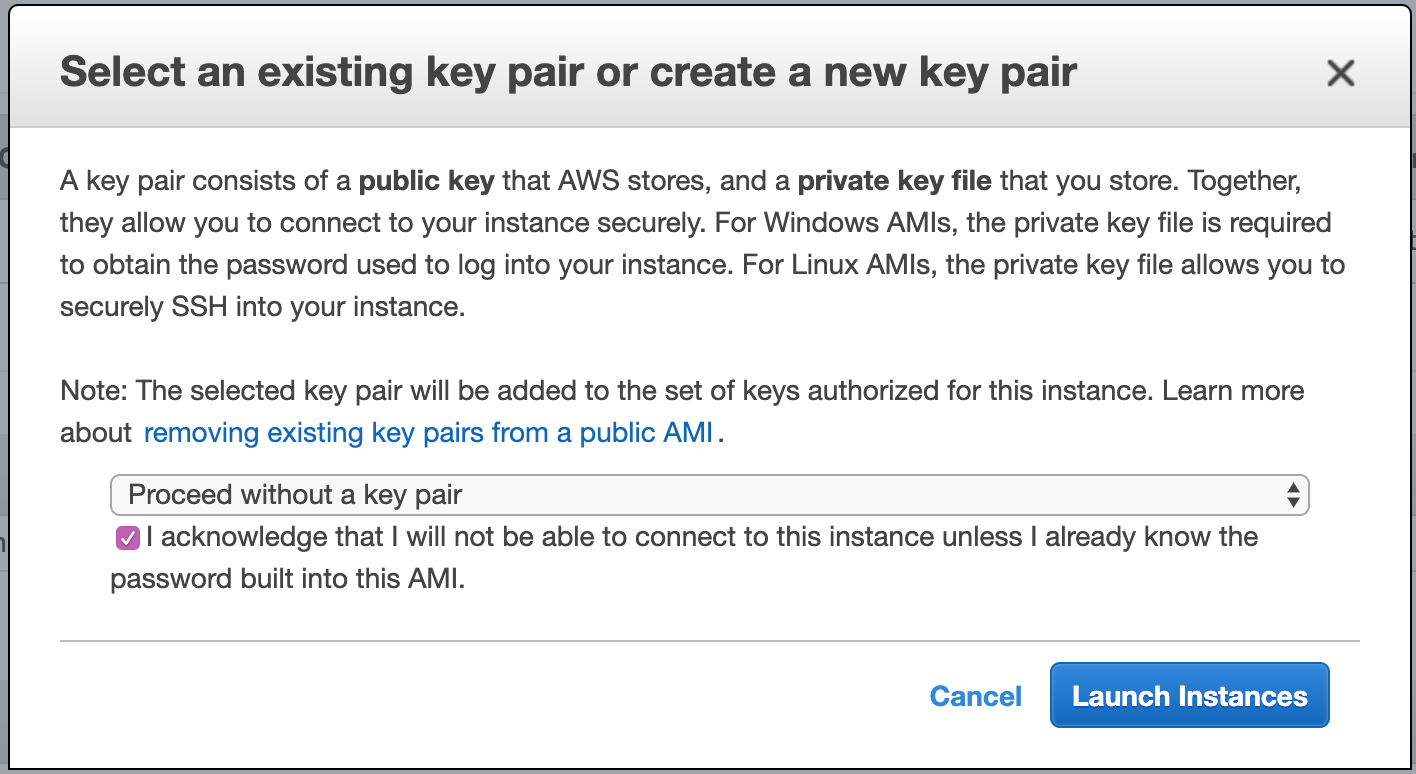
EC2 Instance Connect, which I’ll call Instance Connect from here, allows you to connect to an instance that doesn’t have a key installed.
The joys of closing an account
Closing an AWS account is not something new. It’s obviously been possible for a long time, but you could only do this using the root user of the account in question. When you only have a standalone account, that isn’t really an issue. You set the details when you created the account and assuming you still have access to them you can just log in to delete your account.
That situation changes however when you’re using an Organization. Not only will you more likely be dealing with a larger number of accounts, you often won’t have the root password as accounts created from the Organization are given an automatically generated password. This in turn means that you need to go through the forgot password section of the Console login to get the password sent to your email. And if you don’t have access to that email, well… that’s a bit of an issue.
So, you can imagine this puts up a barrier around closing accounts and many Organizations are left with unused accounts. In fact, I can tell you that within a day of this coming out I cleaned up the accounts in my personal Organization. A task I’d been putting off because it was too much of a hassle.
Enabling access over SSH (or RDP) has always started with providing a key when you create an instance. Doing so is a straightforward process, but it has some drawbacks. One potential issue is that you might share this key with a team, so it becomes hard to see who used it. Worse, when a team member moves on, there is no guarantee they don’t still have access to that key.
Security issues like this are only part of the reason why it’s generally recommended not to use a shared key. Many of us have probably built tools that allow someone to use their own SSH key to access a server; I know I have. Instance Connect is the AWS solution for this. It lets you upload a temporary key to an instance and then immediately connect to it. And for two of the options, you don’t even need to use your own key.
How does it work?
Before we dive into all of the technical things like setting up and securing Instance Connect, let’s have a quick look at how it works from a user perspective. There are three different ways to connect. Let’s start with the most involved one: regular SSH access.
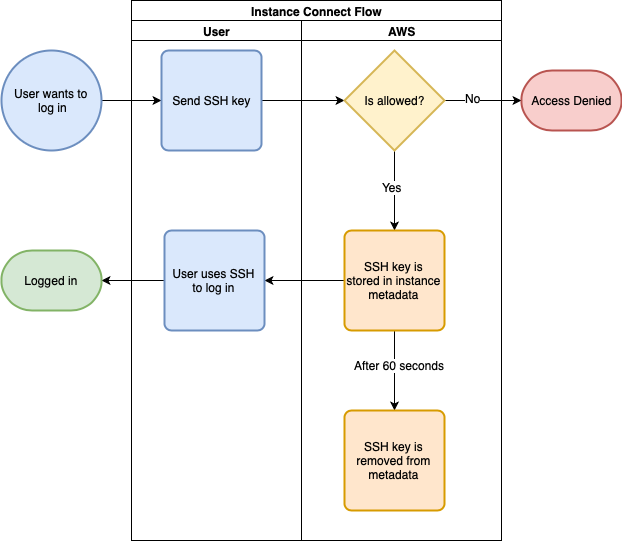
As the above diagram shows, this isn’t complicated. The user makes an API call that sends their public SSH key to AWS. AWS checks the IAM permissions of the user to make sure they are allowed to do this and denies the action if that is not the case. If the user is allowed to upload the key, AWS stores the key in the instance metadata. You then have 60 seconds to connect through SSH before AWS deletes the key again. Assuming you keep your key at $HOME/.ssh/id_rsa this boils down to the following two commands:

As you can see, sending the SSH public key to the instance is an involved command, and as a two-step process, it’s not as smooth as it can be. Which is why AWS also provides the EC2 Instance Connect CLI. Using this tool, you can achieve the same result using a single far shorter command.
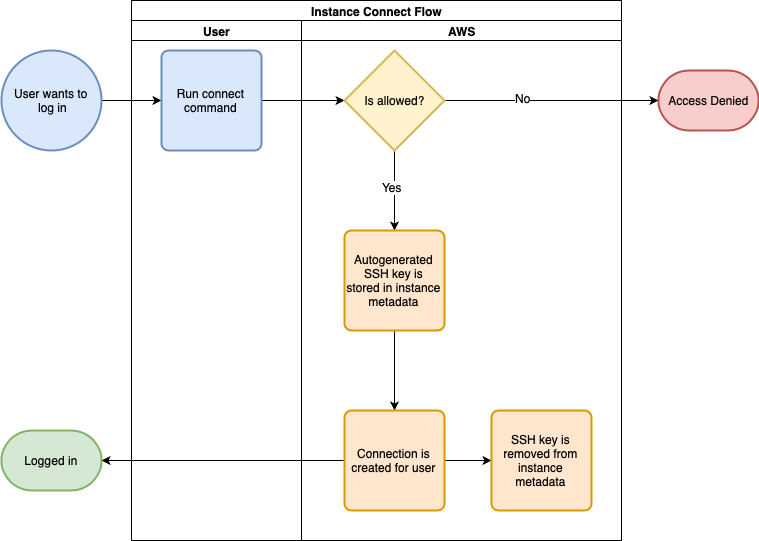
Looking at this diagram, you can already see that it’s easier as AWS handles almost everything. As before, AWS verifies that access is allowed, but then it also generates a temporary key, pushes this up to the metadata and sets up a connection using that key. Once again, AWS deletes this temporary key after 60 seconds. As for the command itself, you only need to provide the instance ID and username (and if that’s ec2-user, you can even leave that part of).
mssh i-12345abc
Clearly, this is a lot easier. However, this SSH client may not be as fully-featured as your own. But, how about we have a quick look at an even easier option? Connecting directly from the AWS Console.

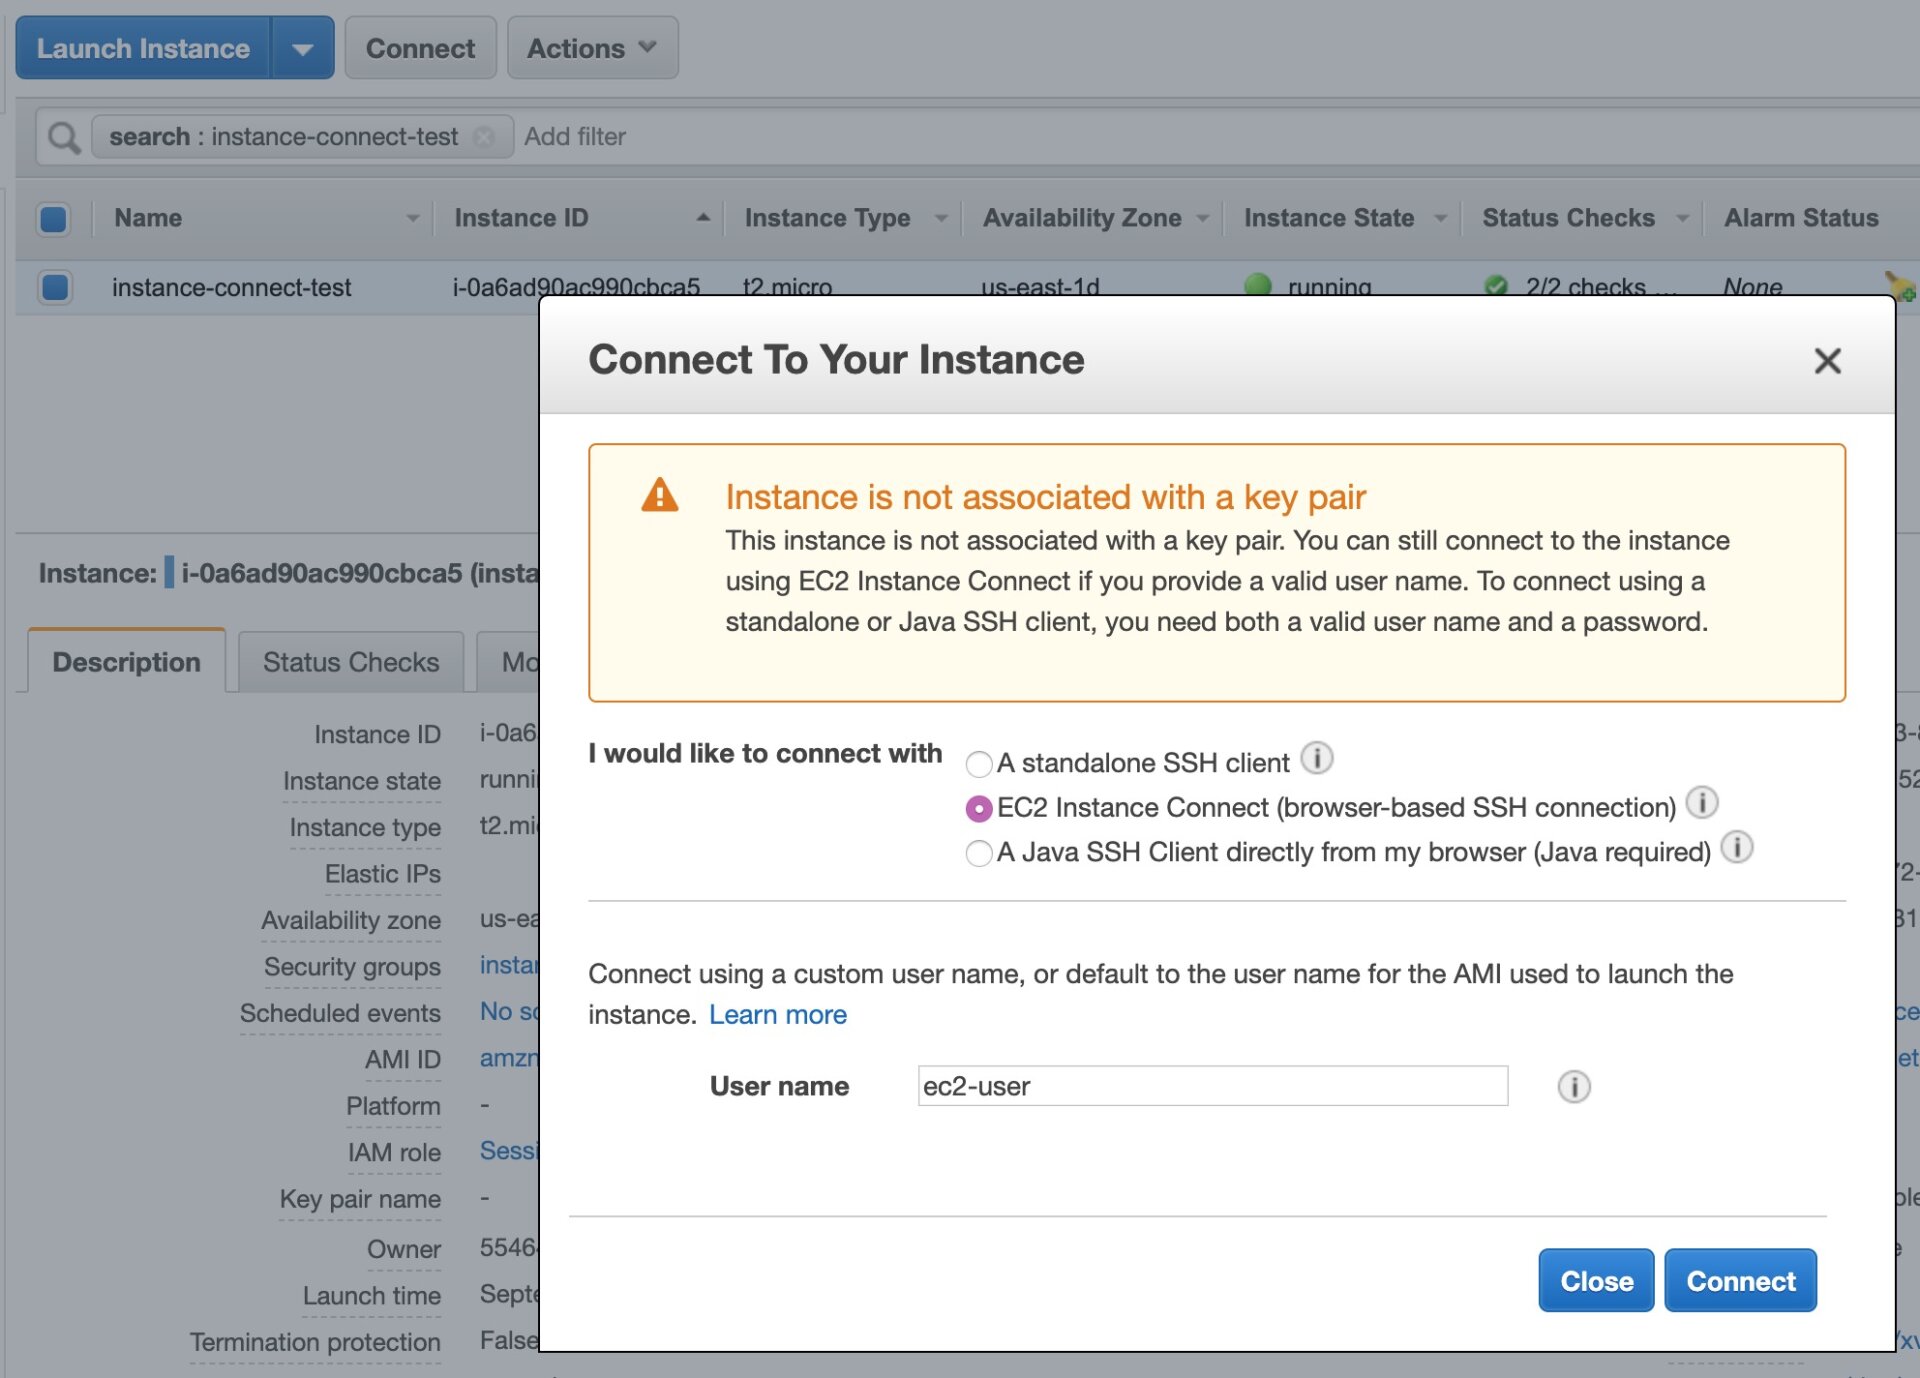
Connecting from the Console is almost the same as when using the Instance Connect CLI. The main difference is that you only need to click a button in the Console. After that, a window or tab pops up that gives you access to the CLI in your browser.
How do we set up Instance Connect?
Ok, now that’s a nice setup, but as with everything else, it does involve a bit of effort to make it work. First, we need some configuration on the servers themselves, which you can do by installing ec2-instance-connect.
Most of what this package does is configure the SSH daemon for us, and it already comes installed in the latest Amazon Linux 2 AMIs. Installing it on older Amazon Linux 2 instances is easy as well, using a regular yum install and similarly for Ubuntu with apt-get.
# For Amazon Linux
sudo yum install -y ec2-instance-connect
# For Ubuntu
sudo apt-get install ec2-instance-connect
How you install this depends on your situation, but it’s easy enough to include in your userdata or build process. Of course, you can install it manually as well.
Now, we also need to make sure that our server is reachable for SSH. So when you spin up the instance, you need to make sure that it has port 22 open to the address you connect from. Please don’t open this up to the world though, limit it to a whitelisted IP or CIDR range.
That said, if you want to connect from the Console, you need to whitelist a specific CIDR range for that too. This CIDR range is a separate range per region which you can find in the AWS IP Ranges JSON file, you will need to filter by EC2_INSTANCE_CONNECT as service.
How do we secure this?
At this stage, you may realise that we need some way to restrict who can access the server. As that isn’t done by way of the SSH key anymore, we need to use a different method. Those of you experienced with how AWS does things, probably aren’t surprised that the tool to do so is IAM.
In fact, with IAM we can not only restrict access to specific instances but even which user can be assumed. This, in turn, allows you to grant different levels of access for different users. Unfortunately, restricting access to instances can’t be done based on tags. Instead, you will have to provide specific instance-ids. The syntax is also slightly awkward, as you need to use the full arn for the instances and you set the allowed username with a Condition.
The ec2:DescribeInstances statement is technically not necessary if you upload the SSH key and then use your SSH client. However, that still requires that you already have all of the information about the instance like the Instance ID, Availability Zone, and public/ private IP.
This mostly sounds great, so what are the limitations?
Unfortunately, not everything is wonderful in the world of Instance Connect. As already highlighted, the way you limit access using IAM is very involved. If you have a dynamic environment, you’ll spend a lot of time managing this access, which makes it nearly useless in these situations.
In addition, only a limited number of operating systems are supported out of the box. These are Amazon Linux 2 and Ubuntu 16.04 and newer. Technically speaking, I don’t see a reason why you can’t replicate the SSH config on other Linux systems. However, that is likely to be a bit more work than installing a package.
There is a similar limitation with your SSH keys as well. Instance Connect only supports RSA keys with a length of 2048 or 4096. As these are temporary keys that’s not necessarily an issue, but still something to keep in mind.
Lastly, you should have direct access to an instance. For access from the Console, this means your instance needs to be publicly accessible (and open to the AWS CIDR range mentioned before). While that is not necessary for the other connection methods, it is still easier if you connect to them directly.
Technically speaking, it is possible to use a bastion host (or jump box) to gain access, but that requires a bit of a workaround. One way to do this is by setting it up so your bastion can deploy the keys, but that has its own risks. The other way I can think of is that a user deploys the keys from their local computer and then connects from the bastion with that same key. All in all, it’s far easier if you can access the private instances through a VPN.
What’s next?
In this post, I took you through how to use EC2 Instance Connect; how to set it up, how to secure it, and some of its limitations. Based on this, you have an idea if this works well for you, but it’s not the only tool AWS offers for this. So, in the next post, we’ll take a look at the awkwardly named AWS Systems Manager Session Manager.
