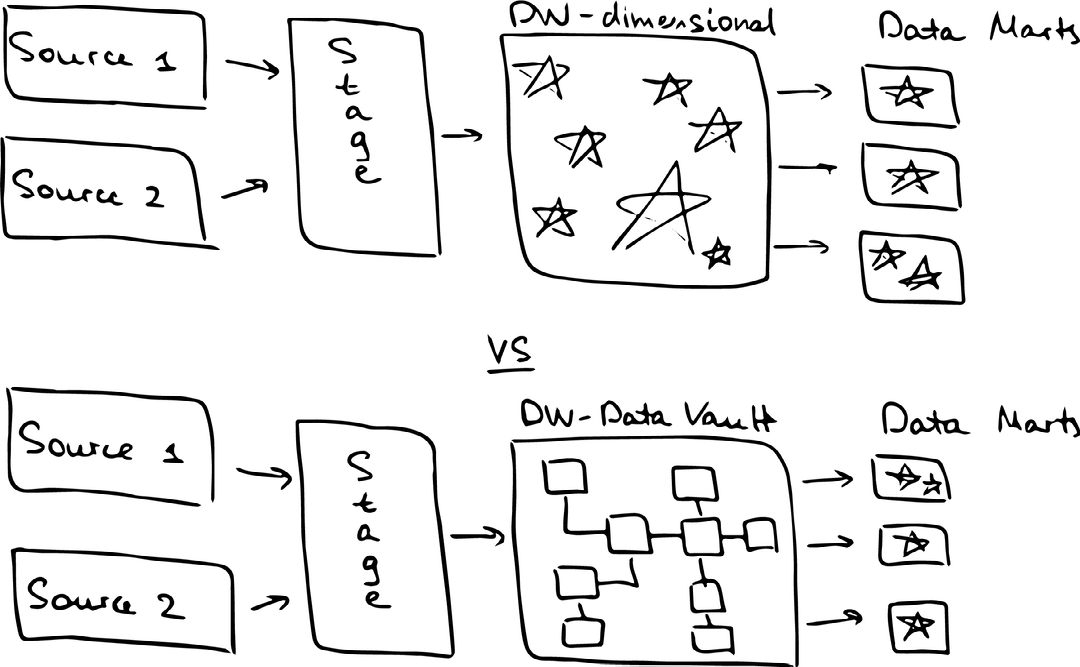
Dimensional modelling, also known as Kimball’s star schema, has long been an industry standard for building a Data Warehouse. Under this approach, we load the data into a staging layer, apply all the transformations, put it into Kimball Multi-Dimensional Data Warehouse, and then load it into smaller Star Schemas for the business to consume.
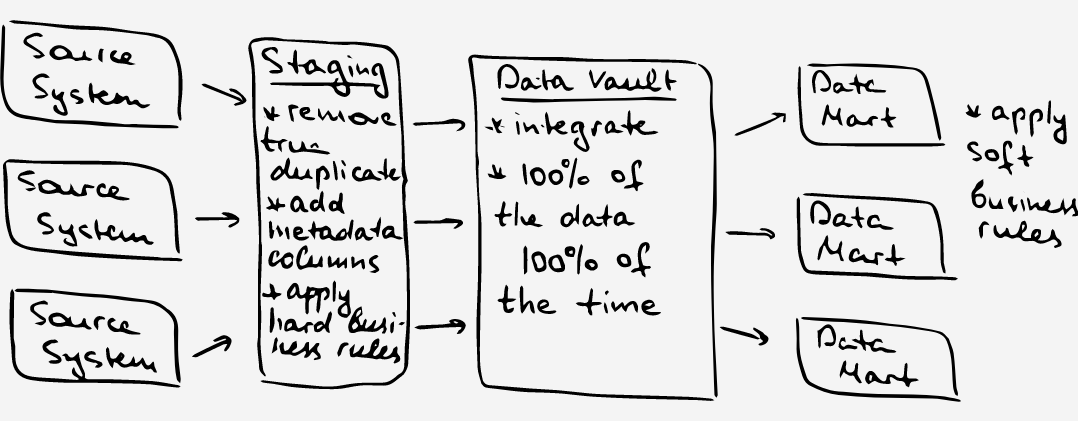
There is more than one way to skin a cat, though – for the last 20 years, Data Vault 2.0 methodology has been making inroads into the Agile Data Warehousing. Data Vault compliments dimensional modelling by providing a solid de-normalised integration layer for all the star schemas to pull from (see image above).
There are plenty of resources explaining the core principles, rules and patterns of the Data Vault methodology, however, there are not that many examples of its implementation.
This blog post will hopefully close the gap between KNOWING THAT Data Vault is an option for your Data Platform and KNOWING HOW to implement it.
Disclaimer: This article is not intended to cover the basic principles of the Data Vault methodology, as it assumes you are already familiar with them. If not, have a read through the Resource section of this article first to give you an idea of what you are in for. To give a bit of a flow to our article, we will gloss over a few benefits of using a Data Vault.
Phase 1. Discovery
We shouldn’t try to design our data platform to answer all existing business questions from the get-go. Instead, we will pick only one most valuable question and will design, populate and test our data warehouse to answer only that one question.
Business Users: What question do you want us to answer?
During the discovery phase, we went to the business stakeholders and asked them about their highest priority question. That’s how we came up with the first increment of our Data Vault:
The first increment of Data Vault should contain all data to answer the following question “Which supervisors are not following the recommended guidelines set for scheduling shifts?” Once the area of focus was identified, we were able to select which source tables we needed to answer the question. At this stage, we also did a walkthrough of the business processes and asked business users, which ids and keys identified are meaningful to them and why, and, more importantly, which keys they are using to identify and locate the records in the system (more on business keys in Step 3).
We wanted to understand as much about the business context surrounding the question as possible: how business users interact with the system? What their day-to-day processes look like? How do they talk about entities and keys? Asking these questions will keep us laser-focused on the business user throughout the modelling process.
BI Team: Which source tables do we need to answer that question?
After we got an initial direction from the business, we spent some time in the discovery phase with the BI team. The aim of this phase was to identify the source tables needed and get a robust understanding of how the systems work and the business processes around it.
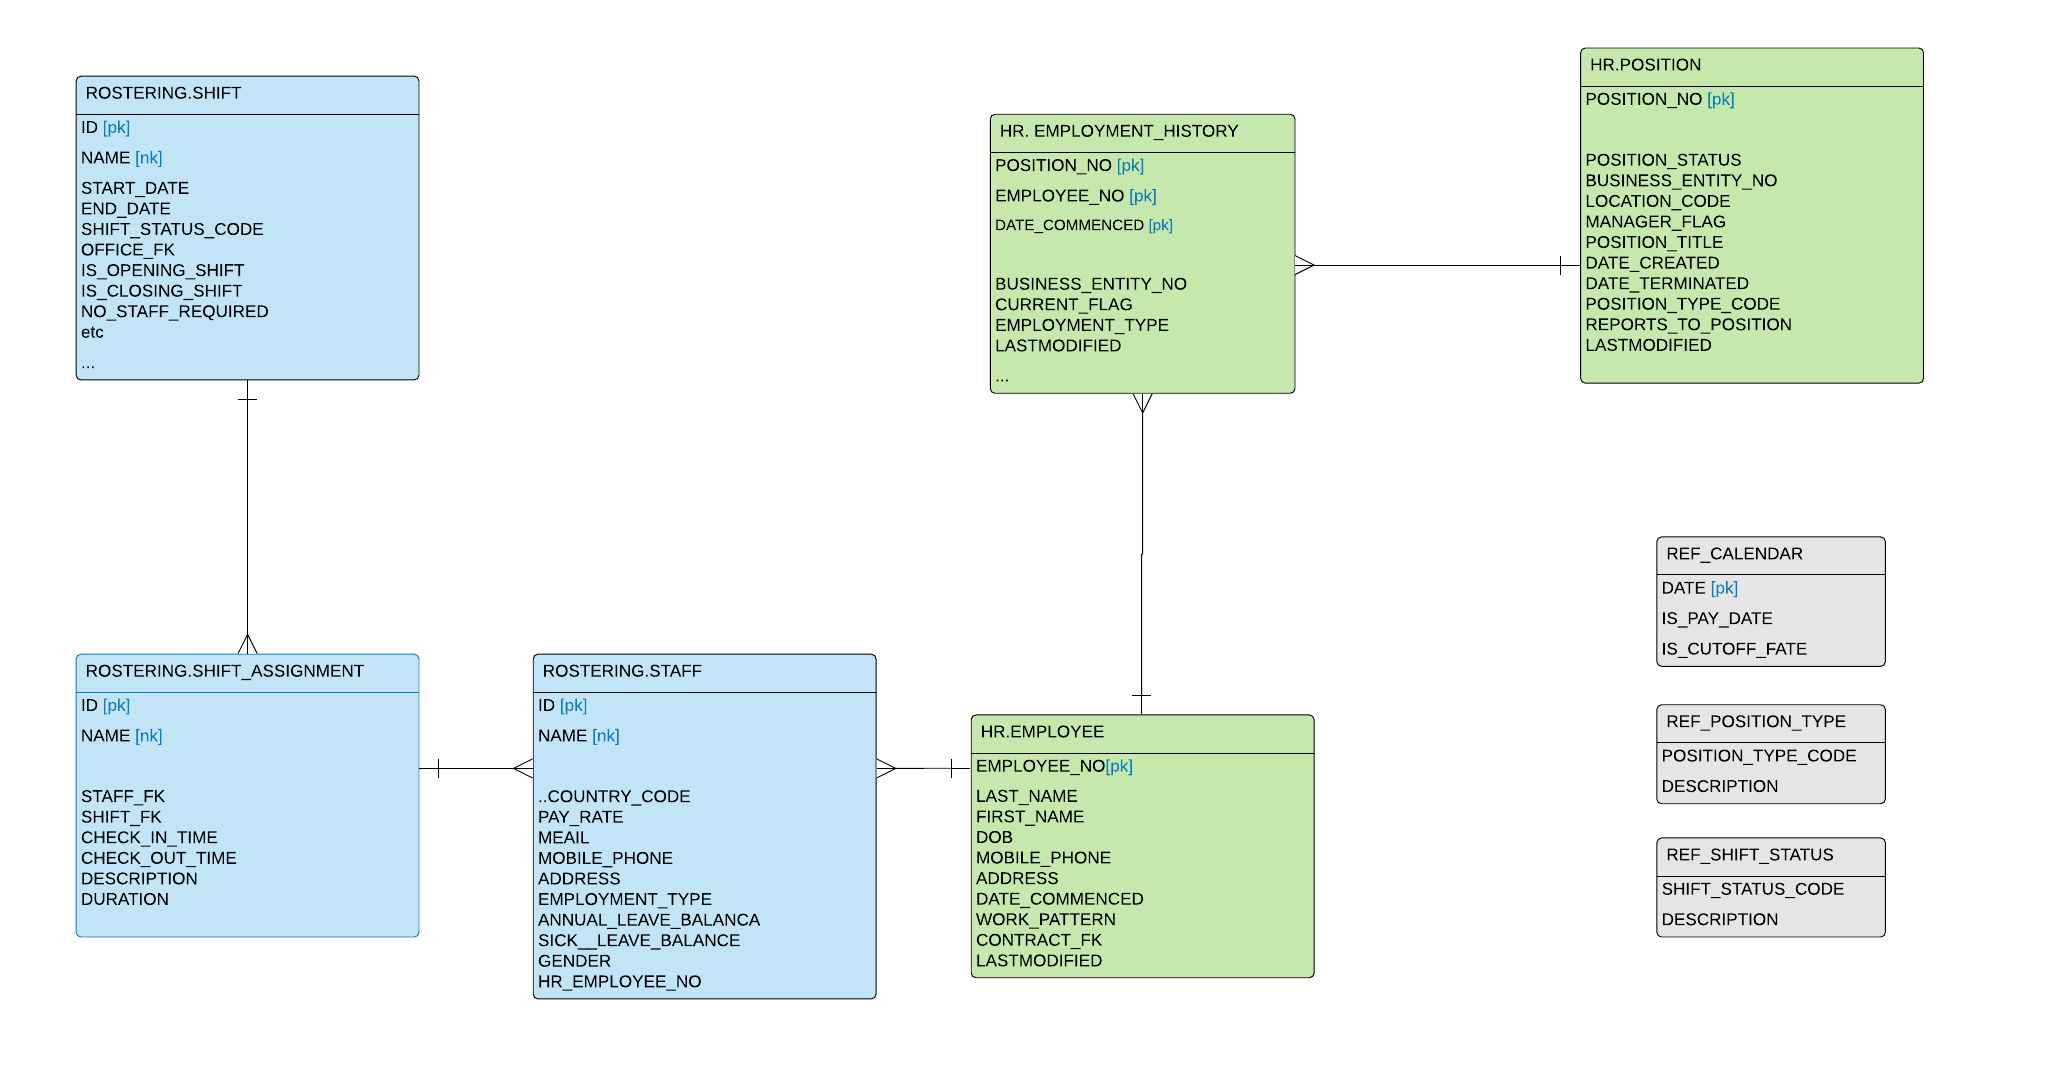
From the discovery session, we found out that we will be touching on two source systems:
- Rostering – used for scheduling shifts and allocating resources
- Tables needed:
- shift – contains details of recurring shifts
- shift_assignment – contains details of shift assignments – individual employees getting assigned to the shift
- staff – contains details of staff members on a roster
- shift_status – contains codes and descriptions for shift statuses
- Tables needed:
- HR – used to manage employment lifecycle
- Tables needed:
- employee – details of employee
- business_entity – details of organizational units
- position – position descriptions and their reporting lines
- position_type – contains codes and descriptions for positions
- employment_history – history of positions held by each employee
- payroll_calendar – calendar tables with flags against pay dates and cutoff dates for submitting employee timesheets.
- Tables needed:
This was a great increment to get started with for a couple of reasons:
- It answered a high-priority question for the business
- By starting with arguably the most challenging part of the Data Vault methodology and its technical implementation – integrating data from multiple source systems – we aim to test and prove that our architecture and technology implementation is fit for purpose.
Phase 2. Modelling
Now that we did a bit of prep work and got a high-level overview of the question at hand and the sources needed, it’s time to model our Data Vault. We will do it in 8 steps. You can find a great overview of the steps in this guide authored by Hans Hultgren.
Step 1. Identify Core Business Concepts (CBC) for the organization
The backbone of the Data Vault consists of core business concepts (CBC) and their relationships. Those concepts or entities are identifiable and fundamental to the whole organization “Persons, Events, Things, Places, Other Concepts”. For example: Sale, Product, Employee, Shift, Invoice and etc. Have a read through Ensemble Modeling blog post by Hans Hultgren, and, while you are at it, have a look at his other posts as well. Those concepts can exist in many data sources in all kinds of shapes and sizes, but only combining those data sources and modelling after the business entities can give us a holistic view of the business.
The first step is identifying which core business concepts exist in our increment. There is one important thing to remember: The driver of the Core Business Concept is… business. We need to select a grain of abstraction that the business is using. For example, only one of the following would be a CBC:
- Person
- Contact
- Customer
Answer: Customer.
Why? Both Person and Contact are very high level of abstraction with plenty of “sub-types” and “roles” such as Customer, Employee, Contractor and Vendor, each with a radically different meaning to the business. Thus, Person and Contact entities are not discussed, reported on, used, managed, seen or heard by the business. Customer, on the other hand, is meaningful to the business, is used by the business, is discussed by the business and is uniformly understood across the business.
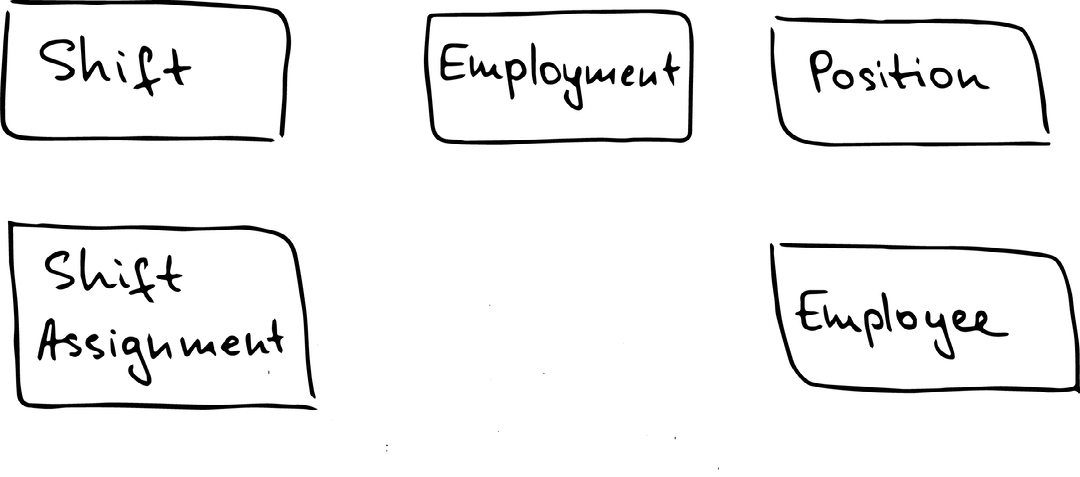
What are CBCs in our increment?
Answer:
- Shift
- Shift Assignment
- Employee
- Position
- Employment
It is not:
- Calendar
- Calendar table contains a list of dates with some helper columns, describing those dates. Calendar on its own has no value to the business, does not represent a business object, and thus has meaning only when referenced somewhere else, providing description and context.
- Resource
- Both Resource and Employee tables describe the same business entity – Employee. We went with Employee CBC as it has a universal understanding within the company, while Resource is a term used only within one source system (Rostering).
Step 2. Identify Hubs
This step is the easiest one, as each of the Core Business Concepts identified in the previous step will have its own Hub in our Data Vault.
Disclaimer: at this stage we need to be careful NOT to base our model on any of the existing source systems and NOT to try and fit the source data into the model or, what’s worse, adjust the model to fit the source data. What we are currently doing is a modelling exercise and not the engineering one. At the end of this step we want to draw the blocks for each Hub of the CBCs identified in the previous step like so:
Step 3. Establish business keys for Hubs
Business keys should be meaningful to business users and as such should not depend on the source system and should not vary from one system to another. It’s a good idea to ask business users the following question for each of the core business concepts identified: “How do you identify, track and locate information?”. Keep in mind, that primary keys are not always aligned with business keys. For example, Vehicle table can have the following primary key and business key:
- ID [pk – primary key]
- Value example: 1234567
- Sequence number generated by the source system to uniquely identify one record
- Of interest only to the technical users
- Used as a foreign key in other tables
- RegoNo [bk – business key]
- Value example: AKS123
- Vehicle registration number, meaningful across the business
- Used by the business to track and locate a unique vehicle
It is worth noting that sometimes a business key can only be defined as a set of attributes. For example, it is not enough to know the course code to uniquely identify a course: the uniqueness can be achieved only by combining Year, Semester and Course Code. Hubs are not required to have a business key defined within one field – we can have a separate field for each part of the business key within the Hub (have a look at our Employment Hub). Remember, regardless of what the system is using, we will ALWAYS go with the field(-s) that are meaningful to the business. For our case study, here is a list of identified hubs and their respective business keys:
- Shift:
- name
- Shift Assignment:
- name
- Employee:
- employee_number
- Position:
- position_number
- Employment:
- employee_number, position_number, date_commenced
Step 4. Establish hashed keys for Hubs
According to the methodology, we always need to hash a business key. This hashed key will be used in all Hubs, Links and Satellites. Sounds easy as… as long as the source system is using business keys as foreign keys. Unfortunately, that is rarely the case: for example, our Shift table has ID as a primary key and NAME as a business key; thus ID column is used to refer from one table to another (foreign key). This type of misalignment between the source system and the business is quite common. How do we deal with it?
In a nutshell, we can apply transformations to the raw data moving into the Data Vault as long as these transformations do not change the grain or the content of individual fields. This means we are ok to optimize the storage and apply static alignment rules by:
- Removing true duplicates
- Aligning data types
- Normalizing / denormalizing
- And… joining tables to bring in needed columns.
The last point is what we need to do in our case to align the sources with the business:
- We need to pre-join every table to get them to use business keys as a foreign key instead of the source system’s primary keys.
- The pre-joining part equates to applying hard business rules as it doesn’t interpret the data or changes its meaning – it merely aligns the data based on business keys.
- But this will require us to do a lot of joins, as all foreign keys in all tables in our increment will need to be replaced with business keys.
- This is a default option, albeit not a tasty one.
The only alternative to the hassle of joining the tables on each other is straying away from the Data Vault best practices and:
- keeping business keys the same, but applying hashing to the primary keys of the source system
- Business keys will be visible in the Hub, while HASHED_KEYs in Hubs, Links and Satellites will be based on the primary keys of the source system
(!) This is an exception, not a rule! It is not recommended per the methodology and as such, should be carefully considered before implementing.
Step 5. Model Hubs
Each Hub is a list of business keys and will contain at least 4 columns:
- Hashed key
- Business key (1 or more)
- Source
- Load_ts
We have already identified Hubs in Step 2, figured out business keys in Step 3 and identified which key to hash in Step 5. All we need to do is put it all together on one diagram. This is how our model will look at this stage:
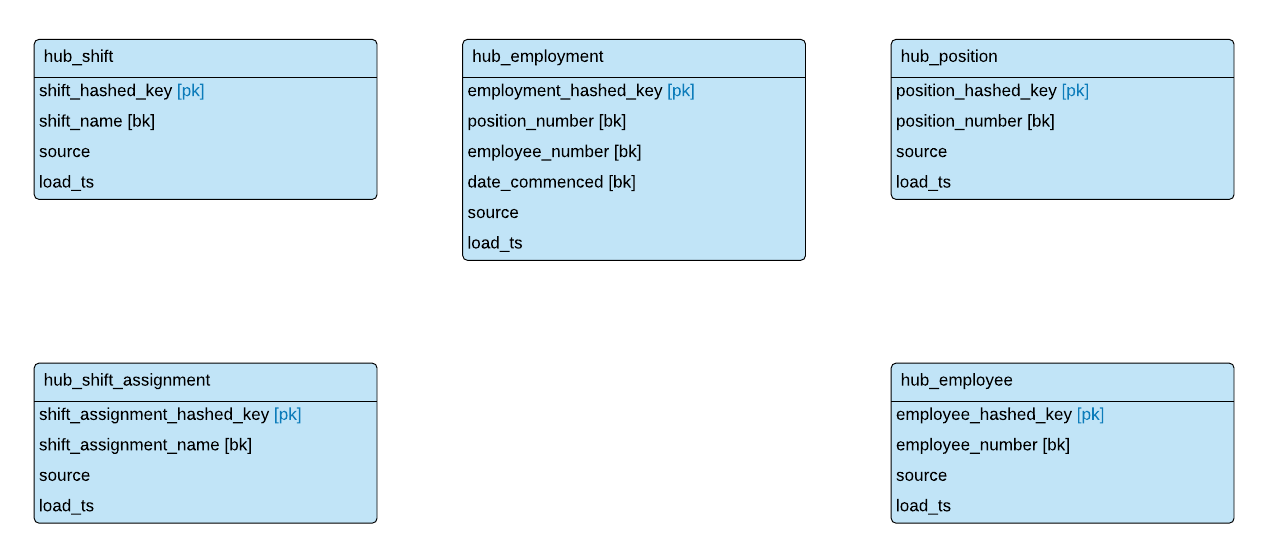
Here are the naming conventions we came up with for our Hubs:
- Table name:
- HUB_<business_entity>
- Hashed PK
- <business_entity>_HASHED_KEY
- Business Key
- <business_entity>_<field_name>
Step 6. Identify business relationships between Hubs
To model the links, we need to understand the nature of the relationships between core business concepts (now present in our Hubs). Note that the relationship can associate 2, 3 or more business concepts. The more concepts are in association, the finer is the granularity. It is up to us to decide which grain makes sense for the business. At this stage, we will aim to describe each relationship as a phrase. After checking in with business and inspecting source systems’ ERD, these are the relationships we identified:
- Shift Assignment record is created when an Employee is allocated to the Shift. Shifts can be allocated to more than one Employee, and an Employee can be allocated to multiple Shifts.
- Shift Assignment <=> Shift
- Shift Assignment <=> Employee
- An Employee holds a Position for a set period of time, can change Positions and can hold multiple Positions at one time.
- Employee <=> Position <=> Employment
- An Employee reports to the supervisor.
- Position <=> Position (hierarchy)
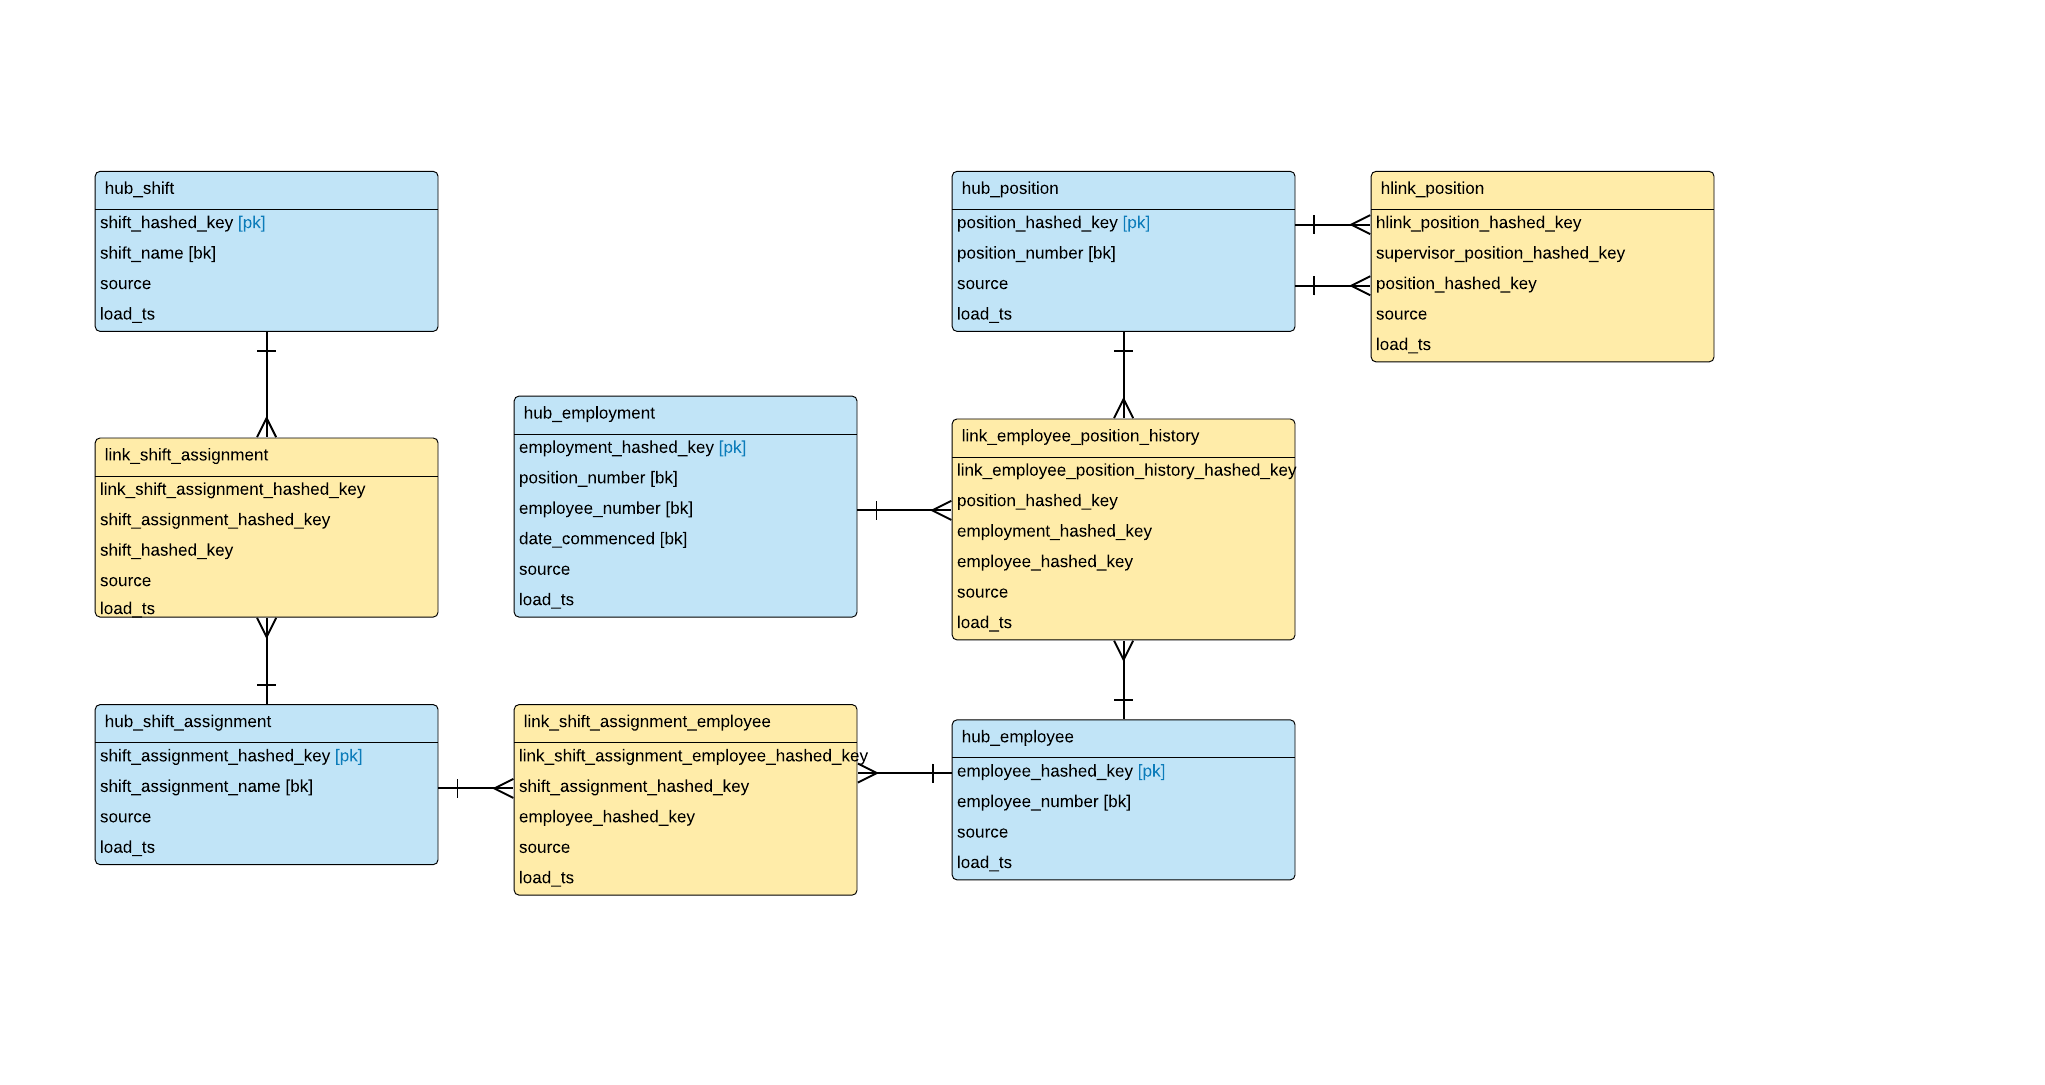
Step 7. Model Links
Now is the time to connect the dots and create Link tables between related Hubs. Each Link table will contain:
- Hashed PK
- Hashed primary key to uniquely identify one instance of a relationship
- Created by concatenating two primary keys from participating hubs and hashing them
- Hashed FKs
- FKs of associated hubs
- Load_ts
- Source
- Source system and table name holding both FKs for this relationship
Here are the naming conventions we used:
- Table name:
- LINK_<business_entity_1>_<business_entity_2>
- HLINK is used if the relationship is hierarchical in nature
- Hashed PK
- LINK_<business_entity_1>_<business_entity_2>_HASHED_KEY
- Hashed FKs
- <business_entity>_HASHED_KEY
- Same naming as Hashed PK in the respective Hub
And this is our Data Vault model, expanded with Link tables:
Step 8. Identify context attributes for each Hub
Hubs and Links are the backbones of our Data Vault. Now we need to add the context. So far we’ve looked at only a handful of fields from our source system tables. Those fields are natural business keys, primary keys, foreign keys. Now it’s time to deal with all other fields in the tables: fields that contain descriptive data.
Splitting fields into Satellites
How do we split these descriptive fields into satellites?
- Split by the source table and source system:
- We always split by the source table. This gives us a bunch of benefits, such as:
- When adding a new source system, we don’t need to modify existing satellites.
- We can parallel load those satellites.
- We can audit and track history per source table.
- For each Hub or Link there should be at least as many satellites as there are source tables;
- We always split by the source table. This gives us a bunch of benefits, such as:
- Split by the rate of change:
- Attributes with different rates of change should potentially be stored in different satellites.
- We split by the rate of change only when absolutely necessary, as the main benefit of more efficient storage rarely outweighs the effort of profiling the data and determining the optimal split.
- PS: Check out this excellent article on “Splitting Satellites based on Rate of Change.”
- As always, our rule of thumb: do it simple now and don’t over-engineer it.
- Split by data classification:
- Sometimes it makes sense to split the attributes based on the type of data stored: one satellite for all geographical data (such as addresses, lats and longs), one satellite for descriptive data, one satellite for status data etc.
- Consider this split as well and implement it only if it makes sense for the business.
Identifying columns for version-control
This is less of a modelling task, and more of a technical task, but I wanted to mention it either way as it might help us understand the modelling of satellites a bit better.
Last thing worth considering is, we need to decide on what goes into the HASHDIFF column. This column is used to detect the changes in descriptive attributes of a business entity. In other words, if the value of hashdiff column changed, then at least one of the descriptive attributes in the satellite has changed.
So far, we have two options for the combination of columns that go into our hashdiff:
- Hash key and last modified timestamp:
- If we have last_modified_date in our source table, it makes sense to use it to identify if the record has changed or not.
- Thus, we’ll concatenate and hash:
- Key used to uniquely identify the record:
- primary key (used by source system) or business key
- A column with last modified timestamp
- Key used to uniquely identify the record:
- Note that this method can only be used if we have one satellite per source table
- The preferred method, as we use just one column to identify if the change occurred or not. However, not all source systems have it… in which case we’ll go with the second option…
- Hash all columns:
- We concatenate and hash:
- Key used to uniquely identify the record:
- primary key (used by source system) or business key
- All other descriptive attributes in the table
- We will use this method if:
- we have more than one satellite per source table
- We don’t have last modified timestamp column available
Remember, you will have a hashdiff column in every satellite, and the hashdiff column will be unique for each satellite. And this is our Data Vault model, now expanded with Satellite tables:
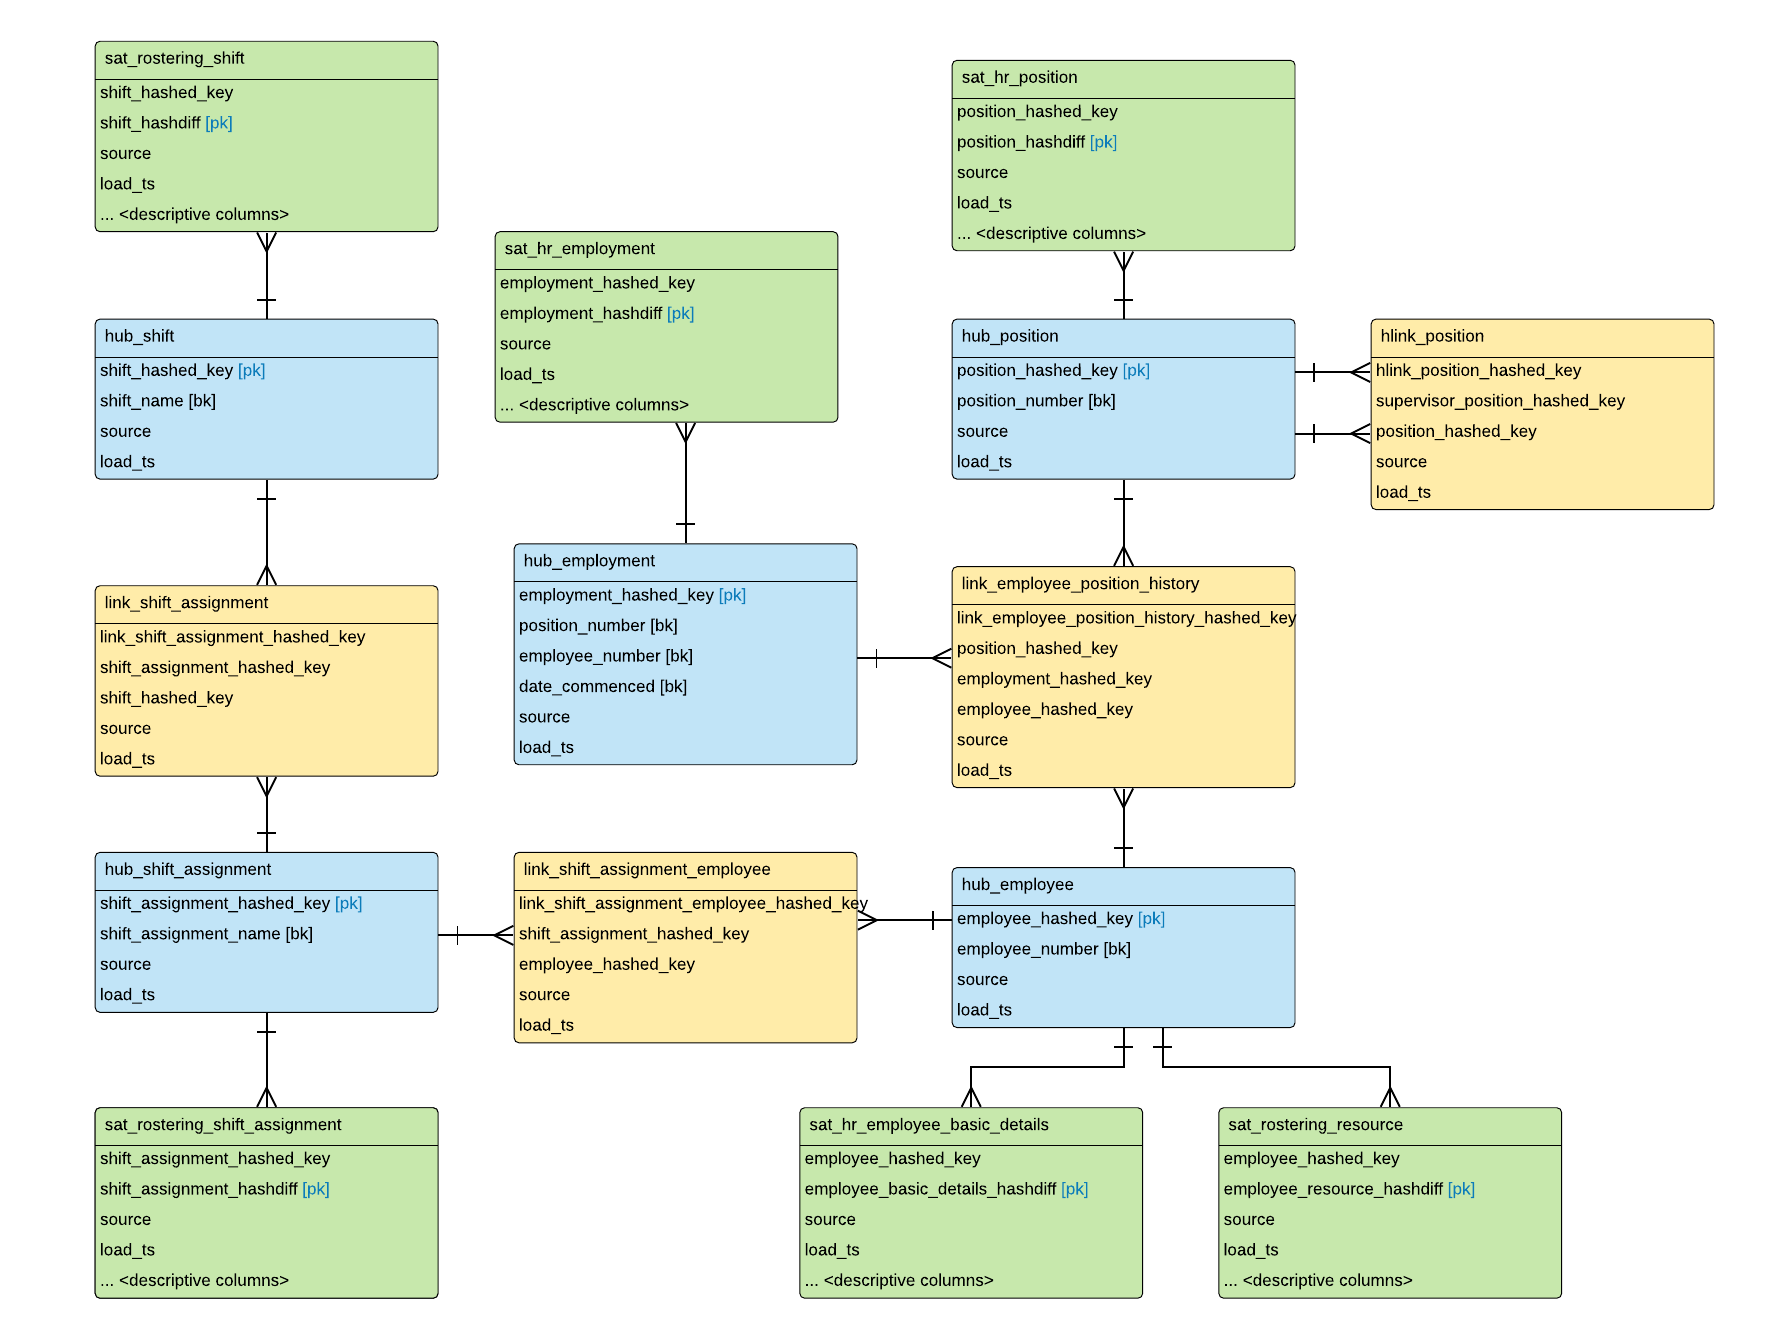
Here are the naming conventions we used:
- Table name:
- SAT_<source_table>_<optional – classification>_<optional – rate_of_change>
- <rate_of_change> options: LRC (low), NRC (none), HRC (high)
- For example:
- SAT_EMPLOYEE_BASIC_DETAILS_LRC (low rate of change)
- SAT_SHIFT
- SAT_SHIFT_STATUSES
- Hashed PK
- LINK_<business_entity_1>_<business_entity_2>_HASHED_KEY
- Hashed FKs
- <business_entity>_HASHED_KEY
- Same naming as Hashed PK in the Hub
- Hashdiff:
- <business entity>_<optional – source_system>_<source_table_name>_HASHDIFF
- Descriptive columns:
- As-is in the source system, with snake_case applied for consistency
Wrapping up
We only lightly touched on the basic steps to model the Data Vault – there is still so much to cover! If you’d like to know more about the methodology, its pros and cons, tools to use for its implementation and lessons learned, feel free to reach out anytime for a chat!
