Written by David Liebert and Michael Diender
Background
I recently provided technical expertise in a team responsible for deploying, configuring and securing Vertex AI User Managed Notebooks (UMNs) in an enterprise-scale commercial environment. Our client possessed a sizable and skilled Machine Learning team utilising on-premises resources. However, the business sought a consistent, secure, and easily automated migration to the cloud. Given the client’s substantial Personally Identifiable Information (PII) and stringent security standards, it was crucial to provide a comprehensive solution with clear explanations of its functionality.
Recent Update
Vertex AI User Managed Notebooks are being deprecated in favour of Vertex AI Workbench Instances (https://cloud.google.com/vertex-ai/docs/workbench/instances/introduction). This is an incremental evolution and I believe that the information presented here remains relevant.
Key Areas of Focus
In this document, I’ll share valuable insights gained from our experiences in securing Vertex AI UMNs in an enterprise-scale commercial environment. These lessons cover various aspects, including:
- UMN Network Connectivity
- The UMN Post-Startup Script
- The Local Disk Mount Process
- The UMN Upgrade Process
- Data Disk Synchronisation Mechanism
- Understanding the Security of the Local Jupyter Account
While these are not the only challenges encountered, and the scope of this document is limited in depth, the lessons shared here will provide useful shortcuts and insights for others embarking on similar projects.
By leveraging these lessons learned, organisations can strengthen the security of their Vertex AI UMN deployments, ensuring compliance with industry standards and safeguarding sensitive data and assets.
Understanding UMN Network Connectivity
If you’re familiar with UMNs, you will recognise this screenshot of a newly created instance.
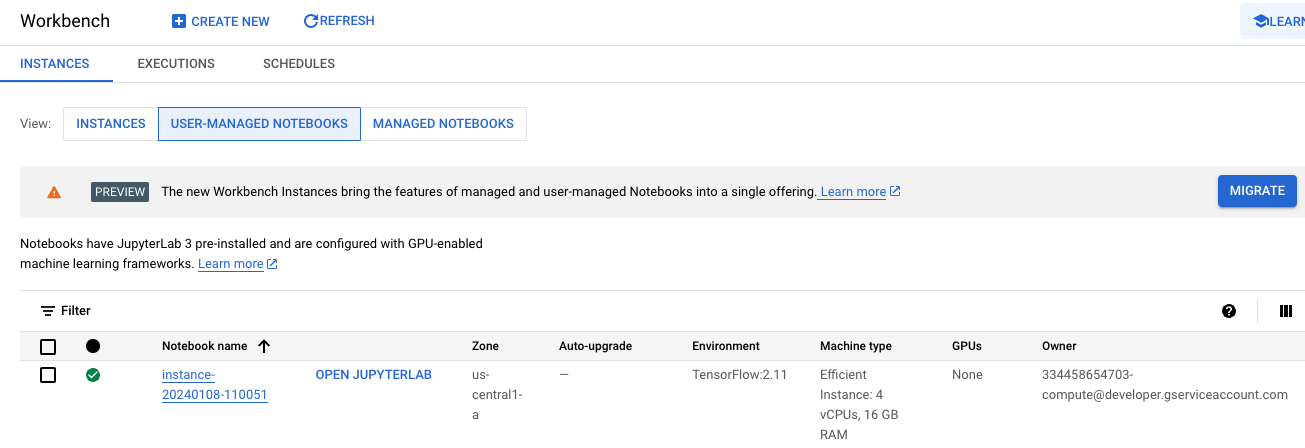 From this screen, you can click on OPEN JUPYTERLAB to launch a Jupyter instance. This instance looks and works much the same as a Jupyter instance running locally.
Delving one layer deeper, if you navigate to Compute Engine > VM Instances, you will find a new VM that serves as the underlying infrastructure for the UMN:
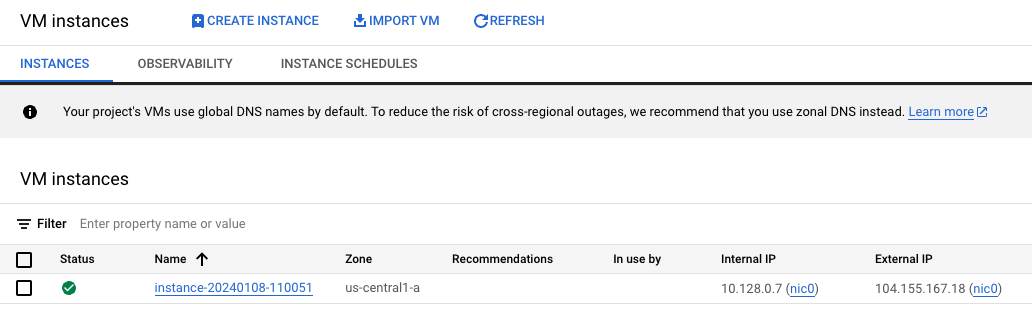
Initially, I assumed that the OPEN JUPYTERLAB link would connect to the external IP address of the underlying VM. However, upon hovering over the link, I discovered that it actually directs to a DNS address within the domain notebooks.googleusercontent.com. This DNS address is associated with an IP address range used by Google infrastructure.
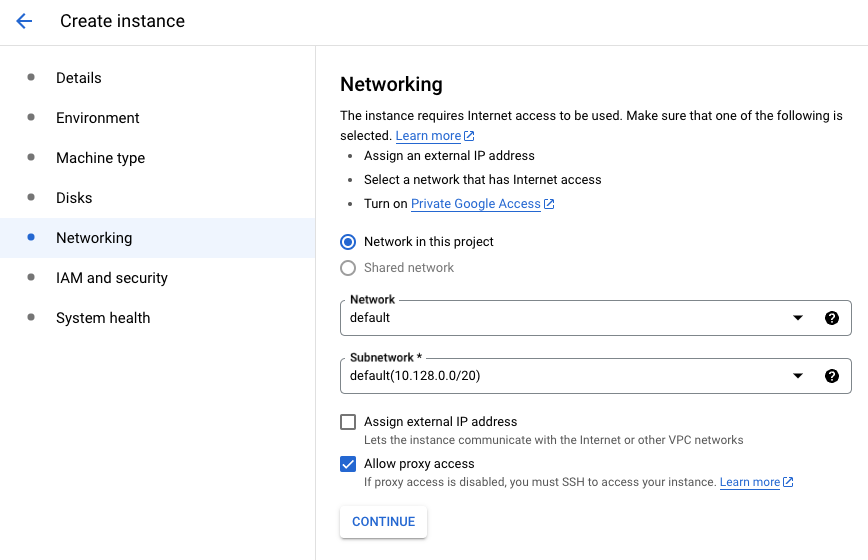
To my surprise, I discovered that when creating a UMN, there’s an advanced option to prevent the assignment of an external IP address to the UMN (and its underlying VM). Interestingly, even without a public IP address configured, the OPEN JUPYTERLAB link still establishes a connection over the public Internet. This raises the question: how is it possible to connect to a UMN over the public Internet if it lacks an external IP address?
 To provide a clear explanation to my client’s security team, I connected to the GCE instance and examined the established TCP connections before initiating a JupyterLab session.
(base) root@example6:~# netstat -nap | grep EST
tcp 0 0 10.152.0.63:34612 172.217.24.46:443 ESTABLISHED 1136/proxy-forwardi
tcp 0 0 10.152.0.63:45216 169.254.169.254:80 ESTABLISHED 1136/proxy-forwardi
tcp 0 0 10.152.0.63:59830 169.254.169.254:80 ESTABLISHED 487/google_osconfig
tcp 0 0 10.152.0.63:22 35.235.241.82:38109 ESTABLISHED 1566/sshd: david_li
tcp 0 0 10.152.0.63:59798 169.254.169.254:80 ESTABLISHED 504/google_guest_ag
After launching the JupyterLab session, I re-examined the TCP connections:
(base) root@example6:~# netstat -nap | grep EST
tcp 0 0 10.152.0.63:34612 172.217.24.46:443 ESTABLISHED 1136/proxy-forwardi
tcp 0 0 10.152.0.63:45216 169.254.169.254:80 ESTABLISHED 1136/proxy-forwardi
tcp 0 0 10.152.0.63:59830 169.254.169.254:80 ESTABLISHED 487/google_osconfig
tcp 0 0 10.152.0.63:22 35.235.241.82:38109 ESTABLISHED 1566/sshd: david_li
tcp 0 0 10.152.0.63:59798 169.254.169.254:80 ESTABLISHED 504/google_guest_ag
tcp6 0 0 ::1:37380 ::1:8080 ESTABLISHED 1136/proxy-forwardi
tcp6 0 0 ::1:8080 ::1:37380 ESTABLISHED 1220/python3
tcp6 0 0 ::1:37396 ::1:8080 ESTABLISHED 1136/proxy-forwardi
tcp6 0 0 ::1:8080 ::1:37396 ESTABLISHED 1220/python3
Observations:
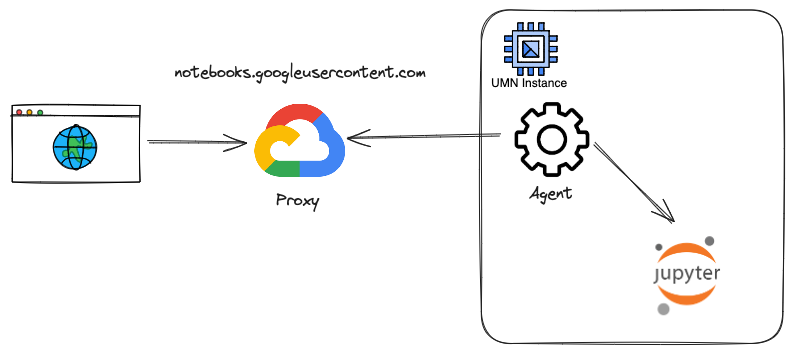
- The connection to the JupyterLab notebook originates from a local process named proxy-forwarding-agent via the IPv6 loopback address (::1).
- There are no incoming connections to the UMN from the Internet.
- An outgoing TCP connection exists from the proxy-forwarding-agent process to the 172.217.24.46 address within the notebooks.googleusercontent.com DNS domain.
Connectivity Mechanism:
- Google provides an endpoint on its infrastructure within the notebooks.googleusercontent.com domain.
- Upon UMN startup, a service called proxy-forwarding-agent establishes an encrypted tunnel over TCP port 443 to the Google endpoint.
- The UMN obtains the endpoint address by querying the Google metadata service, explaining the connections to the 169.254.169.254:80 address.
- This mechanism effectively functions as an SSL VPN.
- As long as the UMN has outgoing Internet access (including via Private Google Access), it can establish this tunnel, allowing incoming connections to the Jupyter port, which only listens on the local loopback address.
Having discovered the existence of the proxy-forwarding-agent, a Google search revealed the inverting-proxy (https://github.com/google/inverting-proxy), which appears to describe the implementation exactly.
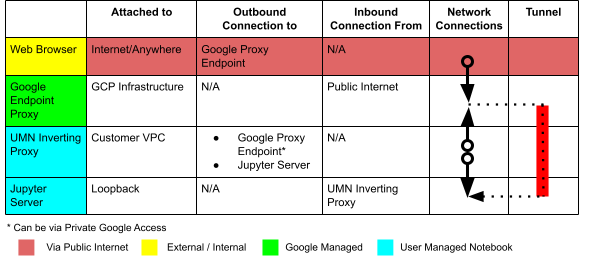
The table and diagram below present a simplified overview of the UMN connectivity mechanism, tailored to the interests of security auditors:
 Understanding the UMN Post-Startup Script
Google Cloud documentation mentions the availability of a post-startup script for UMNs. To clarify any confusion, the UMN post-startup script is distinct from the startup script on the underlying Google Compute Engine (GCE) instance. They serve different purposes and operate independently.
The UMN post-startup script functionality is driven by the /opt/c2d/c2d-startup script, which relies on a flag file located at /root/google_vm_config.lock. The presence or absence of this flag file determines whether the configured UMN post-startup script will be executed.
Key Points:
- The UMN post-startup script is only executed when the UMN is first created or after an upgrade, which recreates the boot disk of the underlying GCE instance.
- Deleting the /root/google_vm_config.lock flag file and rebooting the UMN forces the execution of the post-startup script.
This knowledge is crucial for testing UMN deployments. By understanding the behaviour of the post-startup script, you can ensure that it is executed as intended during testing and that any necessary configurations or modifications are properly applied.
The Local Disk Mount Process
Each UMN is created with a boot disk and a data disk. This configuration can be observed by examining the storage section of the underlying GCE instance:
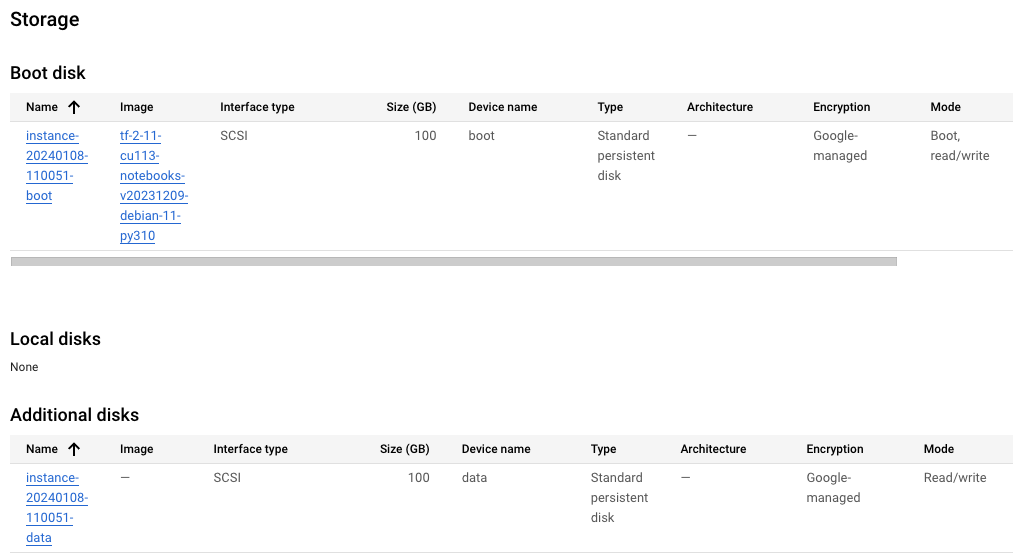 One intriguing aspect of UMNs is the mounting of the data disk. Unlike traditional operating systems, the data disk is not configured as a normal mount point in /etc/fstab. Instead, the mounting process is controlled by the script /opt/c2d/scripts/00-setup-api-services.sh
By understanding the data disk mounting mechanism, you can gain insights into the inner workings of a UMN and troubleshoot any issues related to data disk accessibility or configuration. Moreover, the mount point for the data disk, /home/jupyter, is of particular significance when it comes to explaining the UMN upgrade process.
The UMN Upgrade Process
While Google’s documentation provides a general overview of the User Managed Notebook (UMN) upgrade process, it may not fully align with real-world observations and the underlying scripts. To ensure a successful and seamless upgrade, consider the following points:
- Boot Disk Replacement: During an upgrade, the existing boot disk is replaced with a new one, containing an updated operating system, JupyterLab installation, and other essential components.
- Data Disk Preservation: The original data disk is retained throughout the upgrade process and remains mounted at /home/jupyter. This ensures that user data, notebooks, and code are preserved.
- Snapshot Creation: As part of the upgrade, a snapshot of the original boot disk is automatically created, allowing you to roll back to the previous version if necessary. However, it’s important to note that old snapshots are not automatically deleted, so periodic cleanup may be required.
- UMN Instance State: The upgrade process is launched by the UMN instance itself. Therefore, the instance must be in a running state for the upgrade to be performed successfully. This needs to be considered when combining an automatic upgrade schedule with an idle shutdown configuration.
Recommendations:
- Consult Underlying Scripts: To gain a deeper understanding of the upgrade process, examine the relevant scripts within the /opt/c2d directory. This can provide valuable insights into the specific steps and actions performed during an upgrade.
- Testing and Validation: Thoroughly test the upgrade process in a non-production environment to verify its behaviour and ensure that your data and configurations are preserved as expected.
- Snapshot Management: Regularly review and manage old boot disk snapshots to avoid unnecessary storage consumption.
By following these recommendations, you can effectively navigate the UMN upgrade process and maintain a stable and secure environment for your machine learning workloads.
Data Disk Synchronisation Mechanism
UMNs offer the ability to synchronise the contents of the data disk to a Cloud Storage bucket. This synchronisation mechanism allows UMN users to maintain a backup copy of their work in a Google Cloud Storage bucket, ensuring Jupyter environment preservation in the event of UMN deletion.
Key Points:
- Synchronisation Script: The data disk synchronisation process is managed by a systemd service called gcs_sync.service, which is created by a script located at /opt/c2d/scripts/00-setup-api-services.sh.
- Synchronisation Command: The synchronisation process is executed using the gsutil rsync command
- .gsutil -m rsync -r -u -e -d -x “.*\.cache/.*|.*\.local/.*|.*\.ipynb_checkpoints/.*|.*\.~.*|.*\.jupyter/.*|.*\.ipython/.*” /home/jupyter “gs://${gcs_data_bucket}/”
- Synchronisation Exclusions: Certain directories and files are excluded from synchronisation based on predefined regular expressions. These exclusions are intended to prevent the synchronisation of temporary or sensitive data.
Synchronisation Requirements:
For successful data disk synchronisation, the following conditions must be met:
- Data synchronisation must be properly configured.
- The target storage bucket must have the appropriate permissions. (The rsync process runs under the GCE instance’s service account.)
- User data must be stored within the /home/jupyter directory.
- Don’t store files in excluded directories that you want synchronised.
Security and the Local jupiter Account
Our client prioritised the principle of least privilege for users accessing their UMN. To achieve this, they opted to disable sudo access. This is one of several restrictions that can be configured:
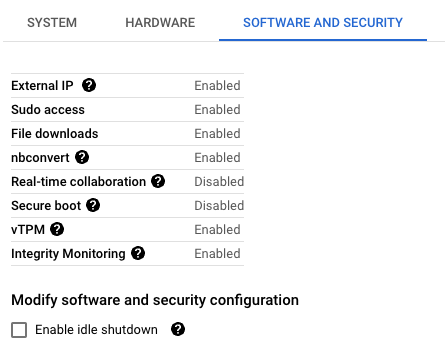
While implementing the principle of least privilege is a commendable goal for enhancing security in UMNs, it’s important to maintain a realistic perspective on the limitations of such restrictions. Disabling sudo access may not fully prevent users from escalating their privileges or bypassing security measures. Users with sufficient technical knowledge can potentially find ways to elevate their privileges and gain access to restricted resources. Furthermore, Docker is enabled on all Google provided images which has security implications which should be taken into account.
The Jupyterlab Terminal provides access to a wide range of tools and utilities that are essential for data exploration, analysis, and development tasks. Restricting access to the command line can severely hinder the productivity and effectiveness of UMN users. It’s important to implement security measures that are proportionate to the risks and prioritise the needs of legitimate users.
To ensure the security of UMNs and safeguard sensitive data, organisations should adopt a defence-in-depth strategy that incorporates multiple layers of protection. Provide comprehensive training and documentation to educate UMN users on secure practices. Implement RBAC to assign users specific roles with predefined permissions. Establish mechanisms to monitor and audit user activities within UMNs. Take a zero trust approach with UMNs by assuming that all users and devices are untrusted until their identities and access rights are verified. Configure network firewalls and VPC service controls to restrict access to UMNs only from authorised networks and devices.
Summary
In this document, I have explored the key areas that require attention to ensure the security of UMNs in enterprise environments. By focusing on these critical aspects, organisations can safeguard sensitive data, mitigate security risks, and maintain compliance with industry regulations.
