
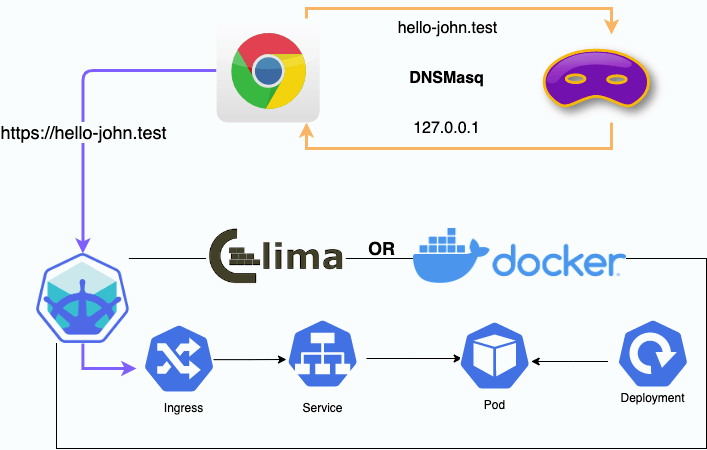
Setting up a local Kubernetes environment locally can sometimes be a struggle, especially when trying to access workloads to test your application’s functionality.
In this article I will show you the following:
- Setup Dnsmasq for resolving a .test domain for development/test purposes
- Use MKCERT for locally-trusted development certificates
- Create a Minikube Kubernetes Cluster
- Configure Minikube Ingress
- Deploy a hello-world app that has TLS enabled
Prerequisites
All you need is Docker (or similarly compatible) container or a Virtual Machine environment and Minikube.
To install any required applications I have used Homebrew.
Step 1 Minikube Install
brew install minikube
Step 2 DNSMasq
homepage: dnsmasq
Dnsmasq is a lightweight, easy to configure DNS forwarder, designed to provide DNS services to a small-scale network.
We will use this to resolve the Domain of .test. So for any of the applications we deploy to our minikube cluster will resolve nicely, so we can visit https://hello-john.test
Step 2.1 DNSMasq Install
brew install dnsmasq
Step 2.2 DNSMasq Config
Configure DNSMasq to resolve the .test domain to our localhost ip address of 127.0.0.1
For M1 users
echo “address=/test/127.0.0.1” >> /opt/homebrew/etc/dnsmasq.conf
For Intel users
echo “address=/test/127.0.0.1” >> /usr/local/etc/dnsmasq.conf
Restart DNSMasq
sudo brew services restart dnsmasq
Step 2.3 Configure MacOS DNS resolving for .test domain
MacOS also allows you to configure additional resolvers by creating configuration files in the /etc/resolver/ directory. This directory probably won’t exist on your system, so your first step should be to create it:
sudo mkdir -p /etc/resolver
Create the domain file
sudo tee /etc/resolver/test >/dev/null <<EOF

nameserver 127.0.0.1

EOF
Once the file is created, OS X will automatically read it.
Make sure you haven’t broken your DNS
ping -c 1 www.google.com
Check that the .test name works
ping -c 1 tonys.test

ping -c 1 this.is.a.test
You should see results that mention the IP address in your Dnsmasq configuration like this:
PING this.is.a.test (127.0.0.1): 56 data bytes

64 bytes from 127.0.0.1: icmp_seq=0 ttl=64 time=0.027 ms


--- this.is.a.test ping statistics ---

1 packets transmitted, 1 packets received, 0.0% packet loss

round-trip min/avg/max/stddev = 0.027/0.027/0.027/0.000 ms
Step 3 MKCERT
Using the tool mkcert we can create localised certs for our Kubernetes Cluster.
Step 3.1 MKCERT Install
brew install mkcert
Step 3.2 Setup and Create Certs
mkcert -install \

-cert-file certs/mkcert.pem \

-key-file certs/mkcert-key.pem \

hello-john.test hello-jane.test \

k8s.dashboard.test "*.dashboard.test" \

"*.test" \

localhost 127.0.0.1 ::1
Step 4 Create Minikube Cluster
Run the command below to create a Minikube Cluster with the following:
- Addons:
- ingress
- ingress-dns
- dashboard
- metrics-server
- CPUS: 4
- Memory: 6g
- Nodes: 1
minikube start \

    --addons=ingress,ingress-dns,dashboard,metrics-server \

--cni=flannel \

--install-addons=true \

    --kubernetes-version=stable \

    --vm-driver=docker --wait=false \

    --cpus=4 --memory=6g --nodes=1 \

    --extra-config=apiserver.service-node-port-range=1-65535 \

--embed-certs
Step 5 Configure Minikube Ingress
To access the pods besides running port forwards, we can utilise the minikube addon ingress which installs an Nginx Ingress Controller.
Step 5.1 Add Certs to the cluster
kubectl -n kube-system create secret tls mkcert --key

certs/mkcert-key.pem --cert certs/mkcert.pem
Step 5.2 Configure Minikube Ingress Addon to use Custom Certs
minikube addons configure ingress
at prompt enter kube-system/mkcert
-- Enter custom cert (format is "namespace/secret"): kube-system/mkcert

✅  ingress was successfully configured
Stop and restart ingress addon
minikube addons disable ingress

minikube addons enable ingress
Step 6 Start the Minikube Tunnel
Start the tunnel
minikube tunnel
This will need to always be running to access the workloads inside the Kubernetes Cluster
Step 7 Test Ingress
Step 7.1 Deploy a test hello world app
In a new Terminal, so the Minikube Tunnel keeps running
@kubectl apply -f
https://raw.githubusercontent.com/kubernetes/minikube/master/deploy/addons/ingress-dns/example/example.yaml


curl hello-john.test


Hello, world!

Version: 1.0.0

Hostname: hello-world-app-86d5b6469f-rdqrq
Test https and confirm that the issuer is from mkcert
curl -v https://hello-john.test


...

*  issuer: O=mkcert development CA; OU=tonyh@Tonys-MacBook-Pro.local (Tony Hallworth); CN=mkcert tonyh@Tonys-MacBook-Pro.local (Tony Hallworth)

*  SSL certificate verify ok.

...
Congratulations!
If you have made it here, you should now have a fully accessible Kubernetes cluster for you to test your deployments on. Happy Kubeing 😄
