Organisations can gain access to a wealth of information, including system detections, vulnerabilities, and configurations, by integrating third-party services such as CrowdStrike’s Falcon Query API with security lakes, which have a centralised structure.
In this post, we’ll take you through the logical steps to configure CrowdStrike’s Falcon Query API log’s conversion into parquet files mapped to the OCSF (The Open Cybersecurity Schema Framework) schematic and consolidate them into security lake. We will cover the following topics.
- What is Steampipe and its role in obtaining CrowdStrike’s Falcon API Logs
- Design of the solution
- How to set-up Steampipe with CrowdStrike’s Falcon API
- How to set-up the python script in order to transform the logs obtained into OCSF format
- How to set-up AWS Glue resources and their role in CrowdStrike’s Falcon API Logs
- How to set-up a Amazon Security Lake owned s3 bucket
- How to set up data conversion in AWS Firehose Delivery Stream
- How to send data to Amazon Security Lake?
- The End Result
Note CrowdStrike has the ability to natively integrate with Amazon Security Lake using Falcon Data Replicator (FDR), this integration requires a number of licence subscriptions and is not suited for real time alerting. More information can be found here and here. The solution described in this blog post does not use FDR.
What is Steampipe and its role in obtaining CrowdStrike’s Falcon API Logs?
Unlike Okta System logs, AWS EventBridge does not have any built-in integration with CrowdStrike for streaming data. Hence, a third-party tool, steampipe, will be used to perform queries to CrowdStrike and extract the logs.
Turbot’s open source project, Steampipe, empowers professionals such as software developers, operations engineers and security teams to effortlessly query their preferred cloud services with SQL using a user-friendly command line interface (CLI). Steampipe abstracts away the challenges of extracting logs/data from cloud services with traditional tooling. It facilitates to run custom scripts, ensuring a consistent, exploratory, and an interactive approach across different IaaS, PaaS, and SaaS services.
The key benefit of Steampipe is that organisations have the freedom to customise the content of logs obtained from CrowdStrike. This allows for a more targeted approach in their security data insights.
Cost-effectiveness is another added benefit as organisations can schedule logs to be obtained over a range of time-frames based on their importance. This allows services to be run only when needed, following the pay-as-you-go pricing based on their usage.
Design of the solution
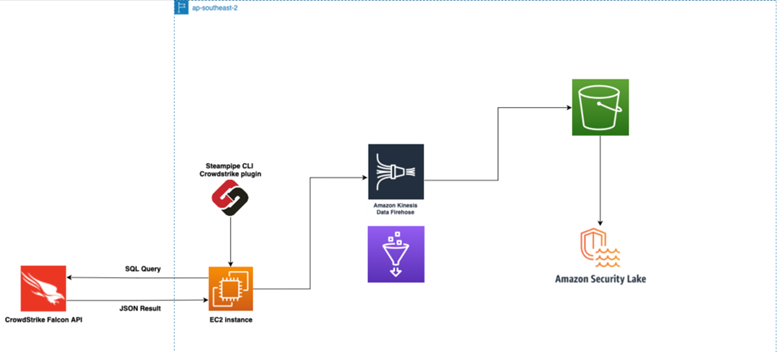
The above is the system architecture of our developed solution to successfully integrate CrowdStrike’s Falcon API logs with Amazon Security Lake.
- An EC2 instance is used to run Steampipe together with a python script to perform automated data transformation and queries to CrowdStrike’s Falcon API.
- The Logs are then sent to AWS Kinesis Firehose to convert them into parquet files using a schema defined in AWS Glue resources.
- The files are finally deposited into an s3 bucket owned by Amazon Security Lake.
How to set-up steampipe with CrowdStrike’s Falcon API
- Within your EC2 instance, Install steampipe onto your machine. The process to do so can be found here on steampipe’s official website. Further Information detailing steampipe’s basic usage can be found here. Once installed, run the below command in your terminal.
steampipe plugin install crowdstrike - Create an API client within Crowdstrike’s Falcon console and select the required access points. The process to set up and define the API can be found here.
- Installing the latest crowdstrike plugin will create a config file (~/.steampipe/config/crowdstrike.spc) with a single connection named crowdstrike.
- Insert the access keys obtained from the created API within the config file’s specified fields, note that these access keys should be securely retrieved from a secrets manager such as AWS secrets manager..
- Create a .sql file and define the SQL query to be used by steampipe to obtain logs through the CrowdStrike Falcon API within the same directory. CrowdStrike’s table definitions and SQL query examples can be found here.
- In our solution, we are querying for open vulnerabilities on our organisation’s systems. The query used in our sql file is as follows:
select
  created_timestamp,
  host_info -> 'hostname' as hostname,
  v.id as vulnerability_id,
  cve,
  app,
  remediation['entities'][0]['action'] as remediation,
  v.status as vuln_status,
  hosts.status as host_status,
  hosts.serial_number as serial_number,
  hosts.local_ip as ip,
  hosts.device_id as device_id
from
  crowdstrike_spotlight_vulnerability as v
  left join
    crowdstrike_host as hosts
    on host_info ->> 'hostname' = hosts.hostname
where
v.status = 'open'
How to set-up a python script in order to transform the logs obtained into OCSF format
The current lack of native integration to convert logs obtained from CrowStrike to the Security Lake accepted OCSF format requires a script to remap key:value pairs initially obtained to conform to OCSF’s standardised schematics. This was accomplished using a python script which
- Extracts json logs obtained from steampipe’s SQL query,
- Remaps them to required values for OCSF’s schema,
- Sends the remapped JSON logs to Kinesis Firehose for conversion to parquet.
Table containing required key values for OCSF security finding category.
|
Name |
Description |
| activity_id |
The normalised identifier of the activity that triggered the event. * CrowdStrike’s logs do not natively contain this value, hence we have defined it in the python script |
| category_uid |
The category unique identifier of the event. * CrowdStrike’s logs do not natively contain this value, hence we have defined it in the python script |
| class_uid |
The unique identifier of a class. A Class describes the attributes available in an event. * CrowdStrike’s logs do not natively contain this value, hence we have defined it in the python script |
| time |
The normalised event occurrence time. |
| finding |
Finding object provides details related to a finding generated by security tool |
| metadata |
The metadata associated with the event. * CrowdStrike’s logs do not natively contain this value, hence we have defined it in the python script |
| severity_id |
The normalised identifier of the event severity. * CrowdStrike’s logs do not natively contain this value, hence we have defined it in the python script |
| state_id |
The normalised identifier of the event status. * CrowdStrike’s logs do not natively contain this value, hence we have defined it in the python script |
| type_uid |
The event type ID. It identifies the event’s semantics and structure. The value is calculated by the logging system as: class_uid * 100 + activity_id. |
How to set-up AWS Glue resources and their role in CrowdStrike’s Falcon API Logs
Kinesis firehose requires a schema to be defined in an AWS glue table in order to map each key:value pair in the JSON logs and transform them to parquet format. The steps below outline our process in creating the glue table and its schema.
- Create an s3 bucket labelled as “crowdstrike-glue-bucket“
- Create a new Glue Database in your AWS console labelled as “crowdstrike-glue-database“
- Create a new Glue Table in your AWS console with the following configuration:
- Table Name: crowdstrike-vulnerabilities
- Database: crowdstrike-glue-database
- Data format: JSON Select the option to manually define a schema.
- Select edit schema as json insert the schema for the logs obtained. In our solution, the schema used can be found here under glue-table-schema.json
How to set-up a Amazon Security Lake owned s3 bucket
Security Lake does not contain native integrations to obtain data from Kinesis Firehose. Instead, we can employ the use of custom sources in order to send the parquet files to Security Lake. The steps below outline how to set-up and configure a custom source for Amazon Security Lake.
- Go to Amazon Security Lake and click on custom sources. Configure the custom source as follows:
- Select create custom source
- Data Source Name: security-lake-CS
- Event Class: CONFIG_STATE
- Relevant account ID that is authorised to write data to your Security Lake. (Only accounts with administrative access are allowed to access Security Lake)
- Leave the rest as default
- An s3 bucket will be created starting with aws-security-data-lake- The custom source folder will be found under /ext/security-lake-CS in the same bucket
How to set up data conversion in AWS Firehose Delivery Stream
Kinesis Firehose is used to convert the JSON logs into the required parquet format for Security Lake. The steps below outline how to set-up and configure the firehose stream.
- Create a new kinesis delivery stream in your AWS console with the following configuration
- Name: crowdstrike-to-security-lake
- Record format conversion: Enabled
- Output format: Apache Parquet
- Input format: OpenX JSON SerDe
- AWS Glue database: crowdstrike-glue-database
- AWS Glue table: crowdstrike-vulnerabilities
- Destination: Security Lake owned bucket created in Step 6 (aws-security-data-lake-)
- Dynamic partitioning: Enabled
- Inline parsing for JSON: Enabled
- Paste in the following under S3 bucket prefix
sourcelocation=!{partitionKeyFromQuery:sourcelocation}/region=!{partitionKeyFromQuery:region}/account=!{partitionKeyFromQuery:account}/eventHour=!{partitionKeyFromQuery:eventHour}/ - Under “Dynamic partitioning keys” fill in the below information:
|
Key Name |
JQ expression |
|
sourcelocation |
.sourcelocation |
|
region |
.region |
|
account |
.account |
| eventHour |
.time |
How to send data to Amazon Security Lake?
To automate our solution, we utilise a script in combination with the built-in tool “cron” within our EC2 instance. This allows us to set a schedule for the collection and transfer of logs to Amazon Security Lake. The steps below outline how to set-up and configure the script.
- Create a crowdstrike_script.sh file and add the following code inside together with the specified changes within the same directory.
# Run the steampipe query steampipe query --output json > crowdstrike-log-output.json

# Run the python script to transform data and send it to kinesis firehose python3 transformer.py
- Update the following values in transformer.py as required and save the file.
- source_location – Source of logs obtained. Default: CrowdStrike
- region – Region logs originate from. Default: ap-southeast-2
- account_id – Your own AWS account ID
- log_file – File path to the .json file Default: crowdstrike-log-output.json
- delivery_stream_name – The name of the Kinesis Firehose delivery stream created above. Default: crowdstrike-to-security-lake
- In your EC2 instance terminal, Type “crontab -e” to open the crontab editor.
- In the editor, add the cron job you want to schedule. The format for a cron job is as follows:
* * * * * command to be executed - - - - - | | | | | | | | | ----- Day of the week (0 - 7) (Sunday is both 0 and 7) | | | ------- Month (1 - 12) | | --------- Day of the month (1 - 31) | ----------- Hour (0 - 23) ------------- Minute (0 - 59)For example, if you want to run the crowdstrike_script.sh every day at 3 AM, you can add the following line:
0 3 * * * /path/to/crowdstrike_script.sh - Save and exit the editor.
- Verify that the cron job has been added by typing crontab -l.
* Note that you will need to have the necessary permissions to edit the crontab file. Also, make sure that the path to your script is correct and that the script has executable permissions. - To run the job ad hoc, run the following within the EC2 instance terminal
bash crowdstrike_script.sh
The End Result
To verify that the process has successfully executed, The logs created will be in apache format and found within the s3 security lake owned bucket created above under the folder: sourcelocation=CrowdStrike/region=<your region>/account=<account ID>/eventHour=<time logs created>
