Introduction
In part one of this series, we discussed how Delta Lake has become the standard data format for a lakehouse architecture, and how to create and write data to Delta Lake tables both locally and on Azure using Rust and the delta-rs library.
In this part, we explore Delta Lake S3 with Rust. Why does S3 deserve its own post? Due to S3 being eventually consistent, Delta Lake S3 requires more effort to set up so that it can handle concurrent writes while providing ACID guarantees. We suggest reading part one before proceeding, as some of the concepts discussed in this post will be much easier to understand.
Setup
We’ll use most of the same tools as we did in part one, but this time we’ll need an AWS account with permissions to create IAM users, S3 buckets, and DynamoDB tables.
The required tools are:
- VS Code (the latest the version the better)
- rust-analyzer extension for VS Code
- Rust compiler/tooling version 1.66.0 or later
The required setup on AWS is:
- An IAM user with an access key ID and secret access key.
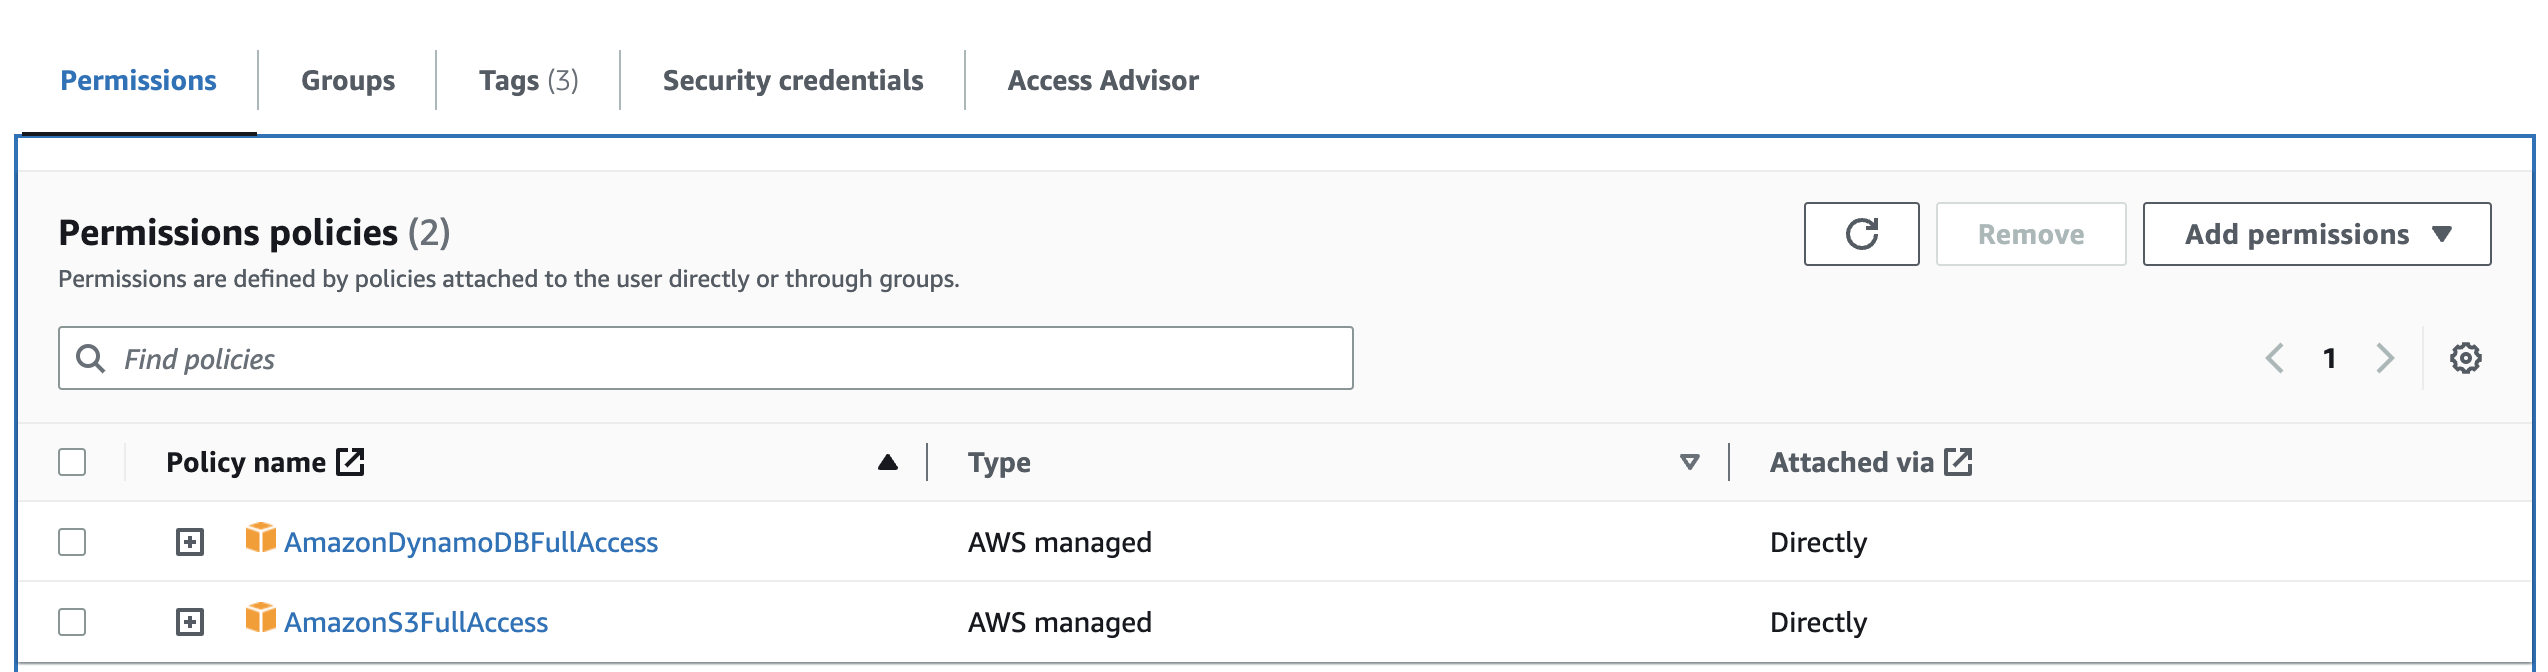
- For demo purposes, attach full S3 and DynamoDB access permissions to the IAM user. This is generally bad practice – you should apply the principle of least privilege when assigning permissions to users and services.
- A fresh S3 bucket with bucket versioning enabled. Versioning is not required (or even recommended) for any Delta-related functionality, but it’s nice to have as we explore certain Delta Lake behaviours. In this post, I will use a bucket named “delta-root”.
Hello delta on S3
Let’s first create an empty Delta Lake table in our S3 bucket. Open an empty folder in VS Code and open the terminal (Ctrl + `).
Inside the terminal, run cargo new rusty-delta-aws to initialise a Rust program. Navigate to the newly created rusty-delta-aws directory in the terminal.
If you run cargo run, VS Code should compile the project and print “Hello, world!”.
Now you have a working bootstrapped application in Rust. Open Cargo.toml file and add the below two lines to dependencies section:
deltalake is the published Rust crate for delta-rs and in our case we have to include s3 as an optional feature. tokio is a dependency for multi-threading and asynchronous programming. Many delta-rs APIs are asynchronous, so we need a runtime to call them, and tokio provides this functionality. The versions are pinned for reproducibility.
Now, edit the main.rs file in rusty-delta-aws/src folder, replacing its contents with the following:
Run cargo build. It will take a few seconds to compile, but it should finish without warnings or errors.
Let’s briefly explain what this program does:
- The “main” function on line 26 defines the table location in the newly created “delta-root” S3 bucket, grabs the AWS access credentials from environment variables, and defines a backend configuration using the credentials
- The “create_table” function is called on line 39 on to create a delta table at the table location with the backend config
- On line 5, the “create_table” function first creates a table builder for a table with id and name columns
- The builder is then called to create the table and return an instance of the newly created DeltaTable
Before running this program, we need to define the environment variables (fill placeholders with your own values) by running the below in your VS Code terminal:
Run cargo run in the terminal to execute the program.

Oops! It did not create a delta table as expected. Although the error message is a bit cryptic, it mentions that there’s a missing lock client for S3 storage.
But why is this error raised? Unlike Azure and GCP storage services, S3 lacks a built-in atomic “put-If-Absent” operation (see the “Adding Log Records Atomically” section in the Delta Lake white paper for more details). In other words, S3 doesn’t provide an operation that puts an object only if it does not yet exist. Delta Lake on S3 must have some extra functionality to implement a locking mechanism required to achieve ACID transactional guarantees. Delta Lake on Databricks handles this extra functionality behind the scenes for users, and by doing so supports writing to the same table from multiple clusters. This is achieved by the Databricks commit service.
For OSS Delta Lake, AWS DynamoDB can be used as a lock client. The Delta Spark connector runs in the context of a Spark application with a Spark driver coordinating all queries. So for Delta Spark, you have the option to work without a lock client if writing from a single cluster. If a table can be written to from multiple clusters, DynamoDB must be used. Because Databricks commit service uses a different locking method, you cannot write to the same Delta Table concurrently from both Databricks and OSS Delta writers. This will most likely result in data corruption. The same applies to delta-rs as well. For now, let’s assume there will always be a single writer to the delta table at any point in time.
Let’s continue by adding the following line to the section for our backend configuration to skip the requirement of a lock client.
Run the program again (cargo run). It should fail with an error that the table already exists. Delete the table1 “directory” from S3 bucket and try again.

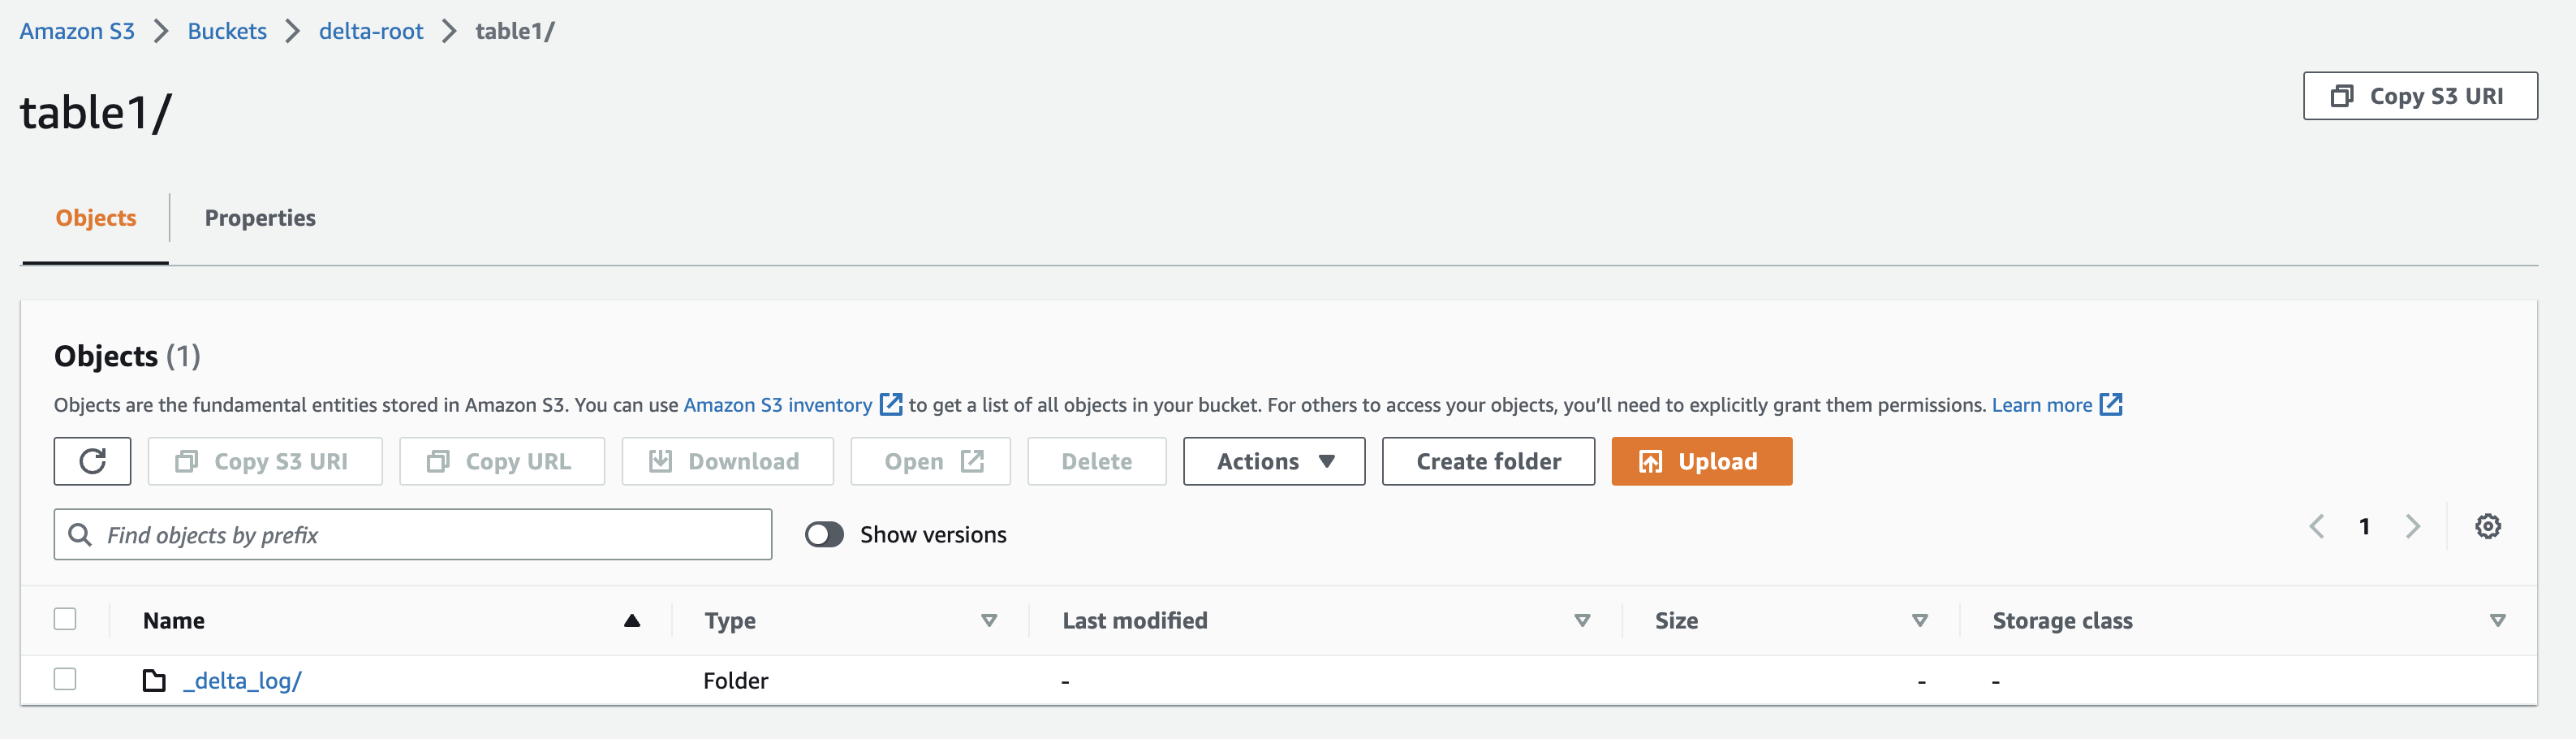
Great! We have our first Delta table created on S3. As expected, it’s an empty table with _delta_log directory containing a single JSON transaction file.
Adding some data to table
The table we have on S3 is currently empty. Now it is time to write a few records to it. Modify deltalake dependency in the Cargo.toml file to be as follows.
Arrow, parquet, and data fusion are required to write parquet files and query them. Now edit main.rs file and replace its contents with below snippet:
Let’s now explain the main program now:
- The first few lines are a group of imports . The most important one is DeltaOps which allows us to write to the table. There are also Arrow-related types imported to create typed data that can be written to the Delta Table.
- Next, the function “get_data_to_write” creates some dummy data using an Arrow DataFrame-like object in memory, containing schema information and column values. You can think of Arrow like parquet, but in-memory.
- The function returns a RecordBatch object that will be written to the Delta Table shortly. In real use cases, the dummy data is replaced with real data.
- Next, the function “append_to_table” takes a table location, backend config, and batch of records to write as parameters.
- The table location and backend config are required to create a table builder (similar to the CreateBuilder used before), but this time the builder connects directly to an existing table.
- A DeltaOps object is created out of the delta table instance. DeltaOps has functions to read and write (append) to the delta table.
- On line 39, the write method of DeltaOps is called, taking an iterator of RecordBatches.
- The function returns a DeltaTable object which can be queried to see the latest version and metadata of the table after the write operation.
- The final piece of code is the main function which orchestrates the above by calling the “get_data_to_write” function, then calls “append_to_table” function, and finally prints the latest version of the table after the write.
Cool, let’s try the new program.
- Run cargo build to compile the project.
- Run cargo run to execute the program.
- It should print a success message to the terminal with the version of latest commit to the table (which should be version 1)

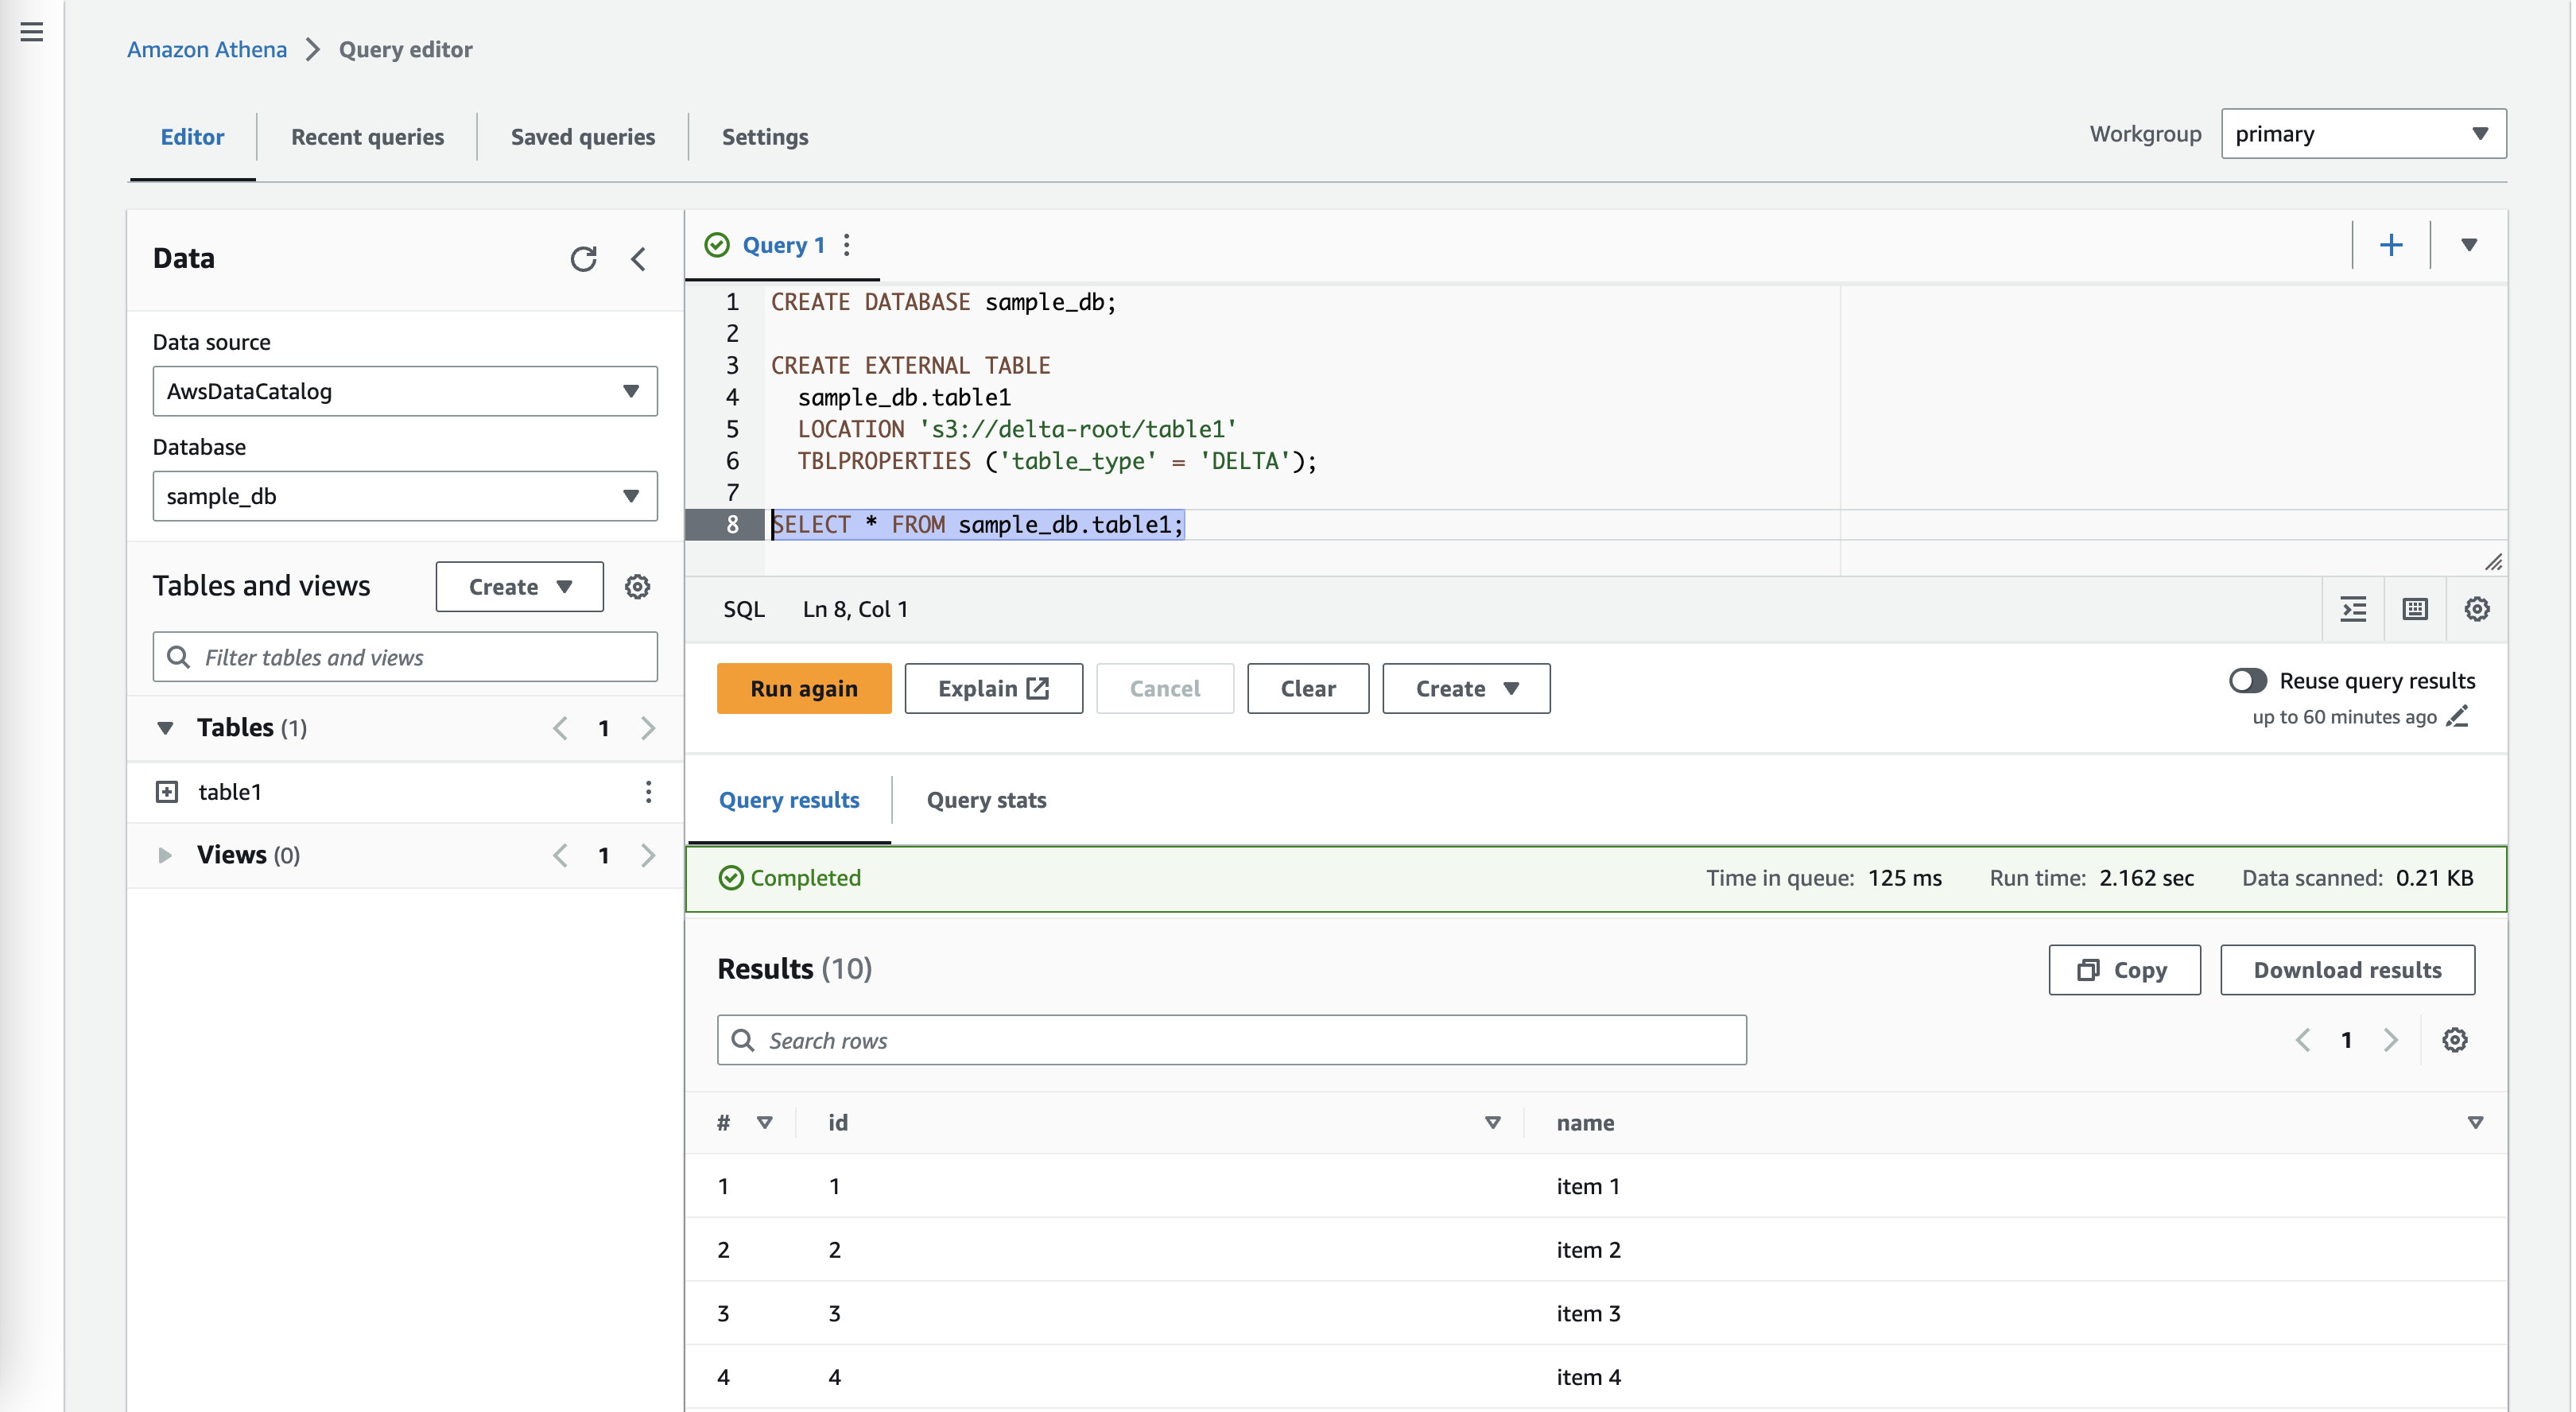
Now check your S3 bucket – you should see a new parquet file created in the table root folder, as well as an additional JSON file in the log folder. You can also query the table from other S3 services like Athena.
Sweet! We have a basic Rust application that runs locally or in the cloud to write data to a Delta table on S3. We can also read from Delta tables using DeltaOps, but I’ll continue on to some more exciting write use cases.
What would happen for concurrent writers
Let’s assume the program we have right now will run in an AWS Lambda function. The function is triggered by S3 object created events, loading some JSON or CSV files landing in the bucket to be loaded into a Delta table. In this scenario, there could be a case where multiple instances of the function are running at the same time, writing to the table in parallel. Let’s simulate this scenario by triggering our current program multiple times.
- In the VS Code terminal, navigate to the parent directory of the current program using cd ..
- Run cargo new runner then change your working directory by running cd runner
- The runner folder will have a hello world Rust program and you can verify that by running cargo run
- VS Code workspace should contain two folders now (rusty-delta-aws and runner)
- In the runner folder, edit the Cargo.toml file by adding the following to dependencies: tokio = { version = “1”, features = [“full”] }
- Edit the runner main.rs file to have the following snippet
- The above code simulates multiple parallel executions of the rusty-delta-aws app that writes to the Delta Lake table. The code has a fixed worker thread count of 8. This controls how many threads will trigger the execution of rusty-delta-aws app concurrently.
- In the same file, modify <writer-executable-path> to point to the delta writer executable. Relative to the runner directory, The path should be “../rusty-delta-aws/target/debug/rusty-delta-aws“, but this will depend on the names you have used.
In the terminal with your current working directory being the runner folder, run cargo build then cargo run
Make sure that the current terminal session for the runner also has the same environment variables used by the rusty-delta-aws application (in case you’ve fired up a new terminal or restarted VS Code).
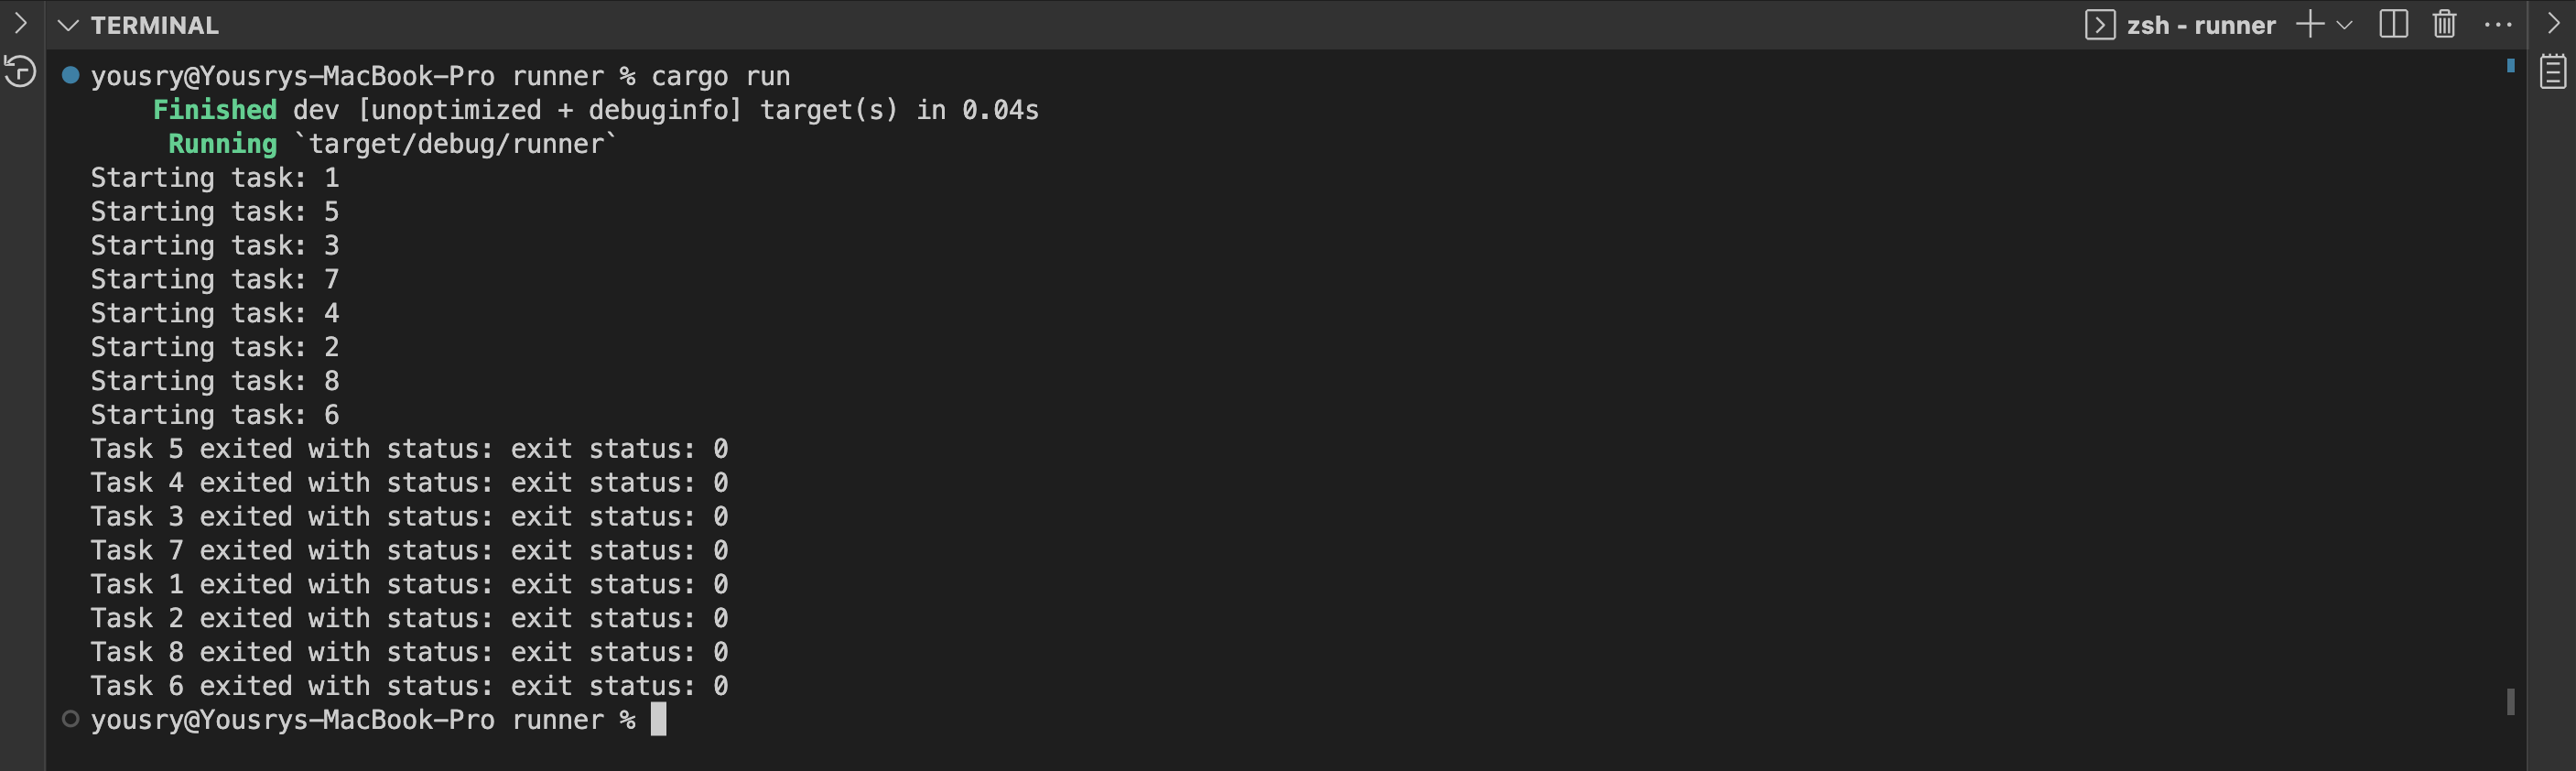
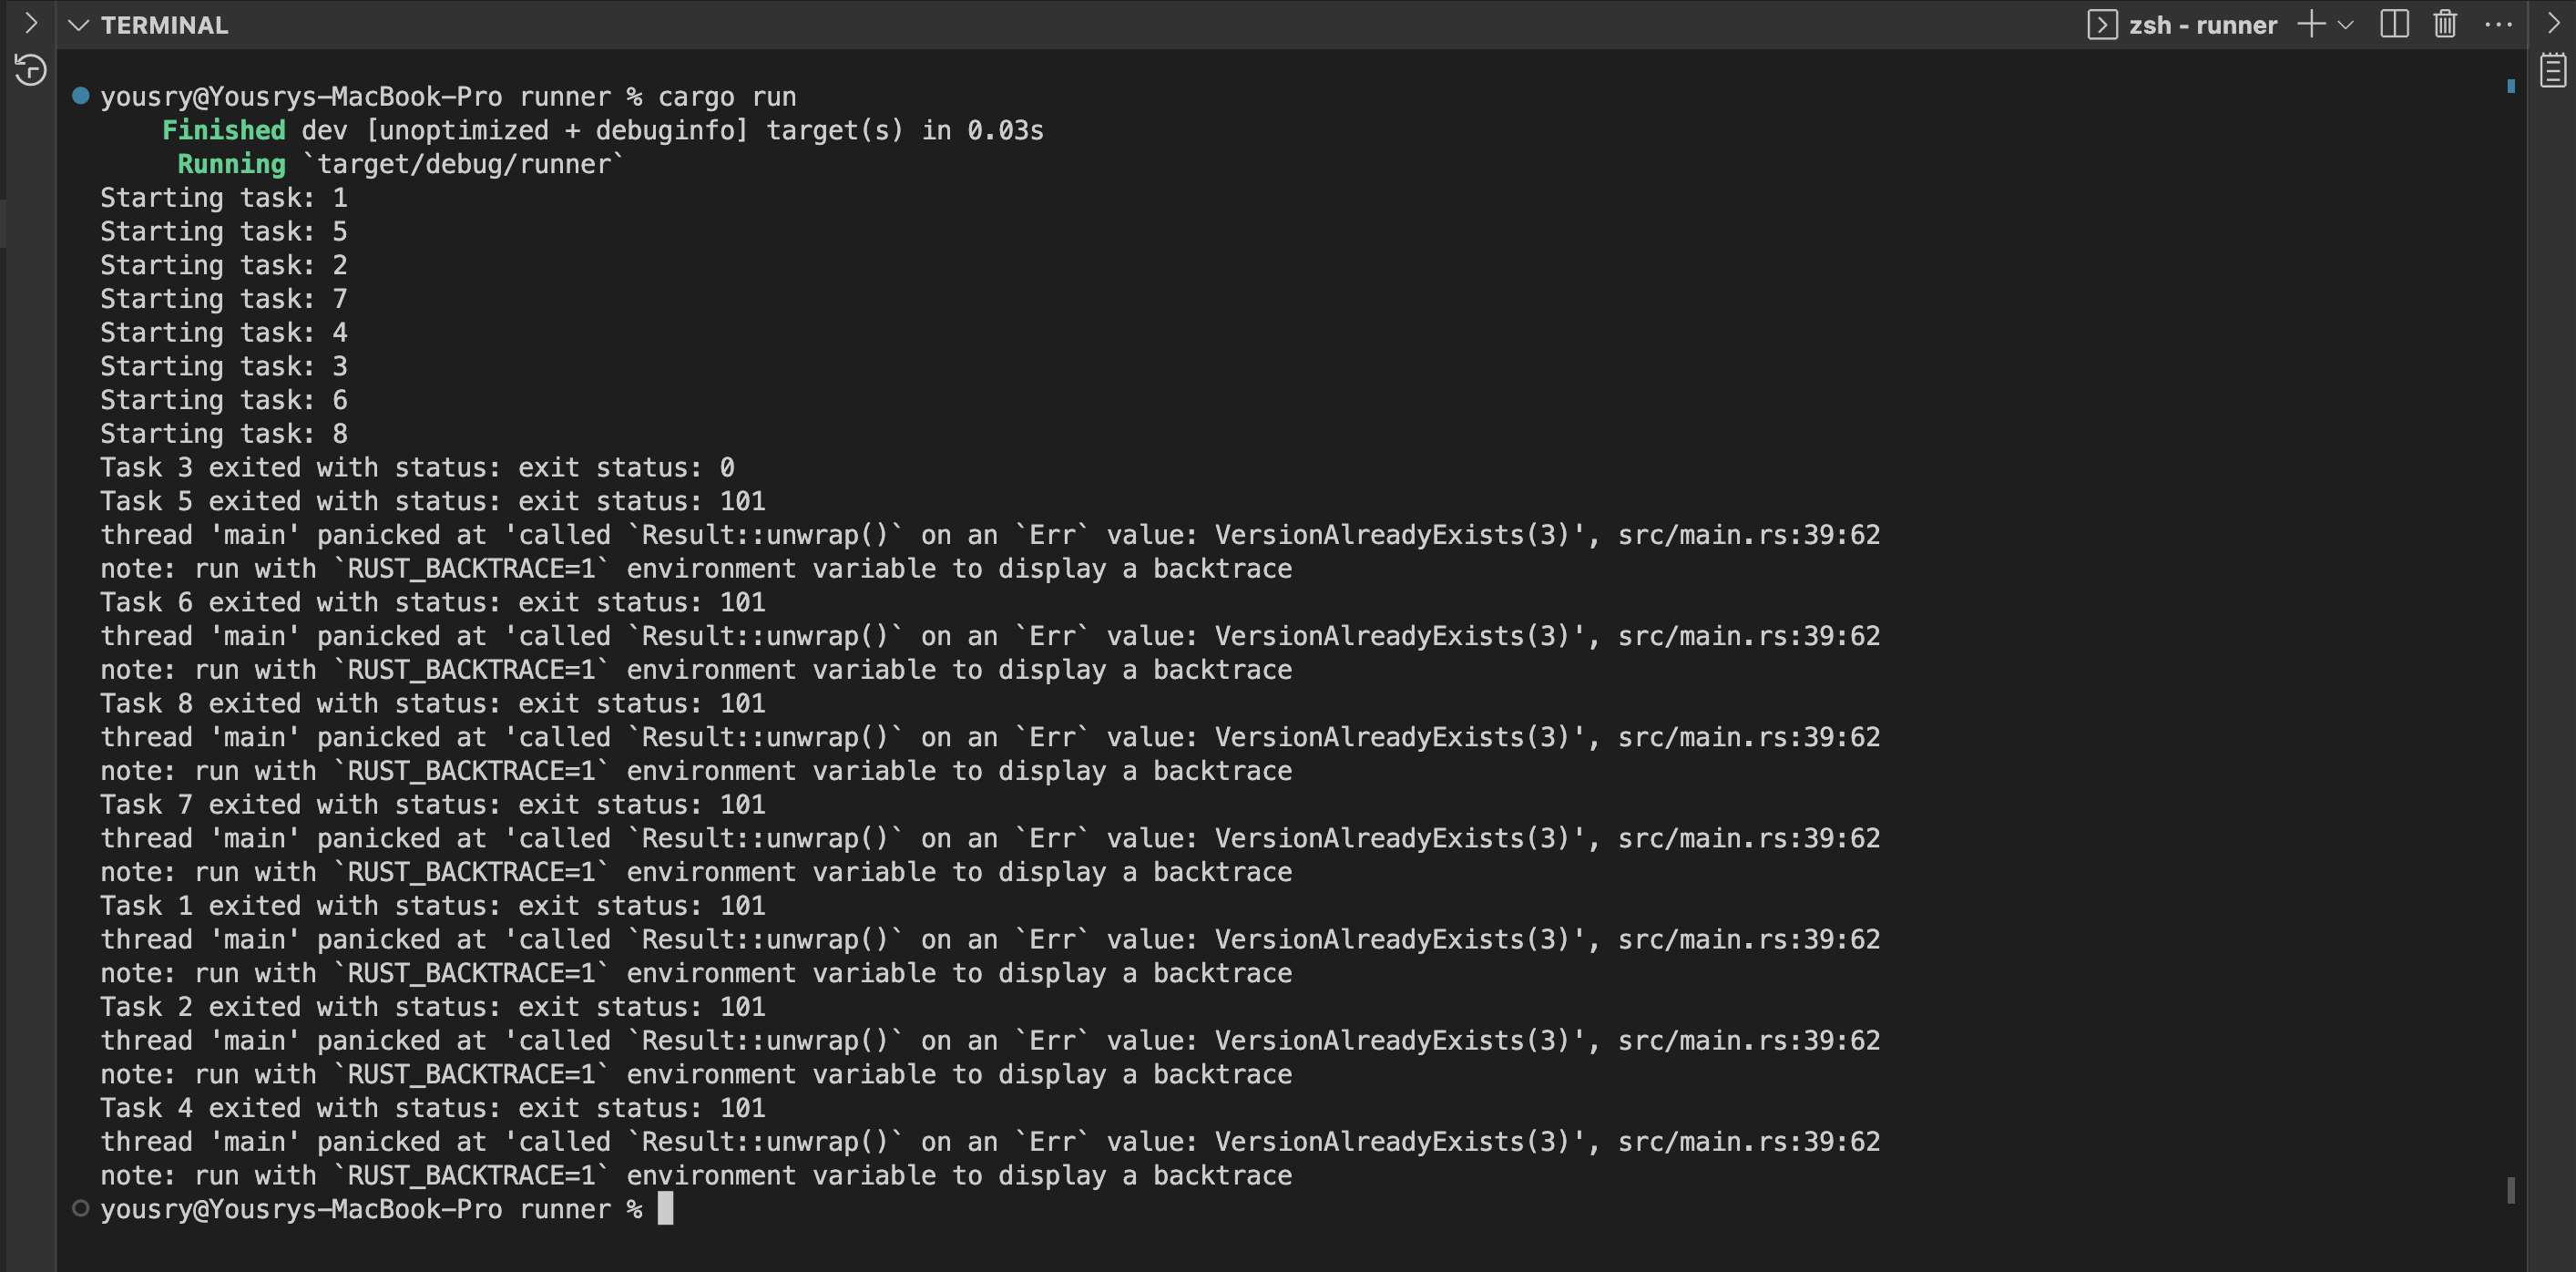
If you read part one, you will notice one major difference. All tasks completed successfully, while in part one a single task worked and others failed. Let’s see what happened here, keeping in mind that the table had originally 10 records from the previous step of writing records using rusty-delta-aws standalone.
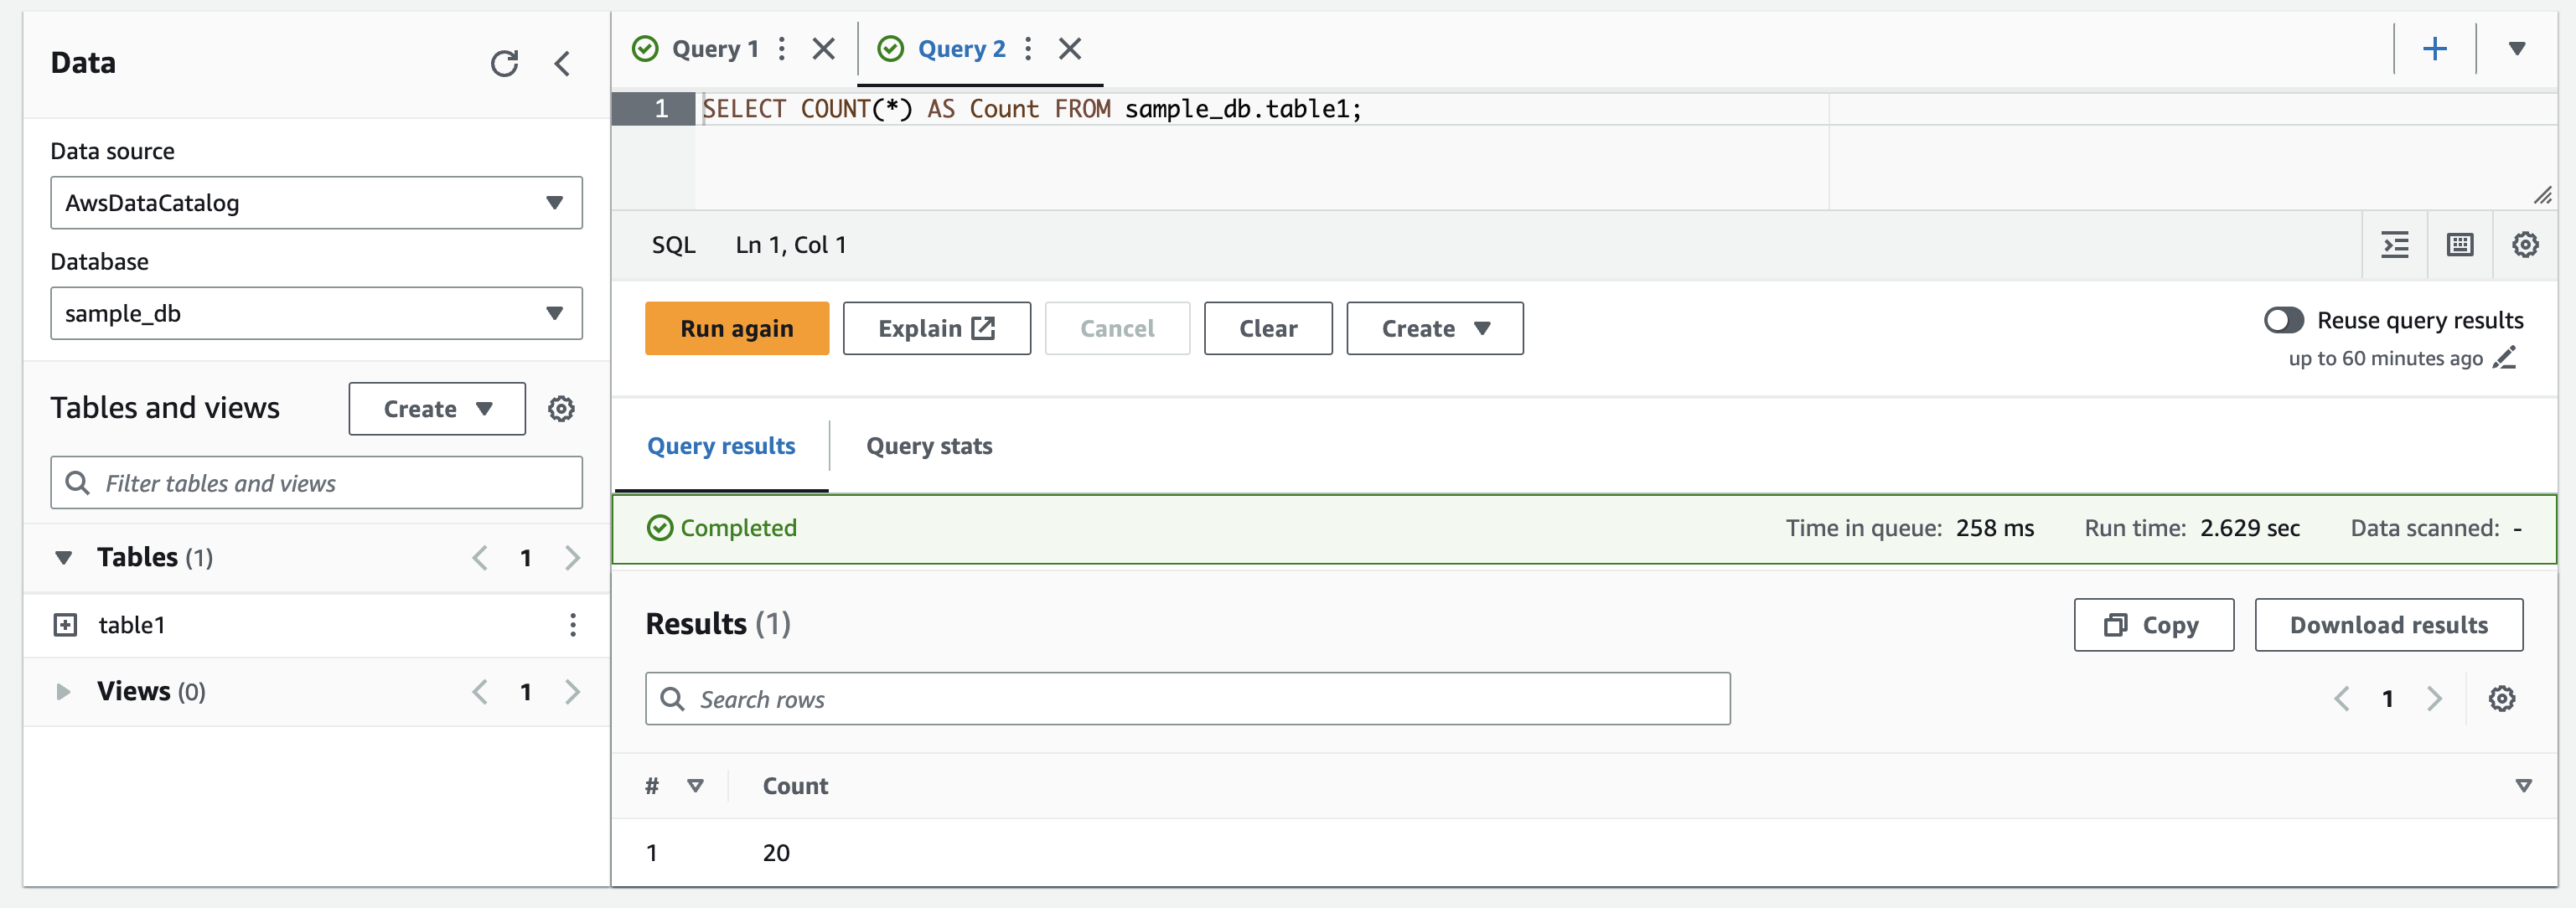
Now the table has 20 records, which means our attempt of parallel writing probably had one task that worked and the others failed. However, it seems the parallel operations reported successful results while not producing any durable effect (this is the D in ACID).
Let’s inspect the files created on S3. The table root folder shows 8 new parquet files created at the same time (15:48:59), along with the first parquet file that was created as part of the initial write operation earlier on.
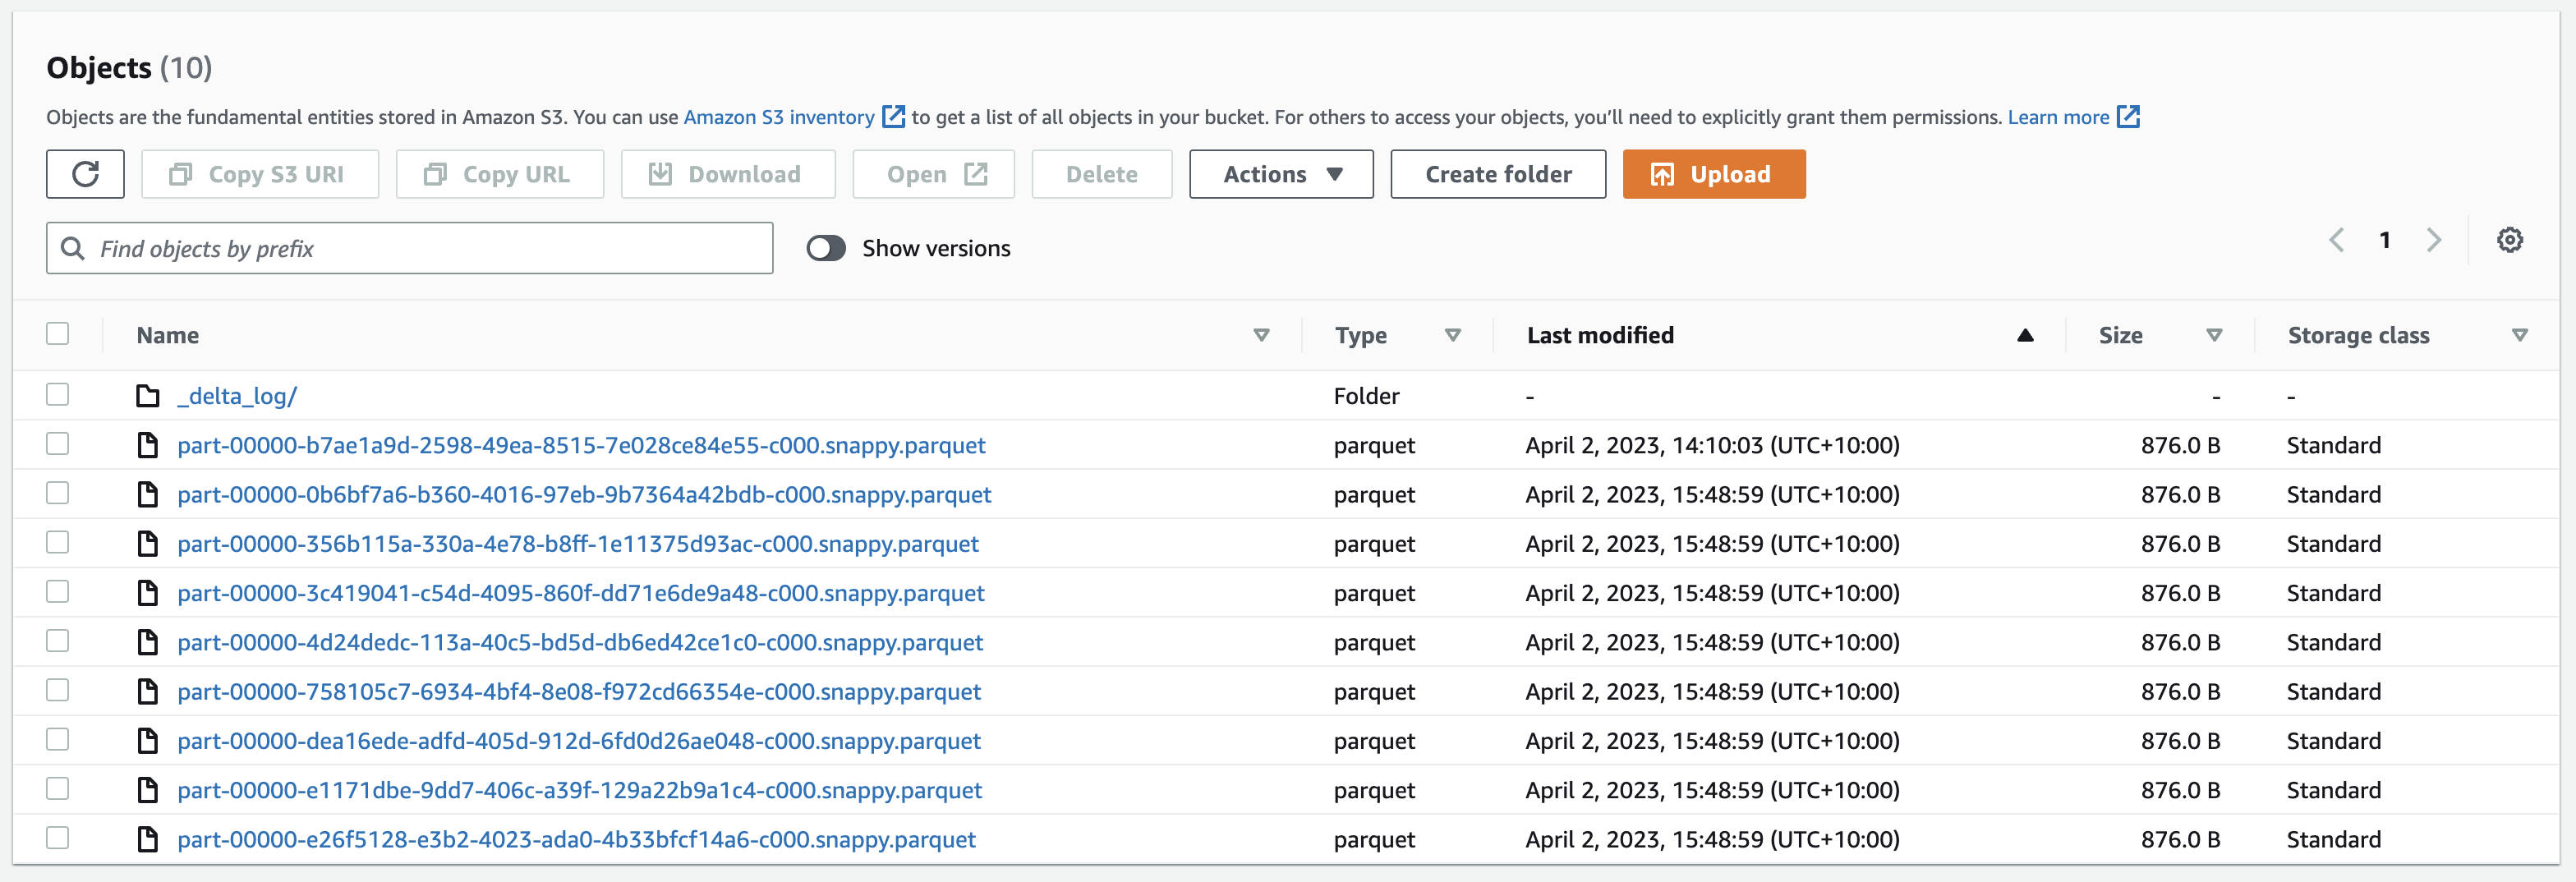
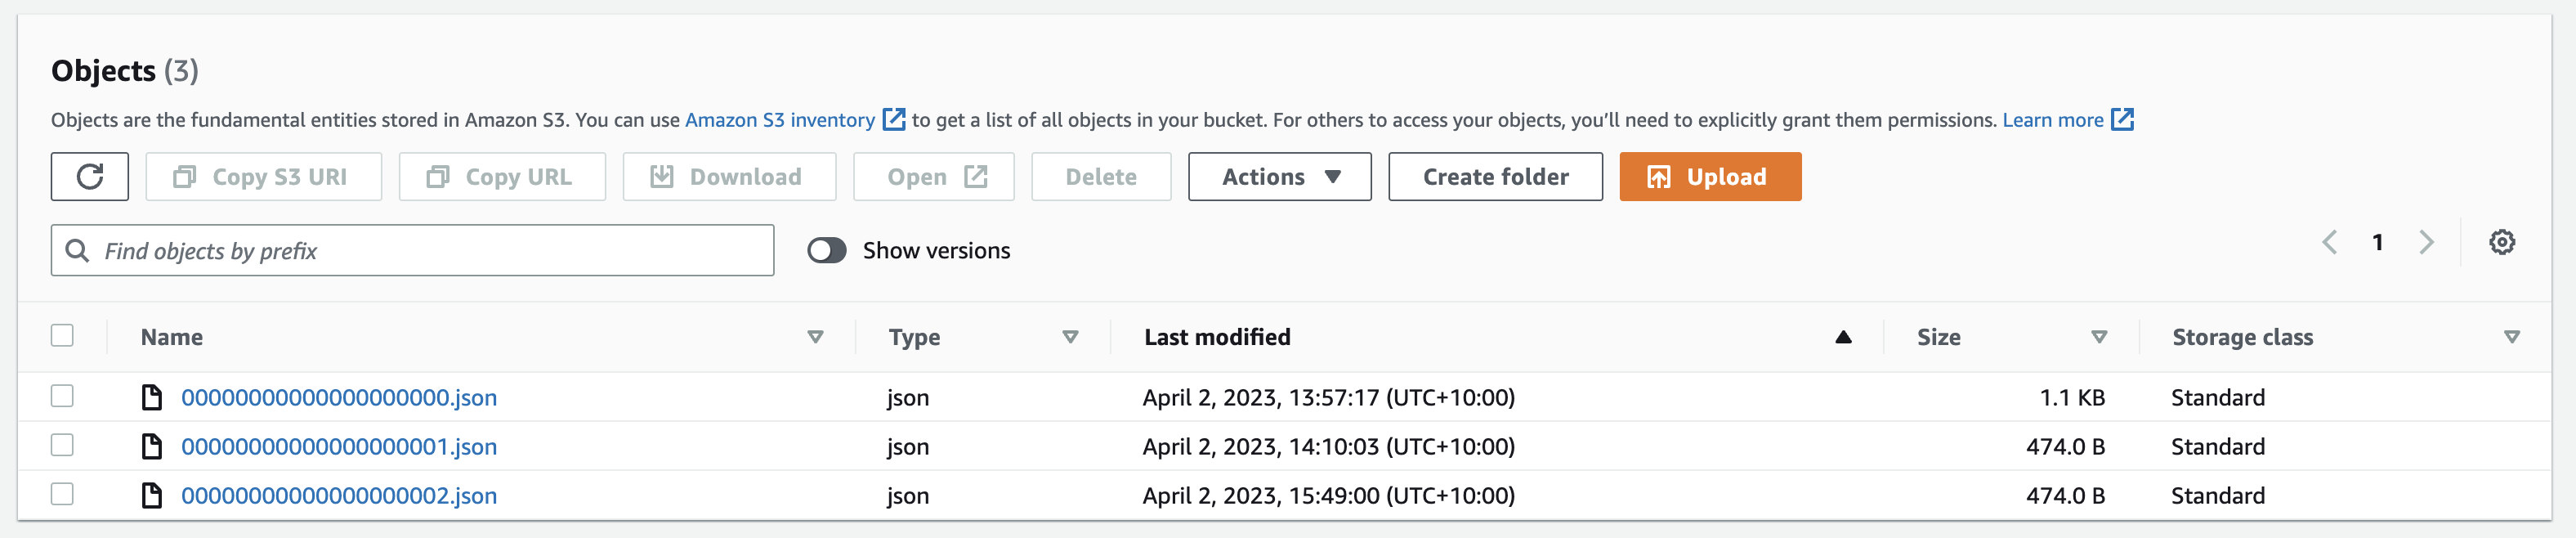
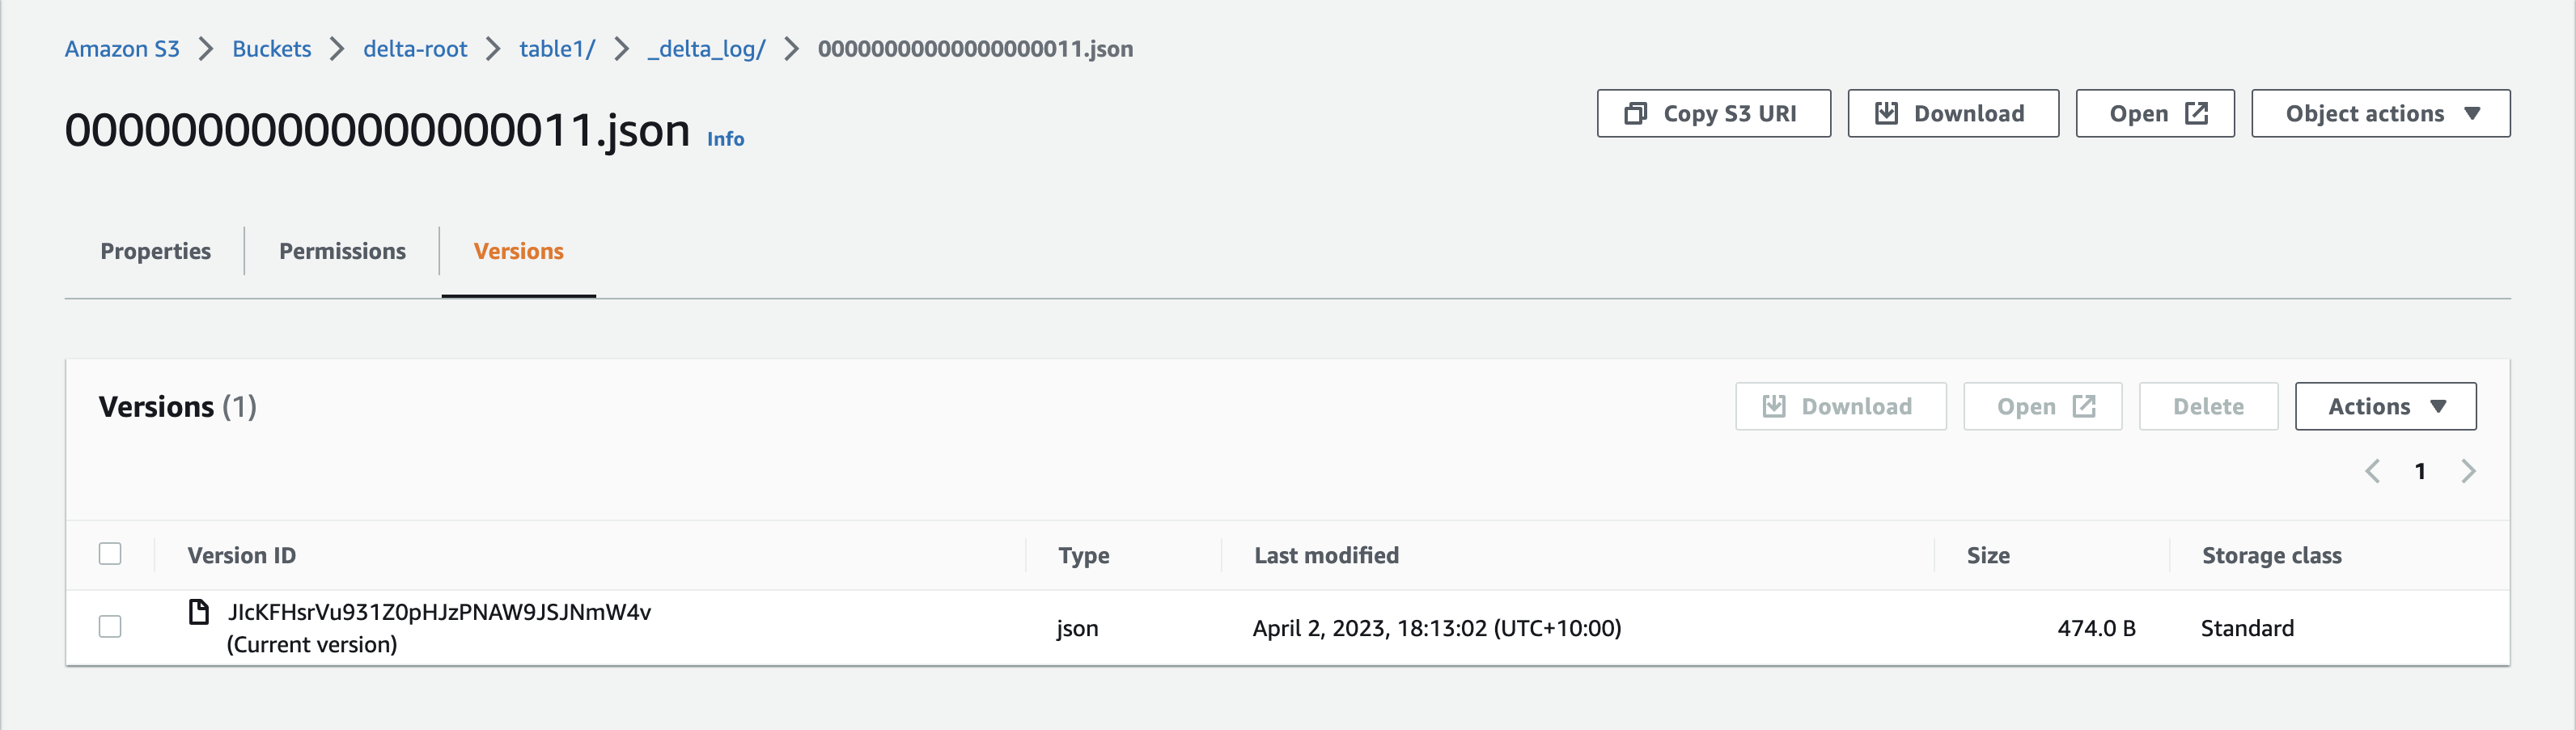
Ok, what about the delta log folder? We know that file with sequence 0 is for the table creation and file with sequence 1 belongs to the first write operation. Now we can see a single additional file with a sequence of 2. So apparently there is one new commit after the initial write and this is the commit that produced the 10 new records.
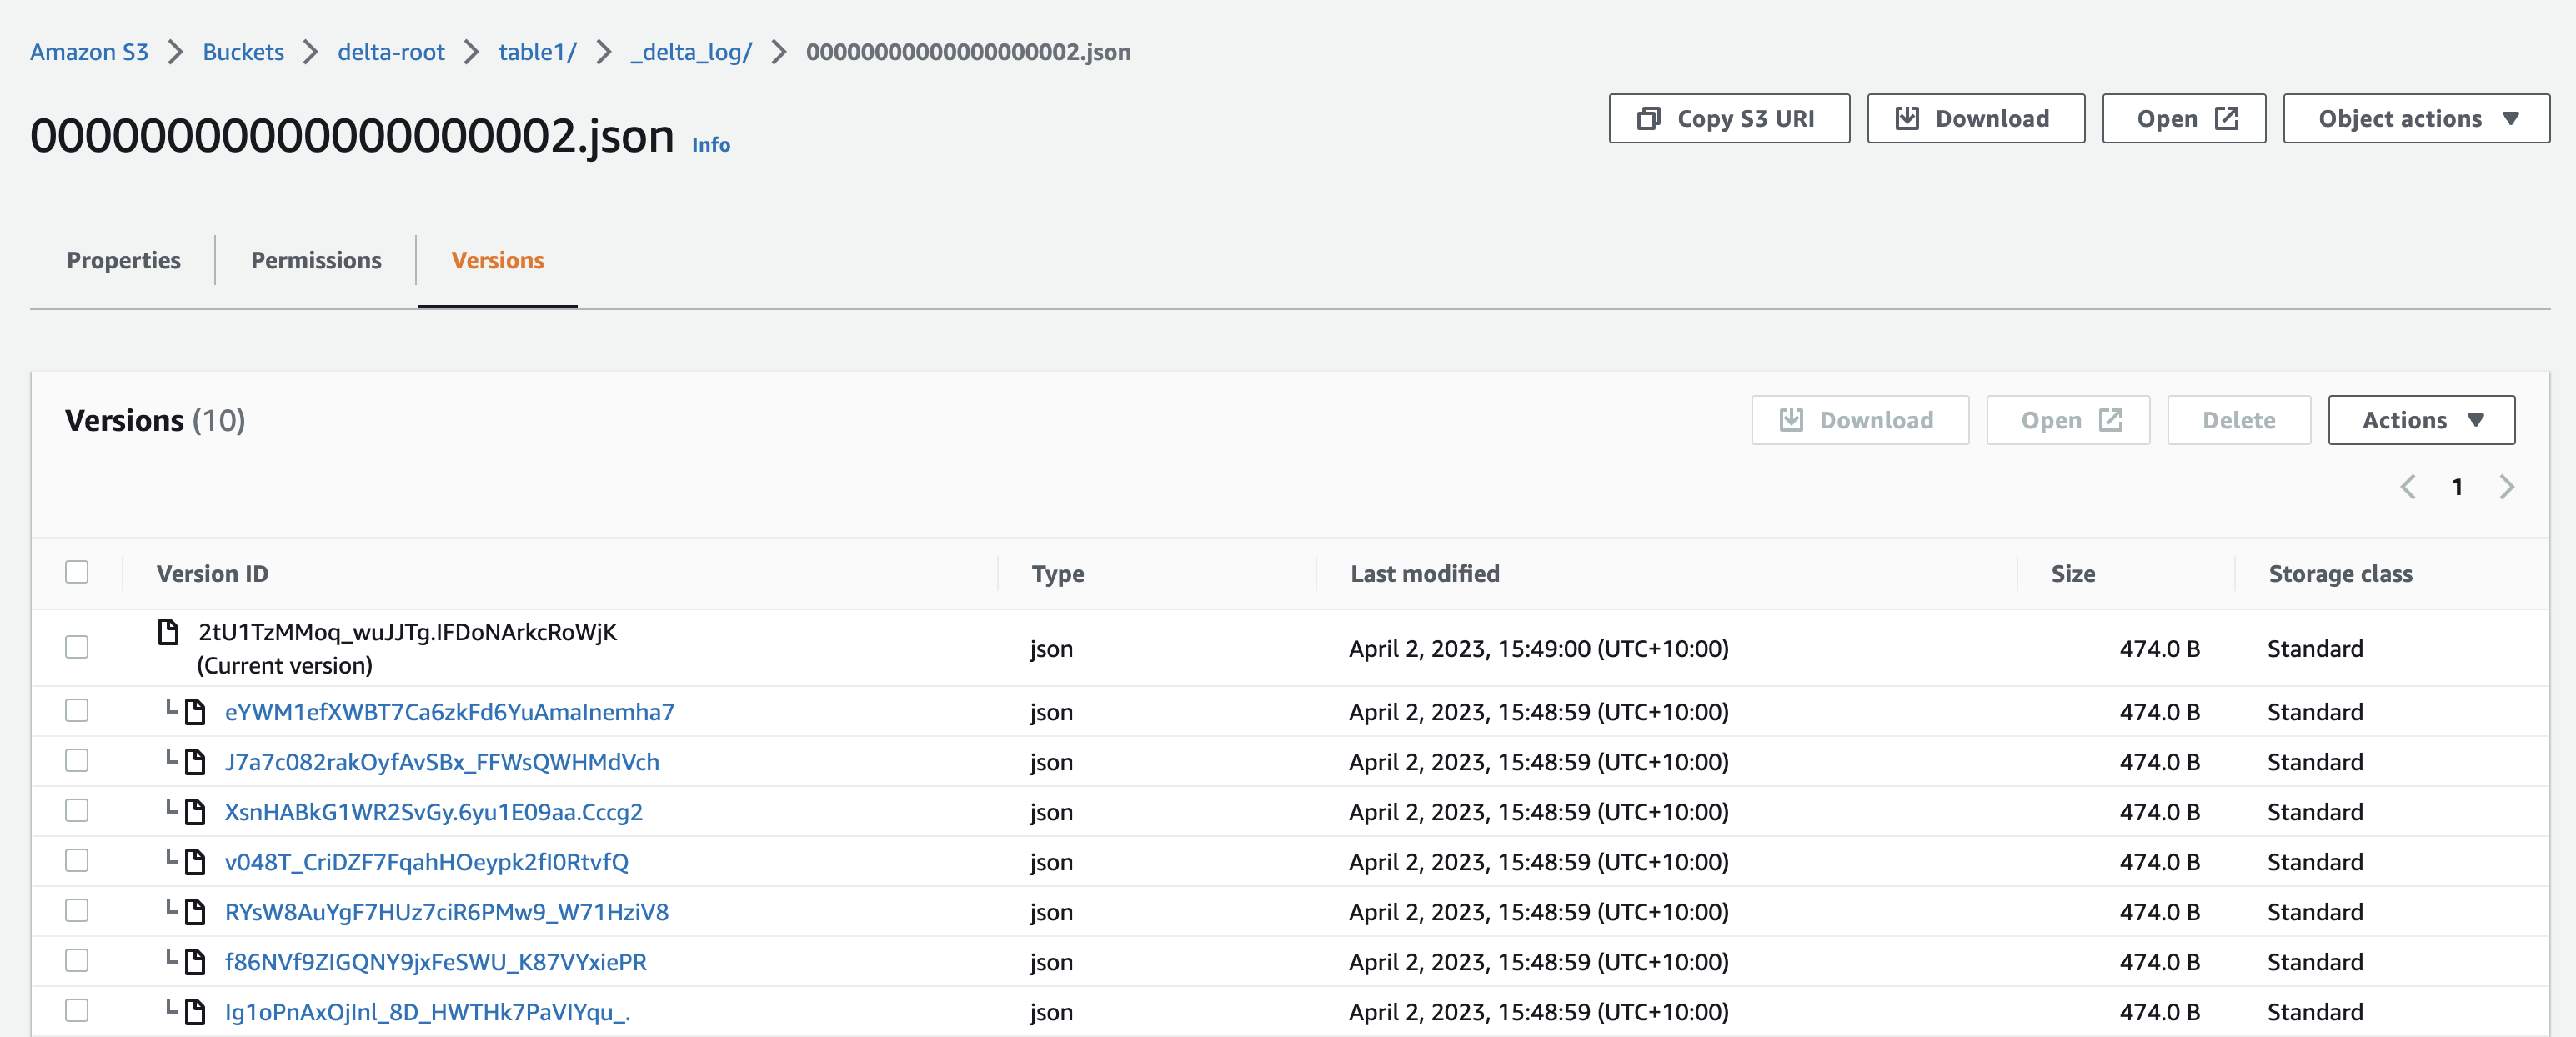
Now it is time to make use of the bucket versioning feature we have enabled when we created our S3 bucket. The version history of commit #2 shows that there are other 7 versions of the same file in addition to the current active version.
What happened is that each instance of the writer application wrote a parquet file containing the data and the log file containing commit details. All were successful, but the last one won. The other writers were not aware of this and reported a misleading success result. This is obvious data corruption, and we have to cater for such cases. This is why Delta Lake S3 requires the additional locking functionality to handle concurrency. Even if it is guaranteed that there will be a single writer only, you never know. So it’s better to be on the safe side.
Adding the locking provider
As of April 2023, the only supported locking provider for S3 is DynamoDB. Unfortunately, there is minimal documentation about how to configure the service, but the source code gives us some clues.
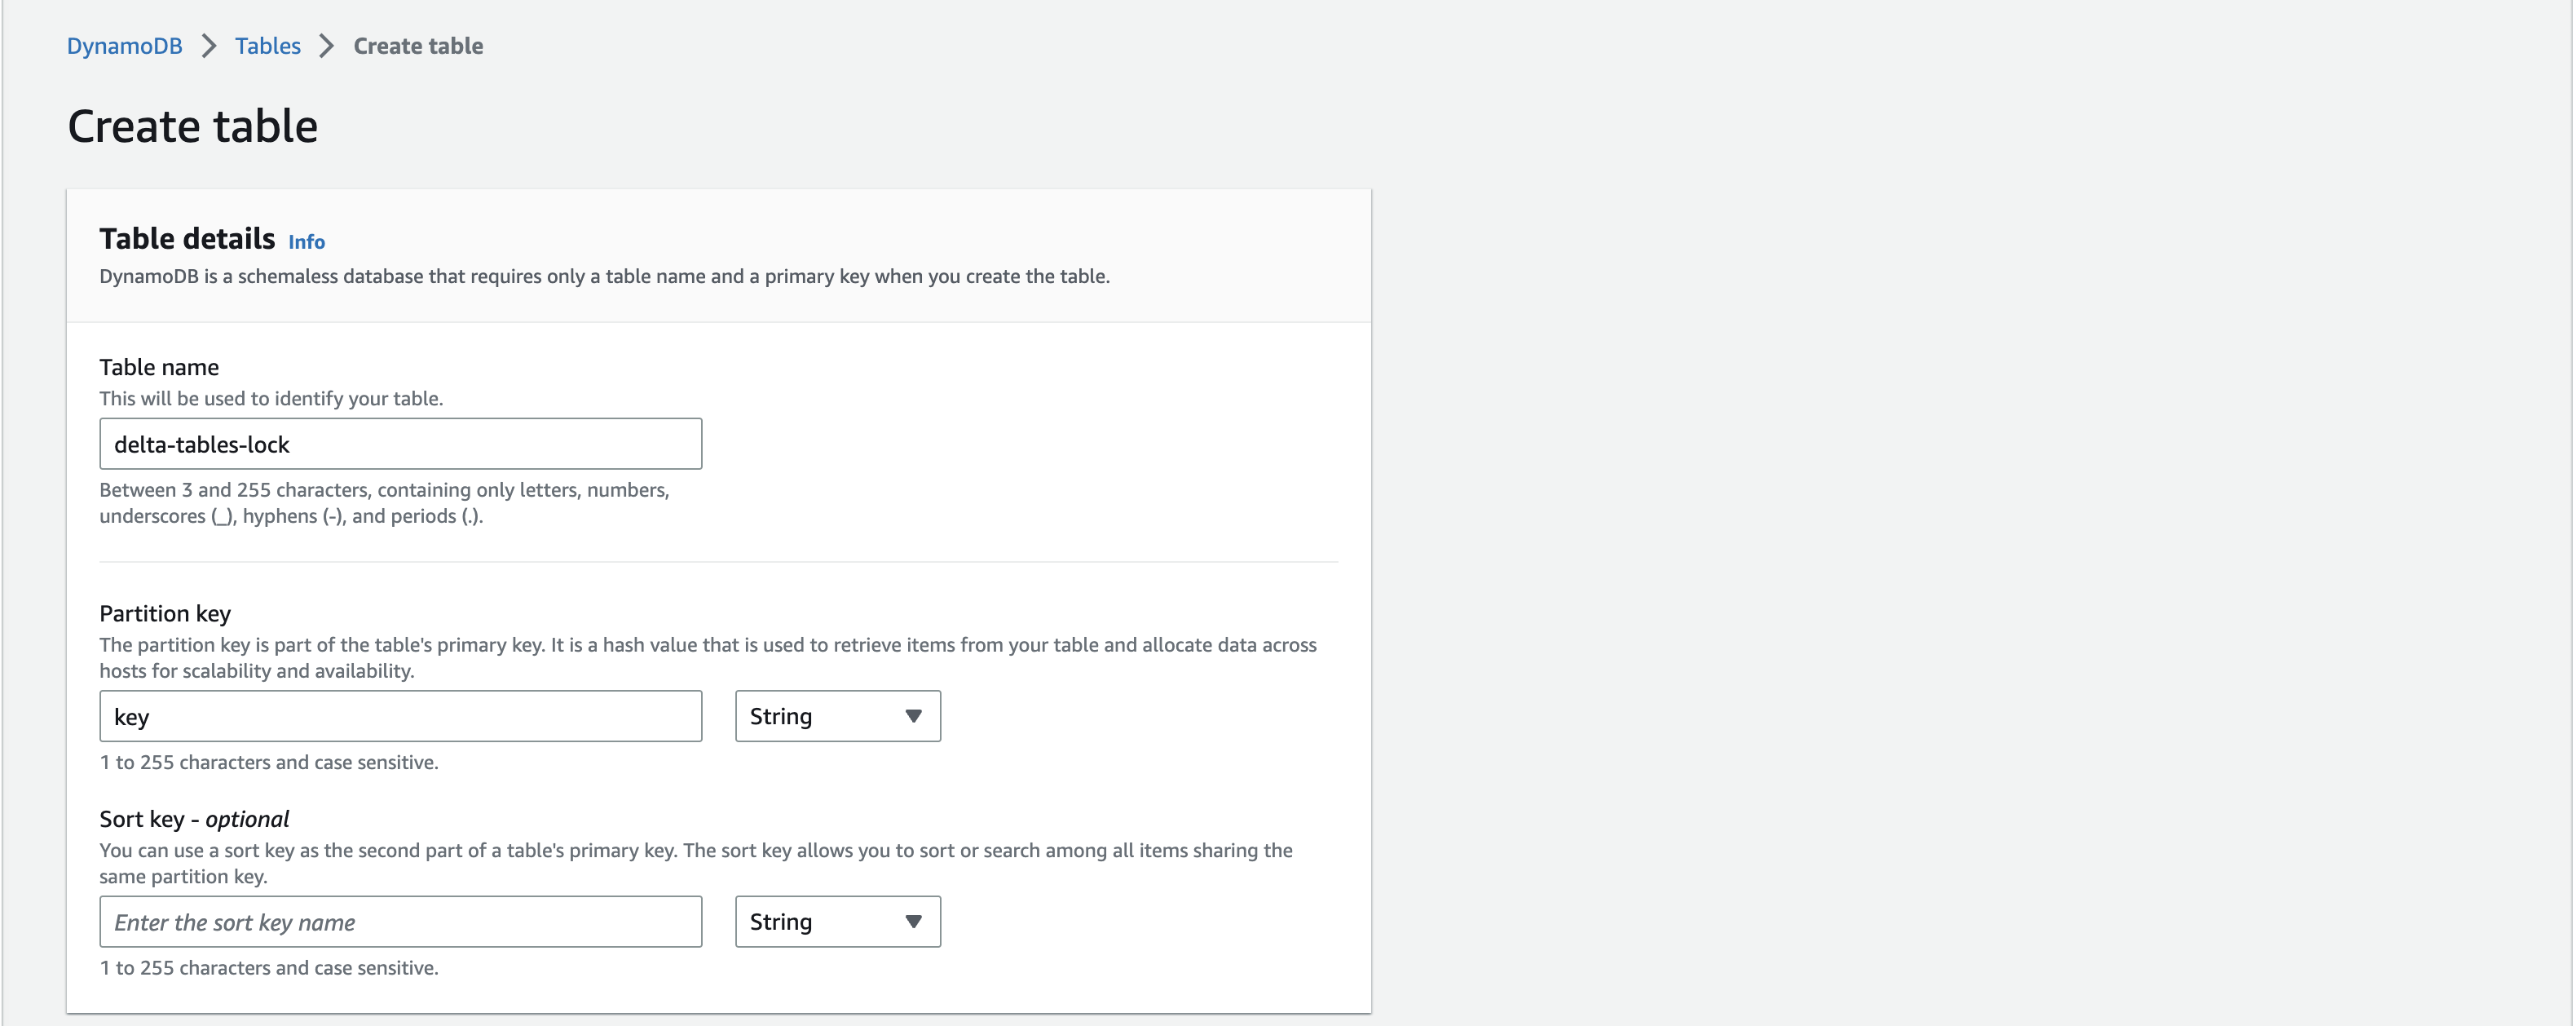
- Head over to your AWS console and open the DynamoDB UI. Find the button to create a new table.
- Create a table called delta-tables-lock and set the partition key as key. The table name can be anything you want, but the partition key must be named “key”.
- You can keep all the defaults except for switching capacity mode to on demand (by selecting “Customize Settings”).
Now in VS Code, open the main.rs file for rusty-delta-aws project:
- Remove the line that adds “AWS_S3_ALLOW_UNSAFE_RENAME” to the backend config
- Add the next few lines to the section of backend config
The above lines set DynamoDB as the locking provider for our table and define the DynamoDB table name to be used as well as its partition key value. You can check these config keys in delta-rs source code here. You can use a single DynamoDB table as a locking tool for multiple delta tables, but for all writers writing to the same delta table, you should use the same “DYNAMO_LOCK_PARTITION_KEY_VALUE” value. In our case it is set to “table1”.
Now navigate in the terminal to rusty-delta-aws and build it to make sure it is still compiling after the new changes. Go back to the runner application folder and run it.
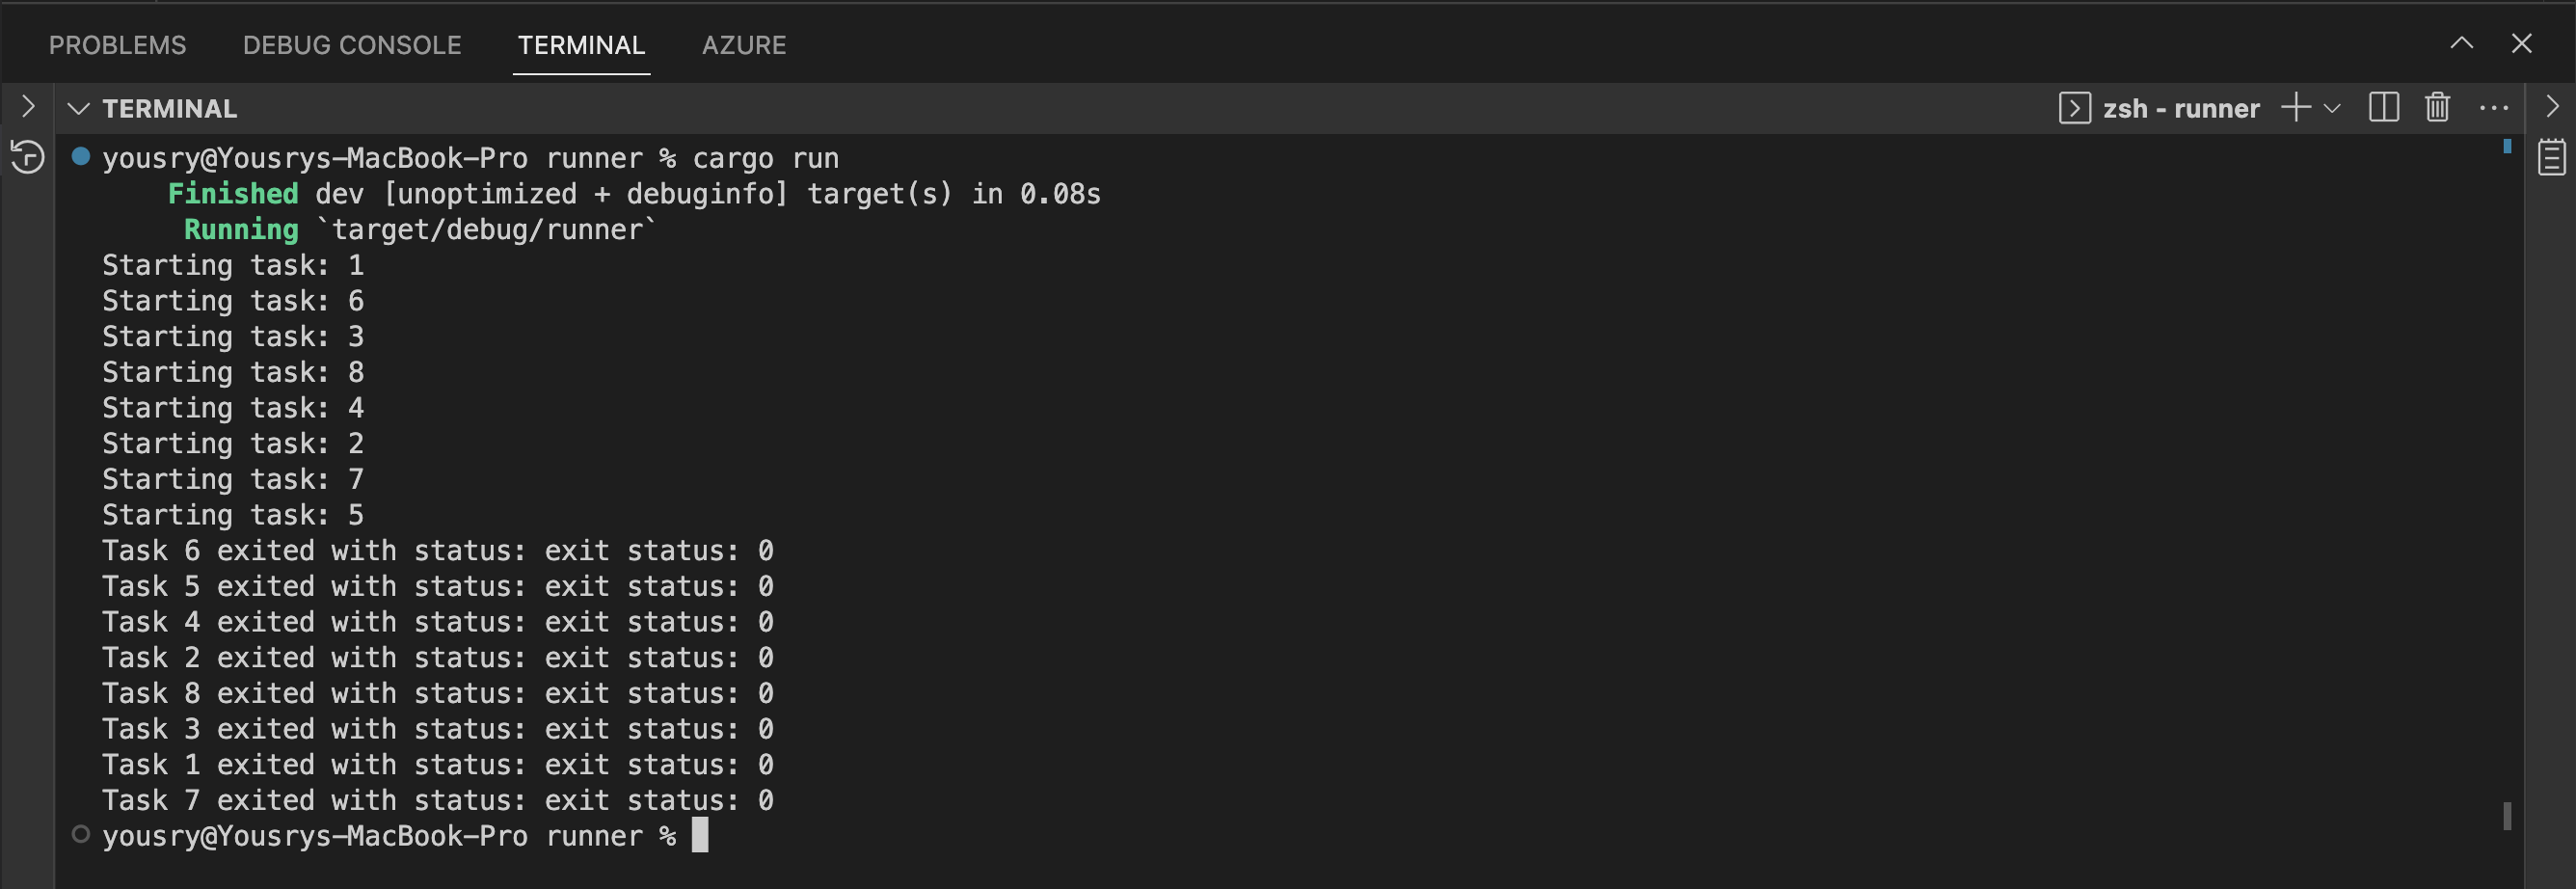
Now we see similar behaviour to part one: one writer succeeded (task 3) and all the others reported a failure. DynamoDB table synchronises multiple writers trying to commit the same delta table version. The table should now have 30 records, but I will leave it to you to verify.
You can see that the added value of DynamoDB locking is the prevention of data corruption and erroneous exceptions in your applications. If a writer fails to write, you will not get a misleading result telling you everything is OK. Now it is time to improve the usability of the current design and allow concurrent writers to write. They will just need to wait for each other if needed so that every one of them will “eventually” (pun intended) produce a standalone commit.
Allowing all writers to write
The following section of the post is very similar to part one. To allow multiple writers, we need to switch from writing with DeltaOps to DeltaTransaction.
- Edit the main.rs file in the rusty-delta-aws application (not the runner application) by removing the line use deltalake::operations::DeltaOps; to make the compiler happy
- Replace it with the following import statements
Add the following function above the append_to_table function
- Inside the append_to_table function, change the line let table to let mut table
- Replace the lines starting with let ops until the end of function (excluding the curly brace) with the below snippet
- In the terminal, change directory to the rusty-delta-aws folder and run cargo build
For an explanation of the above changes, have a look on part one.
Let’s give it a go.
- In VS Code terminal, navigate to the runner folder
- Run cargo run (make sure environment variables are still there)
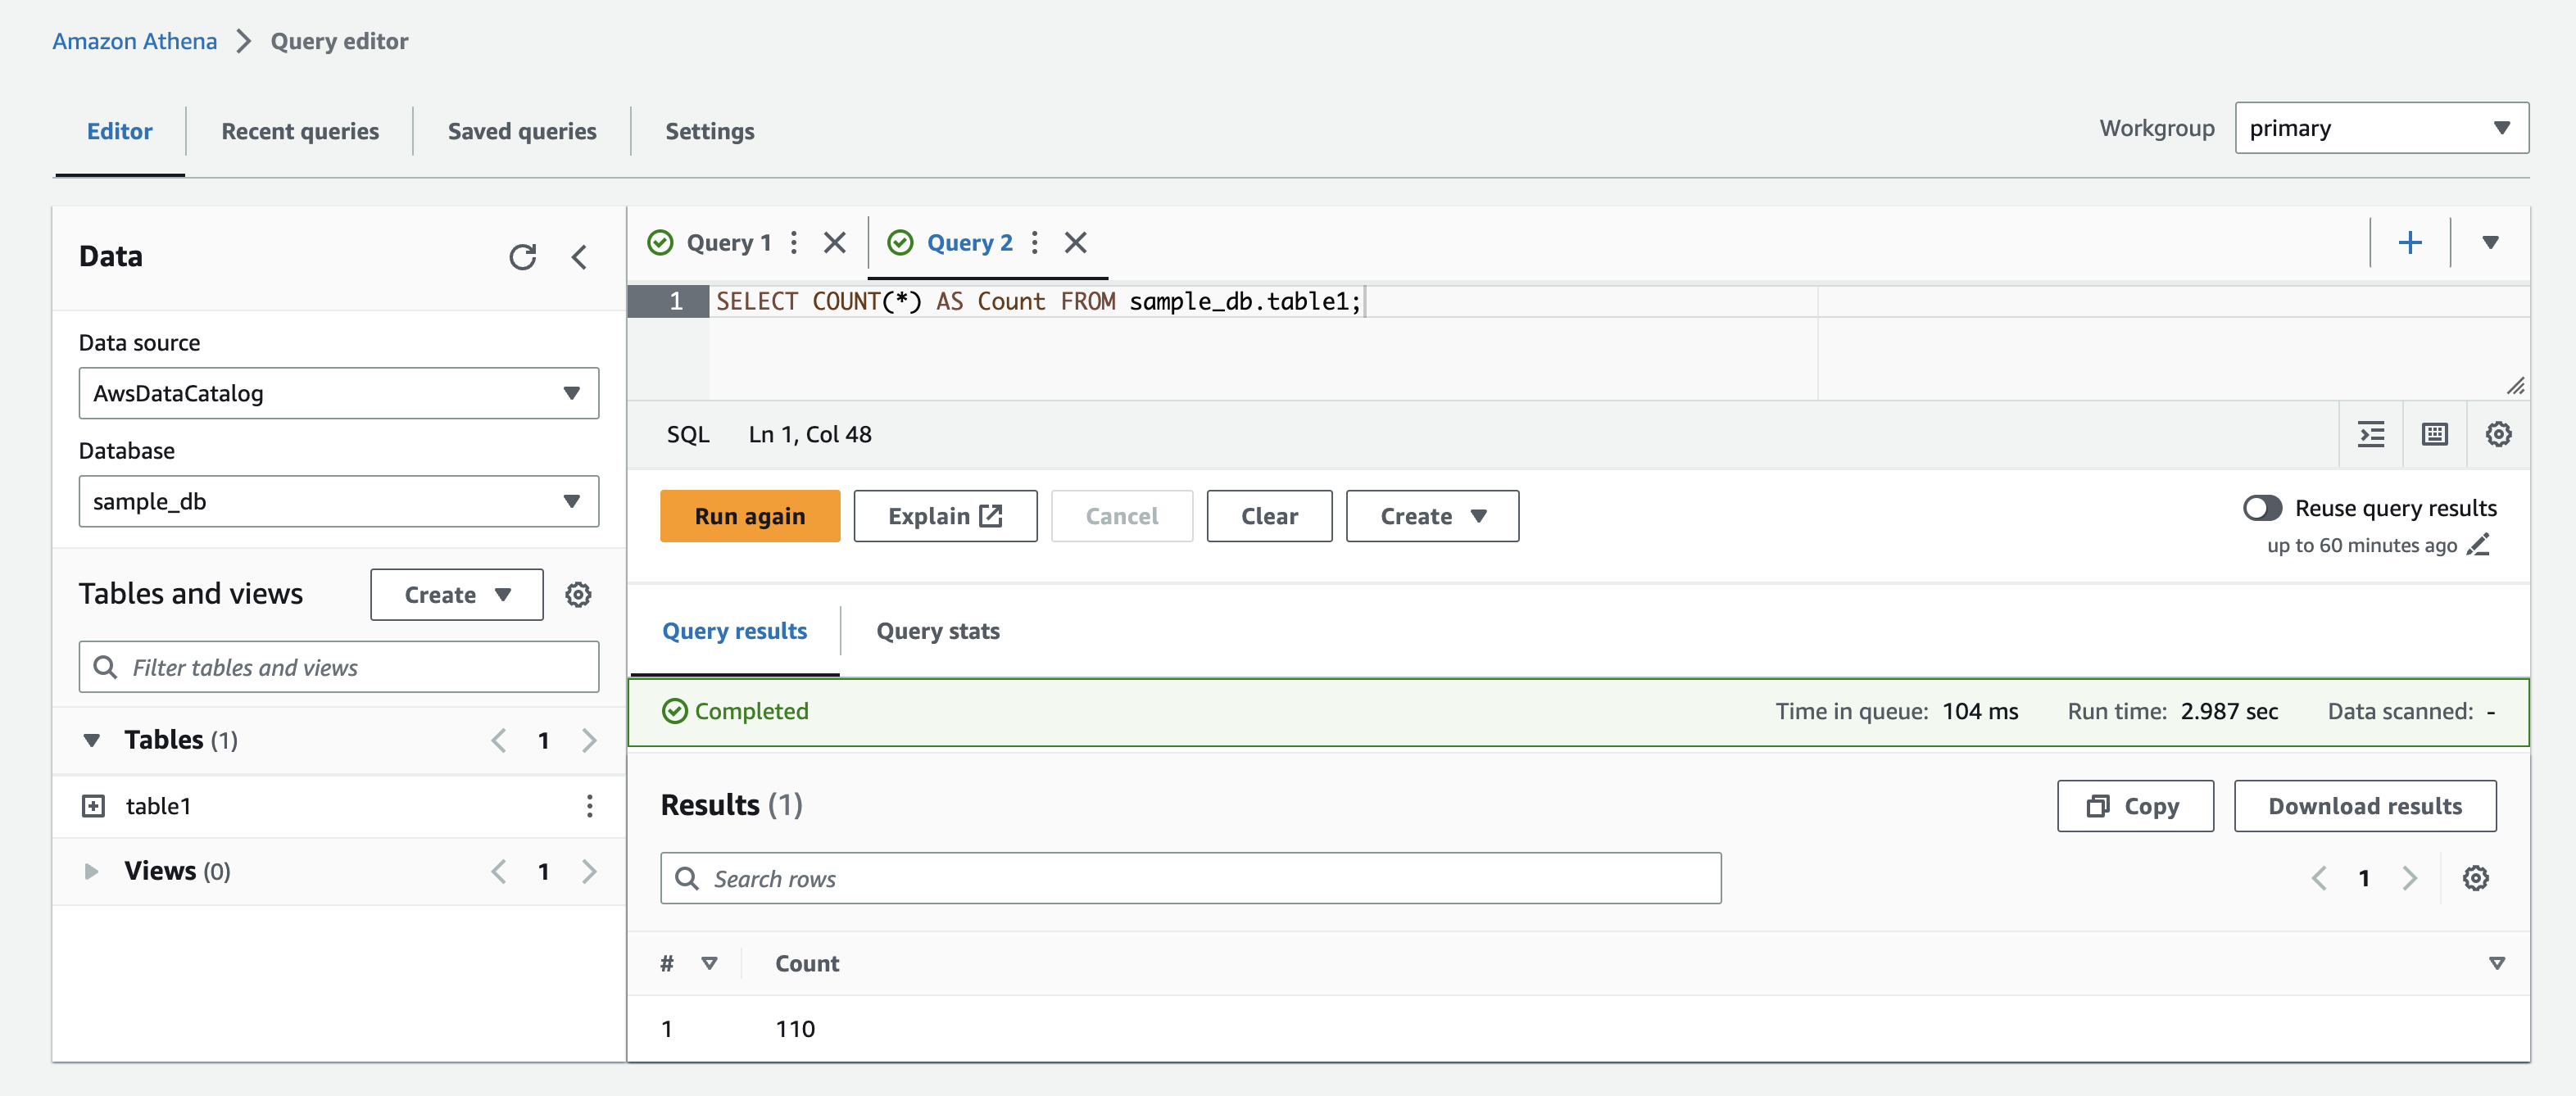
- All the parallel writer tasks should be successful this time. You can verify the number of records in the Delta table before and after running the command to make sure that all 8 processes ran as expected. If you’ve followed along, you’ll know that the table had 30 records before the above attempt, and now it should have 30+80 = 110 records.
The latest JSON file in the transaction log will always have a single version. There is no single file that has more than one version due to multiple writers stepping on each other’s toes. Anyway, this is a small piece of evidence that once you have reliable locking mechanism (which is baked into Azure and GCP storage services, or external like DynamoDB), you don’t need to version your cloud storage files.
Awesome! The delta-rs library can implement the optimistic concurrency protocol, provided you use the right API and set up a locking provider for cloud storage services that are eventually consistent.
Please note that delta-rs has some WIP PRs around improving concurrent writers and properly implementing the delta protocol. So in the near future, the above approach will most likely be improved and/or simplified. Also keep in mind that the code in this post is not production-ready code. For example, unwrapping Results should be replaced with better error handling code or fallible functions.
Another important aspect to consider is that the explained support of multiple writers applies when all the writers are Rust applications using the same DynamoDb lock. If there are additional writers like Spark on EMR or something, that might cause data corruption. But it is fine to have multiple readers on different applications like a Rust program, a Spark cluster and Amazon Athena.
Summary
In this post we have seen:
- How to create an empty Delta Lake table using Rust on S3
- How to add new records to the table
- How to reliably handle parallel writers by avoiding data corruption with a locking provider
We haven’t tried this on GCP yet, but it’s probably similar to Azure. There could be an additional part to this series if we discover something different that’s worth mentioning.
delta-rs is an awesome lightweight tool to interact with delta tables without requiring a Spark cluster. The lakehouse is accessible from anywhere, and if you are not too comfortable with the rusty bits, you can use the Python binding. Have fun!
