
Published October 10, 2023
Written by Praveen Kumar Patidar

Cover image

Introduction

GitHub Actions serves as a robust mechanism for automating repository workflows in an organised, efficient, and transparent manner. It empowers developers to define workflows using a straightforward YAML format, allowing them to easily monitor, debug, and seamlessly integrate with various third-party applications and cloud providers. This enables developers to concentrate their efforts on software development, reducing concerns about software packaging and deployment.

GitHub Action runners offer customised environments that streamline workflow automation, ensuring speed and security. Users have flexibility in choosing between GitHub-hosted runners or self-hosted runners managed by themselves. Furthermore, self-hosted runners can be architected in the cloud, presenting a cost-effective and scalable solution with enhanced security controls.

The setup of self-hosted runners offers several approaches, such as deploying them using simple EC2 instances, leveraging serverless computing with Spot Instances, or orchestrating them within a Kubernetes environment. In this blog, our primary focus will be on explaining the implementation process of GitHub Actions Runners in AWS EKS (Elastic Kubernetes Service) while utilising Karpenter.

Karpenter

Karpenter for EKS is a powerful tool designed to simplify and optimise your EKS cluster management, making it easier than ever to scale your Kubernetes workloads efficiently. Whether you’re an experienced DevOps engineer or just starting with Kubernetes on AWS, Karpenter for EKS is here to streamline your operations and unlock new levels of scalability.

In this blog, we’ll harness the capabilities of Karpenter to efficiently orchestrate GitHub Runners. The end result will offer a significant boost in scalability and flexibility, delivering a secure, high-speed, and versatile solution tailored for enterprises.

The initial part of the blog will delve into configuring AWS VPC (Virtual Private Cloud) and AWS EKS, laying the foundation for the detailed exploration of GitHub runners in part 2 which will be posted later.

Architecture

To establish a connection between GitHub and EKS, you can use a GitHub Personal Access Token (PAT). The subsequent section of this blog post will furnish instructions on setting up the PAT. Once the PAT has been successfully generated, it will be employed within the GHA (GitHub Actions) Action Controller EKS Application to generate Runner Pods. These specific pods will be identified as GitHub Runners and can be accessed by the organisation through tokens.

GHA Actions EKS

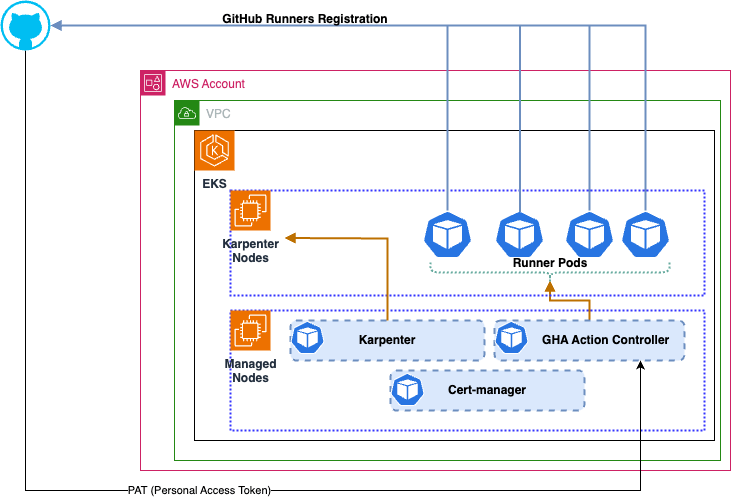
You can see the video presentation for the architectural walkthrough –

Setup Local Environment

To set up EKS, Terraform is used to configure Karpenter. Afterwards, Helm charts will be utilized to install Karpenter and GitHub Runner Controller, with Helm CLI or Terraform serving as the orchestrator.

Repository

We’ll go through the steps below, but if you want to see the end result you can look at the repo aws-eks-terraform-demos.

The Repo consist of four terraform modules which can be deployed in a sequence to complete the demo. The repository deployment orchestration is based on https://3musketeers.io/ pattern. More details can be found in the README.

Install Required Tooling

Configure Local Credentials

Set up AWS Profile/Credentials to connect to the AWS account that your Kubernetes cluster is running. Make sure the credentials have correct access to create, update and delete all services related to the setup.
Read more on how to setup credentials.

Backend Bucket

Terraform Backend bucket is recommended for the demo, because of the complexity of the setup. The bucket configured in the code is <ACCOUNT_ID>-terraform-backend. No action is required if you create a bucket with this naming convention.

Creating VPC

 The first component of the setup is VPC. Refer to the folder aws-eks-terraform-demos/tf-vpc for customisation of the VPC (if needed)

tf-vpc/local.tf consists of the configuration required for VPC CIDRs, names and multi-environment setup.
locals {
  env = {
    demo = {
      vpc_name           = "lab-demo-vpc"
      vpc_cidr           = "10.0.0.0/16"
      azs                = ["ap-southeast-2a", "ap-southeast-2b", "ap-southeast-2c"]
      private_subnets    = ["10.0.0.0/19", "10.0.32.0/19", "10.0.64.0/19"]
      public_subnets     = ["10.0.96.0/19", "10.0.128.0/19", "10.0.160.0/19"]
      single_nat_gateway = "true"
      enable_nat_gateway = "true"
      enable_vpn_gateway = "false"
    }
    test = {
      vpc_name           = "lab-test-vpc"
      vpc_cidr           = "10.1.0.0/16"
      azs                = ["ap-southeast-2a", "ap-southeast-2b", "ap-southeast-2c"]
      private_subnets    = ["10.1.0.0/19", "10.1.32.0/19", "10.1.64.0/19"]
      public_subnets     = ["10.1.96.0/19", "10.1.128.0/19", "10.1.160.0/19"]
      single_nat_gateway = "true"
      enable_nat_gateway = "true"
      enable_vpn_gateway = "false"
    }
  }
  tags = {
    ProjectName = "tf-eks-lab",
  }
  workspace = local.env[terraform.workspace]
}

tf-vpc/main.tf Using VPC terraform module to simplify the VPC creation. The current solution is creating Public and Private VPC.

module "vpc" {
source = "terraform-aws-modules/vpc/aws"

name = local.workspace["vpc_name"]
cidr = local.workspace["vpc_cidr"]

azs = local.workspace["azs"]
private_subnets = local.workspace["private_subnets"]
public_subnets = local.workspace["public_subnets"]

single_nat_gateway = local.workspace["single_nat_gateway"]
enable_nat_gateway = local.workspace["enable_nat_gateway"]
enable_vpn_gateway = local.workspace["enable_vpn_gateway"]
enable_dns_hostnames = true
enable_dns_support = true
enable_ipv6 = true
public_subnet_assign_ipv6_address_on_creation = true
create_egress_only_igw = true

public_subnet_ipv6_prefixes = [0, 1, 2]
private_subnet_ipv6_prefixes = [3, 4, 5]

enable_flow_log = true
create_flow_log_cloudwatch_iam_role = true
create_flow_log_cloudwatch_log_group = true

public_subnet_tags = {
"kubernetes.io/role/elb" = 1
}
private_subnet_tags = {
"kubernetes.io/role/internal-elb" = 1
}
tags = {
Environment = terraform.workspace
}
}

Deploying VPC

Run the below command from the root directory of the repository –

TERRAFORM_ROOT_MODULE=tf-vpc TERRAFORM_WORKSPACE=demo  make applyAuto

On completion, the output will look like as below –

Apply complete! Resources: 34 added, 0 changed, 0 destroyed.

Outputs:

private_tier_subnet_ids = [
  "subnet-xxxxxxxxe2",
  "subnet-xxxxxxxxa2",
  "subnet-xxxxxxxx8f",
]
public_tier_subnet_ids = [
  "subnet-xxxxxxxx0a",
  "subnet-xxxxxxxx9c",
  "subnet-xxxxxxxx74",
]
vpc_id = "vpc-xxxxxxxx03"

Installation of EKS Cluster

The module `tf-eks` consists of the EKS Cluster, NodeGroup and IRSA Roles creation. The module is highly coupled with VPC created for the same environment via tf-vpc. You can still use the custom VPC already created by some other

Some of the key files are –

tf-eks/local.tf It contains the local variables for each workspace(or environment) related variable

locals {
env = {
  demo = {
    aws_region      = "ap-southeast-2"
    cluster_name    = "lab-demo-cluster"
    cluster_version = "1.25"
    instance_types  = ["t3a.large", "t3.large", "m5a.large", "t2.large", "m5.large", "m4.large"]

    vpc_name             = "lab-demo-vpc"
    private_subnet_names = ["lab-demo-vpc-private-ap-southeast-2a", "lab-demo-vpc-private-ap-southeast-2b"]
    public_subnet_names  = ["lab-demo-vpc-public-ap-southeast-2a", "lab-demo-vpc-public-ap-southeast-2b"]
  }
  test = {
    aws_region      = "ap-southeast-2"
    cluster_name    = "lab-test-cluster"
  .
  .
  .

tf-eks/cluster.tf The main cluster file contains most of the configuration for the EKS cluster. Along with NodeGroups and AddOns. The module terraform-aws-modules/eks/aws is used to minimize the code complexity.

module "eks" {
source                         = "terraform-aws-modules/eks/aws"
cluster_name                   = local.workspace.cluster_name
cluster_version                = local.workspace.cluster_version
enable_irsa                    = true
cluster_endpoint_public_access = true
# IPV6
#cluster_ip_family          = "ipv6"
#create_cni_ipv6_iam_policy = true
tags = {
  Environment = "training"
}

cluster_addons = {
  coredns = {
    most_recent = true
  }
  .
  .
  .
  .

tf-eks/irsa.tf The file consists of all IRSA roles required for the solution using the latest IAM terraform module terraform-aws-modules/iam/aws//modules/iam-role-for-service-accounts-eks that come with various predefined roles and policies. e.g. alb, autoscaler, cni etc.

module "vpc_cni_irsa_role" {
  source = "terraform-aws-modules/iam/aws//modules/iam-role-for-service-accounts-eks"

  role_name             = "eks-${module.eks.cluster_name}-vpc-cni-irsa"
  attach_vpc_cni_policy = true
  vpc_cni_enable_ipv4   = true
  vpc_cni_enable_ipv6   = true

  oidc_providers = {
    ex = {
      provider_arn               = module.eks.oidc_provider_arn
      namespace_service_accounts = ["kube-system:aws-node"]
    }
  }
  tags = local.tags
}

module "alb_role_irsa" {
  source                                 = "terraform-aws-modules/iam/aws//modules/iam-role-for-service-accounts-eks"
  version                                = "v5.22.0"
  .
  .
  .
  .

ef-eks/karpenter.tf Using Karpenter terraform module to create required irsa roles along with SQS and policies for node role.

module "karpenter" {
  source                          = "terraform-aws-modules/eks/aws//modules/karpenter"
  cluster_name                    = local.workspace.cluster_name
  iam_role_name                   = "eks-${local.workspace.cluster_name}-karpenter-instance-profile"
  iam_role_use_name_prefix        = false
  irsa_name                       = "eks-${local.workspace.cluster_name}-karpenter-irsa"
  irsa_use_name_prefix            = false
  irsa_oidc_provider_arn          = module.eks.oidc_provider_arn
  irsa_namespace_service_accounts = ["platform:karpenter"]
  tags = {
    Environment = terraform.workspace
  }
}

Deploying EKS

Run the below command from the root directory of the repository –

TERRAFORM_ROOT_MODULE=tf-eks TERRAFORM_WORKSPACE=demo  make applyAuto

On completion, the output will look like as below

Apply complete! Resources: 64 added, 0 changed, 0 destroyed.

Outputs:

cluster_endpoint = "https://23550A7D71C998764F87D62B1A11D6A1.yl4.ap-southeast-2.eks.amazonaws.com"
cluster_security_group_id = "sg-0221d4acc0f89a2b4"

Validation

Let’s verify the installation. Keeping the same credentials, run the below commands (assuming Kubectl is installed)

> aws eks update-kubeconfig --name lab-demo-cluster
Added new context arn:aws:eks:ap-southeast-2:123456789012:cluster/lab-demo-cluster to /Users/USERNAME/.kube/config

# Get all the pods running in the cluster
> kubectl get po -A
NAMESPACE     NAME                       READY   STATUS    RESTARTS   AGE
kube-system   aws-node-4hsdb             1/1     Running   0          2m28s
kube-system   aws-node-bb52m             1/1     Running   0          2m31s
kube-system   aws-node-mv7l4             1/1     Running   0          99s
kube-system   coredns-754bc5455d-cbzlr   1/1     Running   0          2m3s
kube-system   coredns-754bc5455d-zsc67   1/1     Running   0          2m3s
kube-system   kube-proxy-2v7bb           1/1     Running   0          99s
kube-system   kube-proxy-9fmd8           1/1     Running   0          118s
kube-system   kube-proxy-f8w9k           1/1     Running   0          2m2s

# Get all the nodes
> kubectl get nodes
NAME                                             STATUS   ROLES    AGE   VERSION
ip-10-0-10-128.ap-southeast-2.compute.internal   Ready       34m   v1.25.9-eks-0a21954
ip-10-0-14-205.ap-southeast-2.compute.internal   Ready       33m   v1.25.9-eks-0a21954

Note: The two nodes running are part of the node group created by the eks cluster. (defined in tf-eks/cluster.tf). We consider them as core nodes running critical workloads and recommended to use of on-demand nodes.

Conclusion

This section provides a brief overview of how to deploy the VPC and EKS Cluster using the repository code. By utilising the 3Muskteer pattern, we can easily deploy multiple modules across various environments using similar commands. Furthermore, we can significantly reduce coding by utilising the AWS Terraform modules. In the next section, we will explore how to integrate GitHub with EKS by utilising GitHub Controller. To do this, we will first need to configure Keys in GitHub, followed by deploying the tf-apps-core and tf-apps-gha modules.


Continue to Part 2 of the solution here